Sony DVP-CX995V Operating Instructions - Page 79
BACKGROUND, COMPONENT OUT, To force the system to switch to interlace, when PROGRESSIVE is selected
 |
UPC - 027242668591
View all Sony DVP-CX995V manuals
Add to My Manuals
Save this manual to your list of manuals |
Page 79 highlights
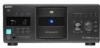
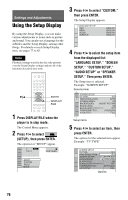
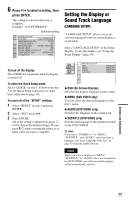
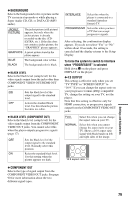
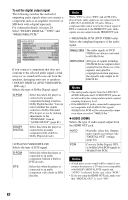
◆ BACKGROUND Selects the background color or picture on the TV screen in stop mode or while playing a Super Audio CD, CD, or DATA CD (MP3 audio). JACKET PICTURE The jacket picture (still picture) appears, but only when the jacket picture is already recorded on the disc (CDEXTRA, etc.). If the disc does not contain a jacket picture, the "GRAPHICS" picture appears. GRAPHICS A preset picture stored in the player appears. BLUE BLACK The background color is blue. The background color is black. ◆ BLACK LEVEL Selects the black level (setup level) for the video signals output from the jacks other than COMPONENT VIDEO OUT/HDMI OUT jacks. ON OFF Sets the black level of the output signal to the standard level. Lowers the standard black level. Use this when the picture becomes too white. ◆ BLACK LEVEL (COMPONENT OUT) Selects the black level (setup level) for the video signals output from the COMPONENT VIDEO OUT jacks. You cannot select this when the player outputs progressive signals (page 17). OFF ON Sets the black level of the output signal to the standard level. Normally select this position. Raises the standard black level. Use this setting when the picture appears too dark. INTERLACE Select this when the player is connected to a standard (interlace format) TV. PROGRESSIVE Select this when you have a TV that can accept progressive signals. After selecting, the confirmation display appears. If you do not select "Yes" or "No" within about 10 seconds, the setting is canceled and the display returns to the Setup Display. To force the system to switch to interlace when "PROGRESSIVE" is selected Hold down x on the player and press DISPLAY on the player. ◆ 4:3 OUTPUT This setting is effective only when you set "TV TYPE" in "SCREEN SETUP" to "16:9." If you can change the aspect ratio on your progressive format (480p) compatible TV, change the setting on your TV, not the player. Note that this setting is effective only for HDMI connection, or progressive signals output from the COMPONENT VIDEO OUT jacks. FULL Select this when you can change the aspect ratio on your TV. NORMAL Select this when you cannot change the aspect ratio on your TV. Shows a 16:9 aspect ratio signal with black bands on left and right sides of the image. 16:9 aspect ratio TV ◆ COMPONENT OUT Selects the type of signal output from the COMPONENT VIDEO OUT jacks. See page 90 for more information about the two different signal types. Settings and Adjustments 79
-
 1
1 -
2
-
3
-
4
-
5
-
6
-
7
-
8
-
9
-
10
-
11
-
12
-
13
-
14
-
15
-
16
-
17
-
18
-
19
-
20
-
21
-
22
-
23
-
24
-
25
-
26
-
27
-
28
-
29
-
30
-
31
-
32
-
33
-
34
-
35
-
36
-
37
-
38
-
39
-
40
-
41
-
42
-
43
-
44
-
45
-
46
-
47
-
48
-
49
-
50
-
51
-
52
-
53
-
54
-
55
-
56
-
57
-
58
-
59
-
60
-
61
-
62
-
63
-
64
-
65
-
66
-
67
-
68
-
69
-
70
-
71
-
72
-
73
-
 74
74 -
 75
75 -
 76
76 -
 77
77 -
 78
78 -
 79
79 -
 80
80 -
 81
81 -
 82
82 -
 83
83 -
 84
84 -
85
-
86
-
87
-
88
-
89
-
90
-
91
-
92
-
93
-
94
-
95
-
96
 |
 |