TP-Link TD-W8970 TD-W8970 V1 User Guide - Page 50
IP Address for VPN, Perfect Forward Secrecy - vpn server
 |
View all TP-Link TD-W8970 manuals
Add to My Manuals
Save this manual to your list of manuals |
Page 50 highlights
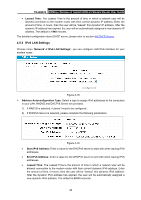
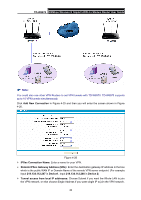
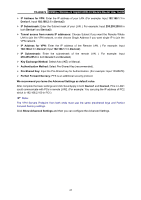
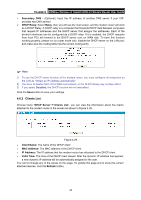
TD-W8970 300Mbps Wireless N Gigabit ADSL2+ Modem Router User Guide ¾ IP Address for VPN: Enter the IP address of your LAN. (For example: Input 192.168.1.1 in Device1, Input 192.168.2.1 in Device2) ¾ IP Subnetmask: Enter the Subnet mask of your LAN. ( For example: Input 255.255.255.0 in both Device1 and Device2) ¾ Tunnel access from remote IP addresses: Choose Subnet if you want the Remote Whole LAN to join the VPN network, or else choose Single Address if you want single IP to join the VPN network. ¾ IP Address for VPN: Enter the IP address of the Remote LAN. ( For example: Input 192.168.2.1 in Device1,Input 192.168.1.1 in Device2) ¾ IP Subnetmask: Enter the subnetmask of the remote LAN. ( For example: Input 255.255.255.0 in both Device1 and Device2) ¾ Key Exchange Method: Select Auto (IKE) or Manual. ¾ Authentication Method: Select Pre-Shared Key (recommended). ¾ Pre-Shared Key: Input the Pre-Shared key for Authentication. (For example: Input 12345678) ¾ Perfect Forward Secrecy: PFS is an additional security protocol. We recommend you leave the Advanced Settings as default value. After complete the basic settings and click Save/Apply in both Device1 and Device2, PCs in LAN1 could communicate with PCs in remote LAN2. (For example: You can ping the IP address of PC2 which is 192.168.2.100 in PC1) ) Note: The VPN Servers Endpoint from both ends must use the same pre-shared keys and Perfect Forward Secrecy settings. Click Show Advanced Settings and then you can configure the Advanced Settings. 41
-
 1
1 -
2
-
3
-
4
-
5
-
6
-
7
-
8
-
9
-
10
-
11
-
12
-
13
-
14
-
15
-
16
-
17
-
18
-
19
-
20
-
21
-
22
-
23
-
24
-
25
-
26
-
27
-
28
-
29
-
30
-
31
-
32
-
33
-
34
-
35
-
36
-
37
-
38
-
39
-
40
-
41
-
42
-
43
-
44
-
 45
45 -
 46
46 -
 47
47 -
 48
48 -
 49
49 -
 50
50 -
 51
51 -
 52
52 -
 53
53 -
 54
54 -
 55
55 -
56
-
57
-
58
-
59
-
60
-
61
-
62
-
63
-
64
-
65
-
66
-
67
-
68
-
69
-
70
-
71
-
72
-
73
-
74
-
75
-
76
-
77
-
78
-
79
-
80
-
81
-
82
-
83
-
84
-
85
-
86
-
87
-
88
-
89
-
90
-
91
-
92
-
93
-
94
-
95
-
96
-
97
-
98
-
99
-
100
-
101
-
102
-
103
-
104
-
105
-
106
-
107
-
108
-
109
-
110
-
111
-
112
-
113
-
114
-
115
-
116
 |
 |