Uniden BCT15 English Owners Manual - Page 64
Programming General Settings, Setting and Using the Display Backlight, Setting the Dimmer
 |
View all Uniden BCT15 manuals
Add to My Manuals
Save this manual to your list of manuals |
Page 64 highlights
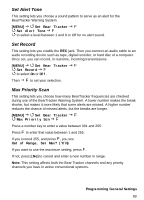
Programming General Settings The following section deals with the general settings of the scanner. Setting and Using the Display Backlight Press F. f appears on the display. Repeatedly press [VOL] to reach your desired level from Off, Low, Medium, and High. Setting the Dimmer If you connect the vehicle power cable's orange wire to a wire or connection point in your car that changes state when you turn on the headlights, the scanner can automatically dim the display when you turn on the headlights. If you have not connected the orange wire, set Dimmer to Manual and manually select the dimmer level. If you have connected the orange wire, set Dimmer to Auto, then select "+ Polarity" if the orange wire gets 12V when you turn on the headlights or to "- Polarity" if the orange wire is switched to chassis ground when you turn on the headlights. Tapping [VOL] overrides the menu setting and cycles through all backlight settings. [MENU] Settings F Set Backlight F Set Dimmer F Auto - Use this setting if you have connected the scanner to your vehicle's headlights using the orange wire. If you select this option, the scanner automatically dims the backlight when you turn on the headlights. After selecting this option, select: + Polarity - If the headlight wire is connected to +12V when the headlights are on pick this setting. - Polarity - If the headlight wire is connected to vehicle ground when the headlights are on, pick this setting. Manual - Use this setting to manually set the dimmer level to High, Middle, Low, or Off. To guide you in your selection, at each setting the display shows what you can expect to see. 64
-
 1
1 -
2
-
3
-
4
-
5
-
6
-
7
-
8
-
9
-
10
-
11
-
12
-
13
-
14
-
15
-
16
-
17
-
18
-
19
-
20
-
21
-
22
-
23
-
24
-
25
-
26
-
27
-
28
-
29
-
30
-
31
-
32
-
33
-
34
-
35
-
36
-
37
-
38
-
39
-
40
-
41
-
42
-
43
-
44
-
45
-
46
-
47
-
48
-
49
-
50
-
51
-
52
-
53
-
54
-
55
-
56
-
57
-
58
-
 59
59 -
 60
60 -
 61
61 -
 62
62 -
 63
63 -
 64
64 -
 65
65 -
 66
66 -
 67
67 -
 68
68 -
 69
69 -
70
-
71
-
72
-
73
-
74
-
75
-
76
-
77
-
78
-
79
-
80
-
81
-
82
-
83
-
84
-
85
-
86
-
87
-
88
-
89
-
90
-
91
-
92
-
93
-
94
-
95
-
96
-
97
-
98
-
99
-
100
-
101
-
102
-
103
-
104
-
105
-
106
-
107
-
108
-
109
-
110
-
111
-
112
-
113
-
114
-
115
-
116
-
117
-
118
-
119
-
120
-
121
-
122
-
123
-
124
-
125
-
126
-
127
-
128
-
129
-
130
-
131
-
132
-
133
-
134
-
135
-
136
-
137
-
138
-
139
-
140
-
141
-
142
-
143
-
144
-
145
-
146
-
147
-
148
-
149
-
150
-
151
-
152
 |
 |