Xerox 6128MFP User Guide - Page 131
Copy-Quality Problems, Phaser® 6128MFP Multifunction Printer
 |
UPC - 095205751772
View all Xerox 6128MFP manuals
Add to My Manuals
Save this manual to your list of manuals |
Page 131 highlights
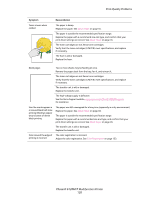
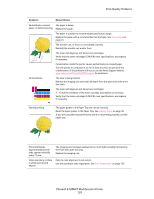
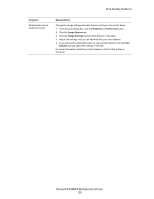
Copy-Quality Problems Copy-Quality Problems When the copy quality is poor, select the closest symptom from the following table to correct the problem. If the copy quality does not improve after carrying out the appropriate action, contact Xerox Customer Support or your reseller. Symptom Lines or streaks only present in copies made from the ADF Reason/Action There is debris on the small ADF glass. When scanning, the paper from the ADF passes over the debris creating lines or streaks. Clean the small ADF glass to the left of the large document glass with a lint free cloth. For more information, see Cleaning the Document Glass on page 154. Spots present in copies taken from the document glass There is debris on the flatbed scanner document glass. When scanning, the debris creates a spot on the image. Clean the glass with a lint free cloth. For more information, see Cleaning the Document Glass on page 154. The reverse side of the original is showing on the copy On the Copy menu, enable Auto Exposure. For information on turning Auto Exposure on and off, see Setting Auto Exposure on page 74. Light colors are washed out or white on the copy Auto Exposure is enabled. On the Copy menu, disable Auto Exposure. For information on turning Auto Exposure on and off, see Setting Auto Exposure on page 74. Image is too light or dark If the copied image is too light or dark, use the Lighten/Darken option on the Copy menu. For information on making the image lighter or darker, see Making the Image Lighter or Darker on page 73. Copied photos look grainy Change to photo mode on the control panel: 1. Press the Copy button on the control panel. 2. Select Document Type. 3. Select Photo. 4. Click OK. Phaser® 6128MFP Multifunction Printer 131
-
 1
1 -
2
-
3
-
4
-
5
-
6
-
7
-
8
-
9
-
10
-
11
-
12
-
13
-
14
-
15
-
16
-
17
-
18
-
19
-
20
-
21
-
22
-
23
-
24
-
25
-
26
-
27
-
28
-
29
-
30
-
31
-
32
-
33
-
34
-
35
-
36
-
37
-
38
-
39
-
40
-
41
-
42
-
43
-
44
-
45
-
46
-
47
-
48
-
49
-
50
-
51
-
52
-
53
-
54
-
55
-
56
-
57
-
58
-
59
-
60
-
61
-
62
-
63
-
64
-
65
-
66
-
67
-
68
-
69
-
70
-
71
-
72
-
73
-
74
-
75
-
76
-
77
-
78
-
79
-
80
-
81
-
82
-
83
-
84
-
85
-
86
-
87
-
88
-
89
-
90
-
91
-
92
-
93
-
94
-
95
-
96
-
97
-
98
-
99
-
100
-
101
-
102
-
103
-
104
-
105
-
106
-
107
-
108
-
109
-
110
-
111
-
112
-
113
-
114
-
115
-
116
-
117
-
118
-
119
-
120
-
121
-
122
-
123
-
124
-
125
-
 126
126 -
 127
127 -
 128
128 -
 129
129 -
 130
130 -
 131
131 -
 132
132 -
 133
133 -
 134
134 -
 135
135 -
 136
136 -
137
-
138
-
139
-
140
-
141
-
142
-
143
-
144
-
145
-
146
-
147
-
148
-
149
-
150
-
151
-
152
-
153
-
154
-
155
-
156
-
157
-
158
-
159
-
160
-
161
-
162
-
163
-
164
-
165
-
166
-
167
-
168
-
169
-
170
-
171
-
172
-
173
-
174
-
175
-
176
-
177
-
178
-
179
-
180
-
181
-
182
 |
 |
