Yamaha AW4416 Version2.0 Manual Supplement - Page 13
Newly added MIDI Remote function - update
 |
View all Yamaha AW4416 manuals
Add to My Manuals
Save this manual to your list of manuals |
Page 13 highlights
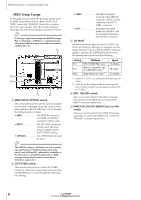
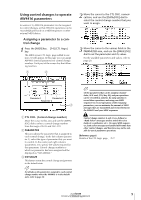
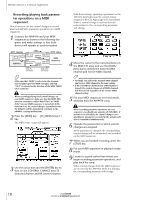
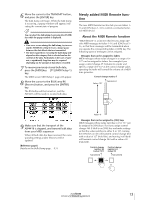
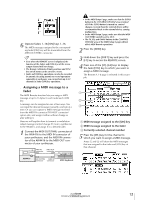
6 Move the cursor to the TRANSMIT button, and press the [ENTER] key. The bulk dump will begin. While the bulk dump is occurring, a popup window will appear, indicating the current state of progress. Tip! You can abort the bulk dump by pressing the [ENTER] key while the popup window is displayed. • If an error occurs during the bulk dump, try increasing the INTERVAL setting to leave a longer pause between the data blocks that are transmitted. • The time required for executing the bulk dump will depend on the category that is selected and on the content of the data. Particularly in the case of automix, a significantly long time may be required depending on the amount of data that is recorded. 7 To receive previously-stored bulk data, press the [MIDI] key ¡ [F1] (MIDI Setup 1) key. The MIDI screen MIDI Setup 1 page will appear. 8 Move the cursor to the BULK area RX (Receive) button, and press the [ENTER] key. The RX button will be turned on, and the AW4416 will be ready to receive bulk data. Newly added MIDI Remote function The new MIDI Remote function lets you use faders 1- 16 and [ON] keys 1-16 to control a connected external MIDI device. s About the MIDI Remote function "MIDI Remote" is a function that lets you assign specific MIDI messages to faders 1-16 and [ON] keys 1- 16, so that these messages will be transmitted when you operate the corresponding fader or [ON] key. The following types of messages can be assigned. q Messages that can be assigned to faders MIDI messages whose value changes in a range of 0- 127 can be assigned to faders. For example if you assign control change #7 (Volume) to a fader and specify a range of 0-127 as the control change value, operating the fader will control the volume of a MIDI tone generator. Control change number 7 Value= 127 Transmitted 9 Make sure that the transport of the AW4416 is stopped, and transmit bulk data from your MIDI sequencer. When all bulk data has been received, the corresponding settings and/or libraries will be updated. [Reference pages] Details on the Bulk Dump page ¡ P.31 Value= 0 q Messages that can be assigned to [ON] keys MIDI messages whose value switches to 0 or 127 can be assigned to [ON] keys. For if you assign control change #64 (Hold) to an [ON] key and make settings so that the value switches to either 0 or 127, turning the [ON] key on (lit) will transmit control change #64 with a value of 127 (Hold On), and turning it off (dark) will transmit control change #64 with a value of 0 (Hold Off). Control change number 64 (value=127) Transmitted Control change number 64 (value=0) Transmitted ON ON ON Version 2.0 Manual Supplement 13
-
 1
1 -
2
-
3
-
4
-
5
-
6
-
7
-
 8
8 -
 9
9 -
 10
10 -
 11
11 -
 12
12 -
 13
13 -
 14
14 -
 15
15 -
 16
16 -
 17
17 -
 18
18 -
19
-
20
-
21
-
22
-
23
-
24
-
25
-
26
-
27
-
28
-
29
-
30
-
31
-
32
-
33
-
34
-
35
-
36
-
37
-
38
-
39
-
40
-
41
-
42
-
43
-
44
-
45
-
46
-
47
-
48
 |
 |