Yamaha AW4416 Version2.0 Manual Supplement - Page 14
Using the MIDI Remote function, with the default settings, Remote A 1-8
 |
View all Yamaha AW4416 manuals
Add to My Manuals
Save this manual to your list of manuals |
Page 14 highlights
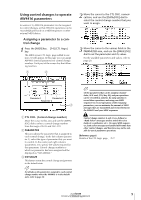
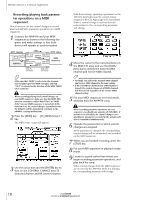
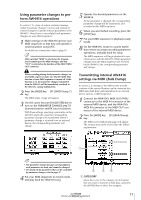
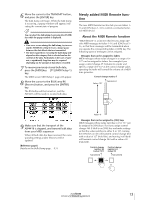
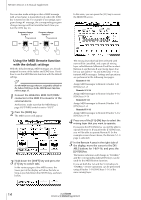
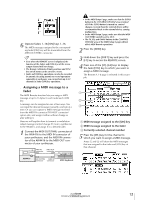
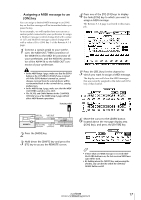
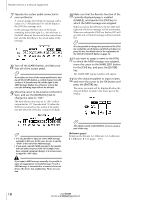
AW4416 Version 2.0 Manual Supplement You can also make settings so that a MIDI message with a fixed value is transmitted only when the [ON] key is turned on (lit). For example if you assign a program change #1 message, the corresponding program change message will be transmitted each time you turn the [ON] key on. Program change number 1 Transmitted Program change number 1 Transmitted ON ON ON ON ON In this state, you can press the [F1] key to access the REMOTE screen. s Using the MIDI Remote function with the default settings With the default settings, MIDI messages are already assigned to some of the faders and [ON] keys. Here's how to use the MIDI Remote function with the default settings. Tip! For the MIDI messages that are assigned by default to the faders/[ON] keys by the MIDI Remote function, refer to page 35. 1 Connect the AW4416's MIDI OUT/THRU connector to the MIDI IN connector of the external device. At this time, make sure that the MIDI Setup 2 page OUT/THRU switch is set to "OUT." 2 Press the [MIDI] key. The MIDI screen will appear. 3 Hold down the [SHIFT] key and press the [F1] key to switch tabs. In the various pages of the MIDI screen, the lower part of the display will show the tabs as long as you hold down the [SHIFT] key, as shown below. The mixing layer that had been selected until now will be cancelled, and a special mixing layer called Remote A/Remote B will be in effect. Remote A and Remote B are mixing layers that let you use faders 1-16 and [ON] keys 1-16 to transmit MIDI messages. Settings and operations are performed in the following four pages. q Remote A 1-8 Assign MIDI messages to Remote A faders 1-8/ [ON] keys 1-8 q Remote A 9-16 Assign MIDI messages to Remote A faders 9-16/ [ON] keys 9-16 q Remote B 1-8 Assign MIDI messages to Remote B faders 1-8/ [ON] keys 1-8 q Remote B 9-16 Assign MIDI messages to Remote B faders 9-16/ [ON] keys 9-16 4 Press one of the [F1]-[F4] keys to select the mixing layer that you want to operate. If you press the [F1]/[F2] keys, you will be able to operate Remote A. If you press the [F3]/[F4] keys, you will be able to operate Remote B. (In the example screen shown above, the Remote A 1-8 page is selected.) 5 In the Remote A area in the right side of the display, move the cursor to the DISABLE buttons for 1-8/9-16, and press the [ENTER] key. The button indication will change to "ENABLE," and the corresponding faders/[ON] keys can be used for the MIDI Remote function. If you set both the 1-8 and the 9-16 buttons to "ENABLE," remote operations can be performed using all faders 1-16/[ON] keys 1-16 of the same mixing layer. 14 Version 2.0 Manual Supplement
-
 1
1 -
2
-
3
-
4
-
5
-
6
-
7
-
8
-
 9
9 -
 10
10 -
 11
11 -
 12
12 -
 13
13 -
 14
14 -
 15
15 -
 16
16 -
 17
17 -
 18
18 -
 19
19 -
20
-
21
-
22
-
23
-
24
-
25
-
26
-
27
-
28
-
29
-
30
-
31
-
32
-
33
-
34
-
35
-
36
-
37
-
38
-
39
-
40
-
41
-
42
-
43
-
44
-
45
-
46
-
47
-
48
 |
 |
