Yamaha AW4416 Version2.0 Manual Supplement - Page 34
NAME EDIT button, LATCH/UNLATCH button, LEARN buttons, ENABLE/DISABLE buttons, buttons, LATCH
 |
View all Yamaha AW4416 manuals
Add to My Manuals
Save this manual to your list of manuals |
Page 34 highlights
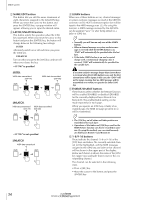
MIDI screen B NAME EDIT button This button lets you edit the name (maximum of eight characters) assigned to the fader/[ON] key. When you move the cursor to this button and press the [ENTER] key, a popup window will appear, allowing you to input the desired name. C LATCH/UNLATCH button This button selects the operation when the [ON] key is pressed. When you move the cursor to this button and press the [ENTER] key, the button will change between the following two settings. q LATCH Alternately switch on or off each time you press the [ON] key. q UNLATCH Turn on when you press the [ON] key, and turn off when you release the key. • If "SW" is specified LATCH MIDI data transmitted (SW=7F) dark lit ON ON ON MIDI data transmitted (SW=00) dark ON ON UNLATCH MIDI data transmitted (SW=7F) MIDI data transmitted (SW=00) dark lit dark ON ON ON • If "SW" is not specified UNLATCH MIDI data transmitted dark lit dark ON ON ON D LEARN buttons When one of these buttons are on, channel messages or system exclusive messages received at the MIDI IN connector (or TO HOST connector/option slot) will be input to the MIDI message area (1). By using this function, a MIDI message received by the AW4416 can be assigned "as is" (or after being edited) to a fader or [ON] key. Tip! • Normally you will turn on only one of the LEARN buttons. • When a channel message or system exclusive message is received while the LEARN button is on, "END" will automatically be specified after the last byte. • If the fader LEARN button is on, and a control change with a continuously changing value is received, "FAD" will automatically be specified for the variable byte. If a system exclusive message longer than sixteen bytes is received when the LEARN button is on, only the first sixteen bytes will be input. In this case, the "END" will not be input, meaning that no MIDI message will be transmitted even when you operate the fader/[ON] key. E ENABLE/DISABLE buttons These buttons select whether the Remote function will be enabled (ENABLE) or disabled (DISABLE) for the currently-displayed layer (Remote A or Remote B). The enable/disable setting can be made separately for each page. When you operate an [ON] key or fader of an enabled page, the MIDI message specified in 1 will be transmitted. Tip! • The [ON] key on/off status and fader position are remembered for each layer. • Operations of the faders and [ON] keys used for the MIDI Remote function can also be recorded in automix. By using this method, you can simultaneously use both layers Remote A and Remote B. F 1-8/9-16 buttons These indicate the channel (1-8 or 9-16) of the [ON] keys and faders. The currently selected channel will be highlighted, and the MIDI messages assigned to the [ON] key and fader of that channel will be shown in the upper part of the display. Below each button is shown the name of the [ON] key (upper row) and fader (lower row) for the corresponding channel. The channel can be selected in the following ways. • Press a [SEL] key • Move the cursor to the button and press the [ENTER] key 34 Version 2.0 Manual Supplement
-
 1
1 -
2
-
3
-
4
-
5
-
6
-
7
-
8
-
9
-
10
-
11
-
12
-
13
-
14
-
15
-
16
-
17
-
18
-
19
-
20
-
21
-
22
-
23
-
24
-
25
-
26
-
27
-
28
-
 29
29 -
 30
30 -
 31
31 -
 32
32 -
 33
33 -
 34
34 -
 35
35 -
 36
36 -
 37
37 -
 38
38 -
 39
39 -
40
-
41
-
42
-
43
-
44
-
45
-
46
-
47
-
48
 |
 |
