Yamaha AW4416 Version2.0 Manual Supplement - Page 23
Reference, QUICK REC screen, Quick Rec 2 - 16 track digital
 |
View all Yamaha AW4416 manuals
Add to My Manuals
Save this manual to your list of manuals |
Page 23 highlights
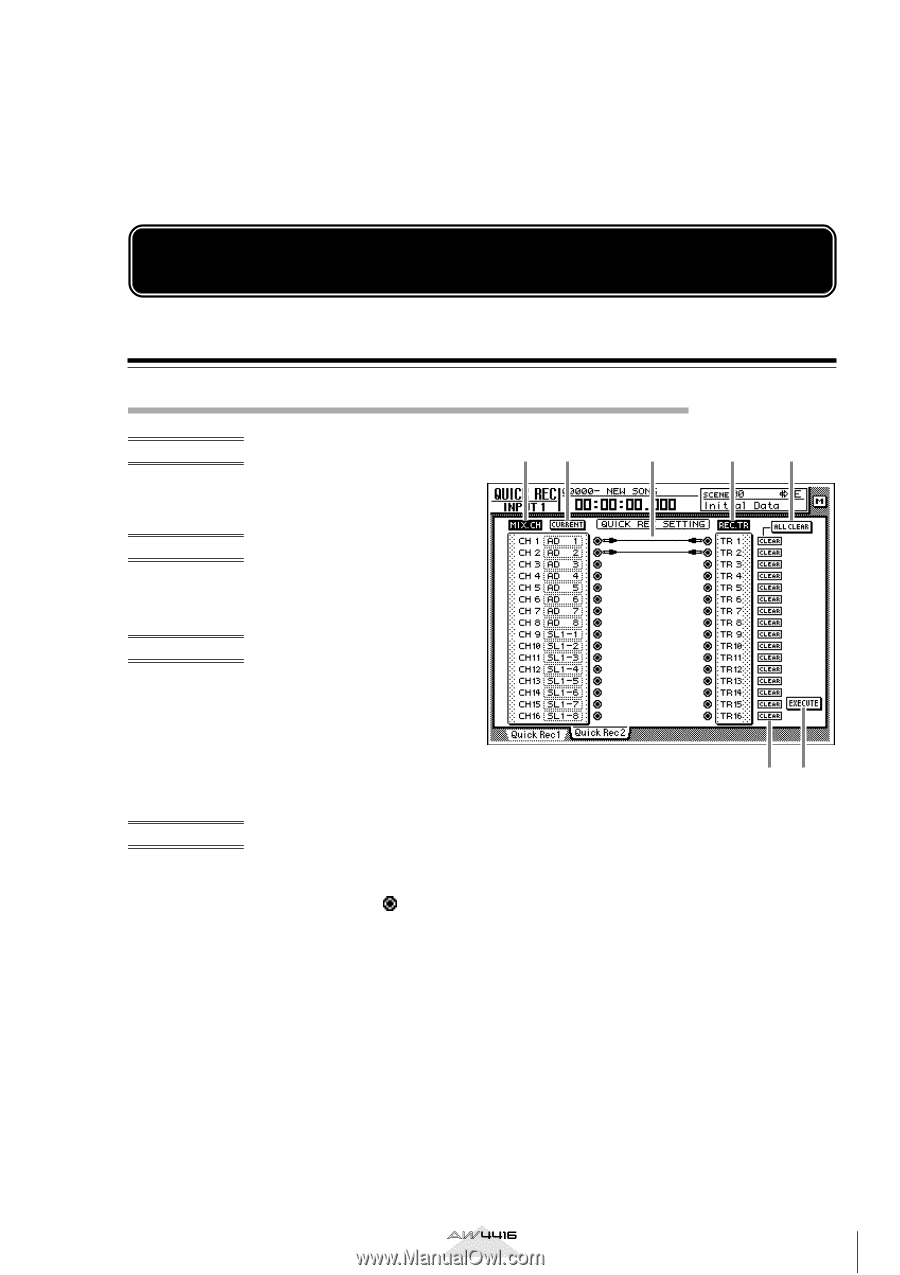
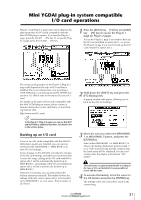
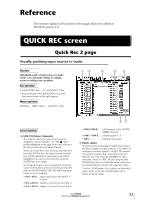
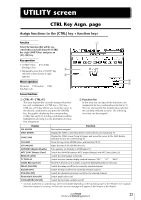
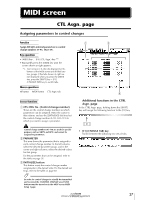
Reference This section explains all functions of the pages that were added in AW4416 version 2.0. QUICK REC screen Quick Rec 2 page Visually patching input sources to tracks Function Individually patch 16 input sources to audio tracks 1-16, and make settings for simultaneous recording in one operation. Key operation • [QUICK REC] key ¡ [F2] (Quick Rec 2) key • Repeatedly press the [QUICK REC] key until the screen shown at the right appears. Mouse operation M button ¡ QREC button ¡ Quick Rec 2 tab 13 2 45 67 Screen functions D MIX.CH (Mixer channels) This column shows the type of input sources assigned to input channels 1-16. The (jack) symbol displayed at the right of this area indicates the direct output of each input channel. When you move the cursor to the jack symbol and press the [ENTER] key, the input channel for that row will be selected for operations, and will be highlighted. To cancel your selection, press the [ENTER] key once again. To change the input source assignment, move the cursor to the numerical box for each input channel and turn the [DATA/JOG] dial. The following input sources can be assigned. • AD 1-AD 8..... Input signals from the INPUT 1- 8 jacks • SL1-1-SL1-8 ... Inputs 1-8 of an I/O card (slot 1) • SL2-1-SL2-8 ... Inputs 1-8 of an I/O card (slot 2) • DIN L/DIN R....... L/R channels of the DIGITAL STEREO IN jack • SMP 1-SMP 8...... Sampling pads 1-8 • MET Internal metronome E Patch cables This area shows virtual patch cables that connect the direct outputs of input channels 1-16 (MIX.CH column) to recorder inputs 1-16 (REC.TR column). To connect a patch cable, move the cursor to a MIX.CH jack and press the [ENTER] key. Then move the cursor to a REC.TR jack and press the [ENTER] key. (You can make the same connection by performing these steps in the opposite order.) Use the CLEAR button (6) to defeat an individual patch cable, or the ALL CLEAR button (5) to defeat all patch cables. Version 2.0 Manual Supplement 23
-
 1
1 -
2
-
3
-
4
-
5
-
6
-
7
-
8
-
9
-
10
-
11
-
12
-
13
-
14
-
15
-
16
-
17
-
 18
18 -
 19
19 -
 20
20 -
 21
21 -
 22
22 -
 23
23 -
 24
24 -
 25
25 -
 26
26 -
 27
27 -
 28
28 -
29
-
30
-
31
-
32
-
33
-
34
-
35
-
36
-
37
-
38
-
39
-
40
-
41
-
42
-
43
-
44
-
45
-
46
-
47
-
48
 |
 |