Yamaha AW4416 Version2.0 Manual Supplement - Page 33
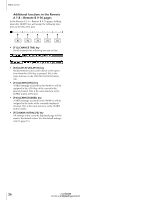
Remote A 1-8/Remote A 9-16/ Remote B 1-8/Remote B 9-16 s
 |
View all Yamaha AW4416 manuals
Add to My Manuals
Save this manual to your list of manuals |
Page 33 highlights
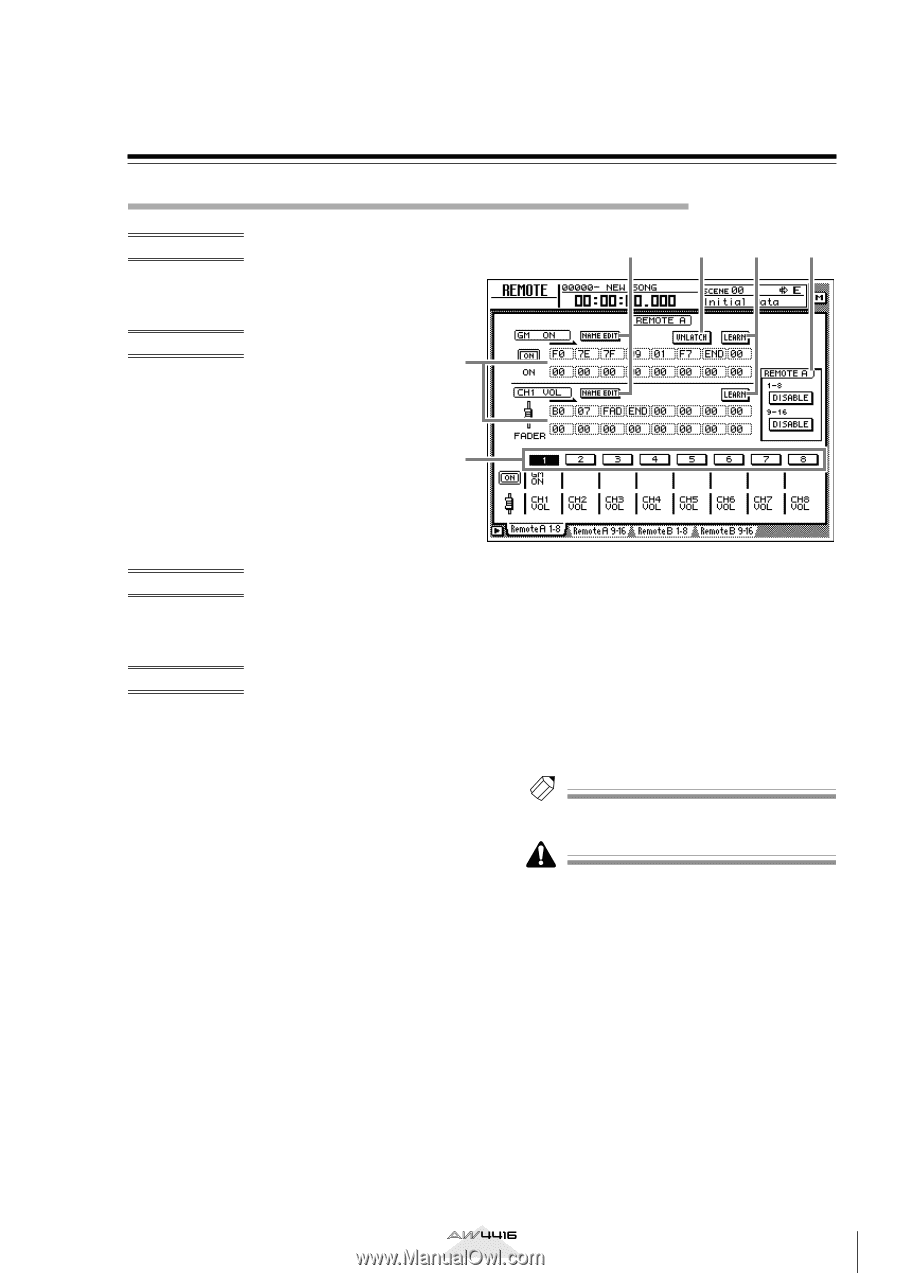
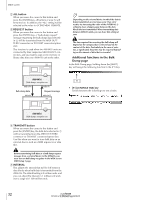
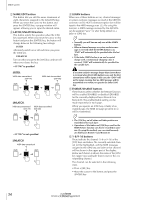
Remote A 1-8/Remote A 9-16/ Remote B 1-8/Remote B 9-16 pages Remotely controlling external MIDI devices Function Use faders 1-16/[ON] keys 1-16 to transmit the desired MIDI messages and remotely control external MIDI devices. Key operation • [MIDI] key ¡ [F1] (Remote A 1-8) key 1 - [F4] (Remote B 9-16) key (*1) • Repeatedly press the [MIDI] key until the screen shown at the right appears. *1. From version 2.0, the tabs displayed at the bottom of the MIDI screen 6 are divided into two groups. If the tabs shown at right are not dis- played when you press the [MIDI] key, press the [SHIFT] key + [F1] (CHANGE TAB) key to switch tabs. Mouse operations M button ¡ MIDI button ¡ Remote A 18/Remote A 9-16/Remote B 1-8/Remote B 9-16 tabs Screen functions A MIDI messages The MIDI messages assigned to the fader and [ON] key of the channel selected by the [SEL] key are displayed here in hexadecimal form. Move the cursor to each numerical box, and turn the [DATA/JOG] dial to edit the value of each byte (two-digital hexadecimal value). The following values can be selected. • 00-FF (hexadecimal This is the MIDI message that will actually be transmitted. • END This indicates the end of the MIDI message. When you operate the fader or [ON] key, the MIDI message from the beginning to immediately before END will be transmitted. • SW (only for [ON] key This indicates the on/off state of the [ON] key. The byte whose value is set to "SW" will be transmitted as a value of 7F (hexadecimal) when the [ON] key status changes to On, and as a value of 00 (hexadecimal) when the key changes to Off. 2 3 45 • FAD (only for fader This indicates the current position of the fader. The byte whose value is set to "FAD" will be transmitted as a value of 00-7F (hexadecimal) when you operate the fader. Tip! A MIDI message of up to 16 bytes (including "END") can be registered for a fader/[ON] key. • When assigning a MIDI message, you must be sure to add "END" at the end. If "END" is not specified, the MIDI message will not be transmitted. • If a MIDI message is assigned to a fader but "FAD" is not specified within the MIDI message, operating the fader will not transmit the MIDI message. • When assigning a MIDI message to an [ON] key, you can specify "SW" as one of the bytes as necessary. in this case, the corresponding MIDI messages will be transmitted when the [ON] key is turned on and when it is turned off. • If you do not specify "SW," the assigned MIDI message will be transmitted only when the [ON] key is turned on. • If you input a MIDI message manually, it is possible to input an inappropriate or invalid message. When assigning MIDI messages, we recommend that you use the LEARN button (4) whenever possible. (For details on using the LEARN button to assign a MIDI message, refer to page 15.) Version 2.0 Manual Supplement 33
-
 1
1 -
2
-
3
-
4
-
5
-
6
-
7
-
8
-
9
-
10
-
11
-
12
-
13
-
14
-
15
-
16
-
17
-
18
-
19
-
20
-
21
-
22
-
23
-
24
-
25
-
26
-
27
-
 28
28 -
 29
29 -
 30
30 -
 31
31 -
 32
32 -
 33
33 -
 34
34 -
 35
35 -
 36
36 -
 37
37 -
 38
38 -
39
-
40
-
41
-
42
-
43
-
44
-
45
-
46
-
47
-
48
 |
 |