Yamaha AW4416 Version2.0 Manual Supplement - Page 4
Reference s], in the same way.
 |
View all Yamaha AW4416 manuals
Add to My Manuals
Save this manual to your list of manuals |
Page 4 highlights
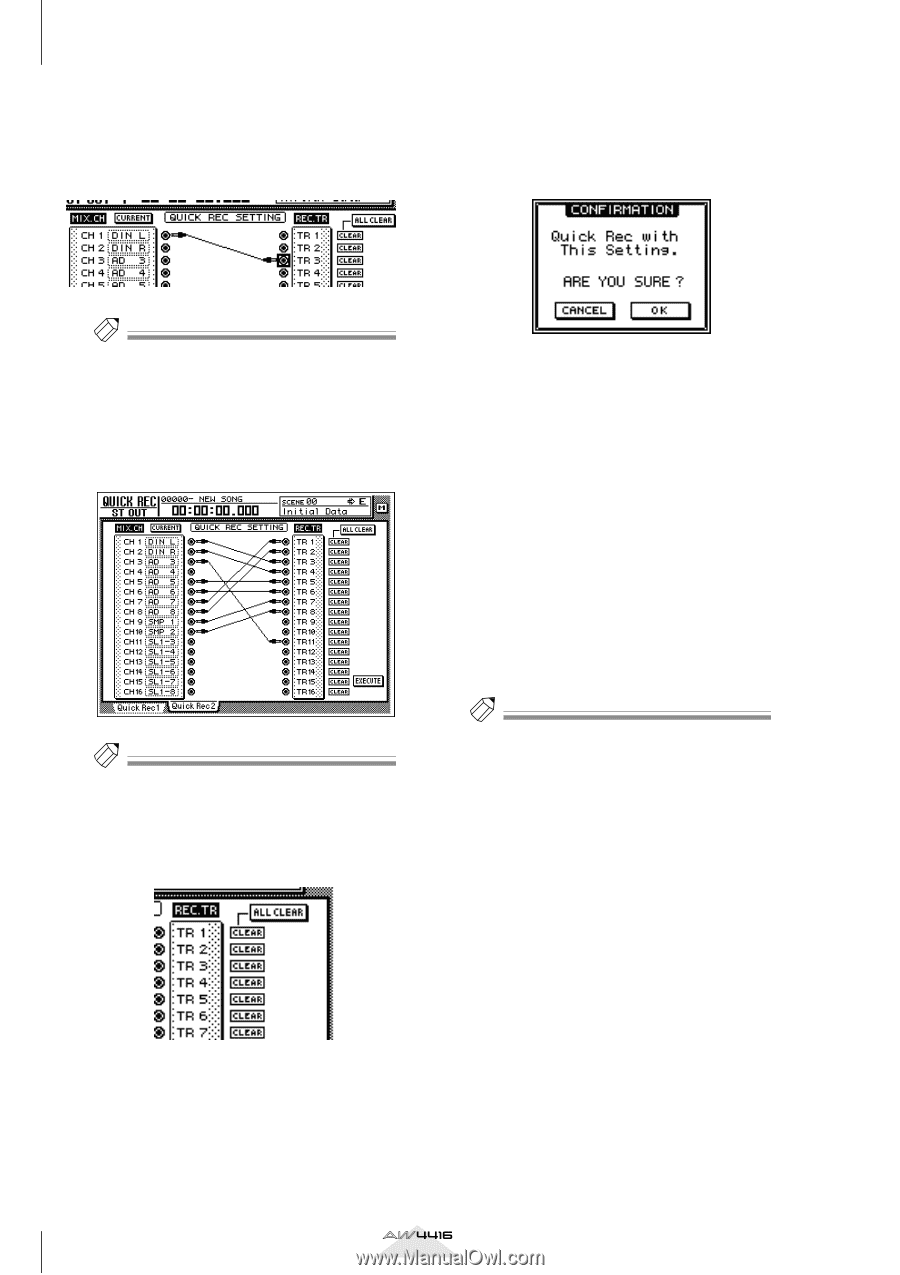
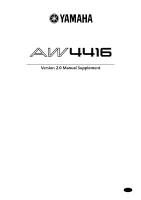
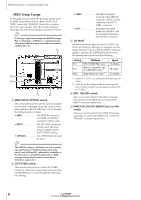
AW4416 Version 2.0 Manual Supplement 4 In the REC.TR area, move the cursor to the jack for the desired patch-destination track, and press the [ENTER] key. The patch-source and patch-destination in the screen will be connected by a patch cable. 6 When you are finished making patch cable connections, move the cursor to the EXECUTE button located in the lower right of the display, and press the [ENTER] key. The following popup window will appear. Tip! • You may perform steps 3 and 4 in reverse order. • It is also possible to connect the direct output of the same channel to multiple tracks. However, it is not possible to connect multiple direct outputs to a single track. 5 Make connections for other input channels in the same way. Tip! • To cancel a specific patch cable, move the cursor to the CLEAR button located at the right of the corresponding recorder input, and press the [ENTER] key. • To cancel all patch cables, move the cursor to the ALL CLEAR button located at the upper right of the display, and press the [ENTER] key. 7 To execute the Quick Rec function, move the cursor to the OK button and press the [ENTER] key. To cancel the operation, move the cursor to the CANCEL button and press the [ENTER] key. When you execute Quick Rec, the internal settings of the AW4416 will change as follows. • The input patch and recorder input settings will be set according to the settings of the Quick Rec 2 page. • Assignments to the stereo bus will be forcibly cancelled for any input channel to which a patch cable is connected. • Channel library number 01 will be recalled for the monitor channel of any track to which a patch cable is connected, restoring it to the default condition. Tip! If desired, each input channel to which a patch cable is connected can be initialized when you execute Quick Rec. To do this, move the cursor to the FLAT/ CURRENT button located in the upper left of the display, and press the [ENTER] key to make the button read "FLAT." [Reference pages] Details on the Quick Rec 2 page ¡ P.23 4 Version 2.0 Manual Supplement
-
 1
1 -
 2
2 -
 3
3 -
 4
4 -
 5
5 -
 6
6 -
 7
7 -
 8
8 -
 9
9 -
 10
10 -
11
-
12
-
13
-
14
-
15
-
16
-
17
-
18
-
19
-
20
-
21
-
22
-
23
-
24
-
25
-
26
-
27
-
28
-
29
-
30
-
31
-
32
-
33
-
34
-
35
-
36
-
37
-
38
-
39
-
40
-
41
-
42
-
43
-
44
-
45
-
46
-
47
-
48
 |
 |