Yamaha CVP-601 Owner's Manual - Page 40
Playing Different Voices with the Left and Right Hands
 |
View all Yamaha CVP-601 manuals
Add to My Manuals
Save this manual to your list of manuals |
Page 40 highlights
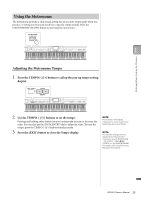
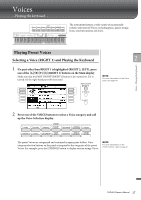
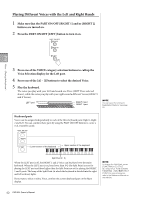
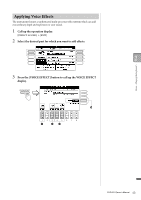
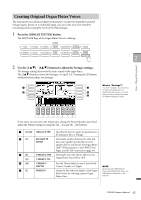
Playing Different Voices with the Left and Right Hands 1 Make sure that the PART ON/OFF [RIGHT 1] and/or [RIGHT 2] buttons are turned on. 2 Press the PART ON/OFF [LEFT] button to turn it on. 2 Voices - Playing the keyboard - 3 Press one of the VOICE category selection buttons to call up the Voice Selection display for the Left part. 4 Press one of the [A] - [J] buttons to select the desired Voice. 5 Play the keyboard. The notes you play with your left hand sound one Voice (LEFT Voice selected above), while the notes you play with your right sound a different Voices (RIGHT 1 and 2 Voices). LEFT part RIGHT 2 part RIGHT 1 part NOTE You can save the settings to Registration Memory. See page 83. Keyboard parts Voices can be assigned independently to each of the three keyboard parts: Right 1, Right 2 and Left. You can combine these parts by using the PART ON/OFF buttons to create a rich, ensemble sound. Lower section of the keyboard Upper section of the keyboard Split Point (F 2) When the LEFT part is off, the RIGHT 1 and 2 Voices can be played over the entire keyboard. When the LEFT part is on, keys lower than F 2 (the Split Point) are set for playing the LEFT part and those higher than the Split Point are set for playing the RIGHT 1 and 2 parts. The lamp of the Split Point (at which the keyboard is divided into the right and left sections) lights. If you want to select or edit a Voice, confirm the current keyboard part on the Main display. NOTE To change the Split Point, press: [FUNCTION] → [C] STYLE SETTING/ SPLIT POINT/CHORD FINGERING → TAB [-][3] SPLIT POINT. For more information, refer to the Reference Manual on the website. 40 CVP-601 Owner's Manual
-
 1
1 -
2
-
3
-
4
-
5
-
6
-
7
-
8
-
9
-
10
-
11
-
12
-
13
-
14
-
15
-
16
-
17
-
18
-
19
-
20
-
21
-
22
-
23
-
24
-
25
-
26
-
27
-
28
-
29
-
30
-
31
-
32
-
33
-
34
-
 35
35 -
 36
36 -
 37
37 -
 38
38 -
 39
39 -
 40
40 -
 41
41 -
 42
42 -
 43
43 -
 44
44 -
 45
45 -
46
-
47
-
48
-
49
-
50
-
51
-
52
-
53
-
54
-
55
-
56
-
57
-
58
-
59
-
60
-
61
-
62
-
63
-
64
-
65
-
66
-
67
-
68
-
69
-
70
-
71
-
72
-
73
-
74
-
75
-
76
-
77
-
78
-
79
-
80
-
81
-
82
-
83
-
84
-
85
-
86
-
87
-
88
-
89
-
90
-
91
-
92
-
93
-
94
-
95
-
96
-
97
-
98
-
99
-
100
-
101
-
102
-
103
-
104
-
105
-
106
-
107
-
108
-
109
-
110
-
111
-
112
-
113
-
114
-
115
-
116
-
117
 |
 |
