Yamaha CVP-601 Owner's Manual - Page 86
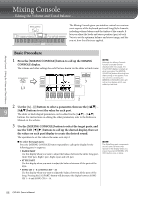
Mixing Console – Editing the Volume and Tonal Balance –, Basic Procedure
 |
View all Yamaha CVP-601 manuals
Add to My Manuals
Save this manual to your list of manuals |
Page 86 highlights
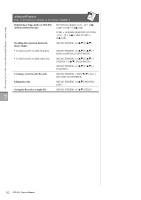
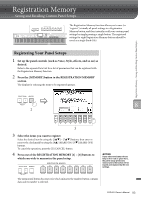
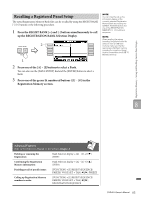
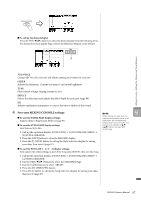
Mixing Console - Editing the Volume and Tonal Balance - The Mixing Console gives you intuitive control over various sonic aspects of the keyboard parts and Song/Style channels, including volume balance and the timbre of the sounds. It lets you adjust the levels and stereo position (pan) of each Voice to set the optimum balance and stereo image, and lets you set how the effects are applied. Mixing Console - Editing the Volume and Tonal Balance - Basic Procedure 1 Press the [MIXING CONSOLE] button to call up the MIXING CONSOLE display. The volume and other settings for each Part are shown via the slider or knob icons. 3 1,3 NOTE Although the Mixing Console function provides several displays (see next page), the VOL/VOICE display is called up when you press the [MIXING CONSOLE] button at the first time after turning on the power. From the next time, pressing the [MIXING CONSOLE] button will call up the display which was called up last time. 2 2 Use the [A] - [J] buttons to select a parameter, then use the [1] - 9 [8] buttons to set the value for each part. The slider or knob shaped parameters can be edited via the [1] - [8] buttons. For instructions on editing the other parameters, refer to the Reference Manual on the website. 3 Use the [MIXING CONSOLE] button to select the target parts, and use the TAB [-][3] buttons to call up the desired display, then set the values on each part/display to create the desired sound. The operation to set the value is the same as in step 2. To select the target parts: Press the [MIXING CONSOLE] button repeatedly to call up the display for the following parts in sequence. • PANEL PART Use this display when you want to adjust the balance between the entire Song part, entire Style part, Right 1 part, Right 2 part and Left part. • STYLE PART Use this display when you want to adjust the balance between all the parts of the Style. • SONG CH 1 - 8 or SONG CH 9 - 16 Use this display when you want to adjust the balance between all the parts of the Song. Pressing the [A] (PART) button will alternates the display between SONG CH 1 - 8 and SONG CH 9 - 16. NOTE The Style/Song part components are the same as those that appear in the display when you press the panel [CHANNEL ON/ OFF] button once or twice. 86 CVP-601 Owner's Manual
-
 1
1 -
2
-
3
-
4
-
5
-
6
-
7
-
8
-
9
-
10
-
11
-
12
-
13
-
14
-
15
-
16
-
17
-
18
-
19
-
20
-
21
-
22
-
23
-
24
-
25
-
26
-
27
-
28
-
29
-
30
-
31
-
32
-
33
-
34
-
35
-
36
-
37
-
38
-
39
-
40
-
41
-
42
-
43
-
44
-
45
-
46
-
47
-
48
-
49
-
50
-
51
-
52
-
53
-
54
-
55
-
56
-
57
-
58
-
59
-
60
-
61
-
62
-
63
-
64
-
65
-
66
-
67
-
68
-
69
-
70
-
71
-
72
-
73
-
74
-
75
-
76
-
77
-
78
-
79
-
80
-
 81
81 -
 82
82 -
 83
83 -
 84
84 -
 85
85 -
 86
86 -
 87
87 -
 88
88 -
 89
89 -
 90
90 -
 91
91 -
92
-
93
-
94
-
95
-
96
-
97
-
98
-
99
-
100
-
101
-
102
-
103
-
104
-
105
-
106
-
107
-
108
-
109
-
110
-
111
-
112
-
113
-
114
-
115
-
116
-
117
 |
 |
