Yamaha CVP-601 Owner's Manual - Page 87
Save your MIXING CONSOLE settings., To save the SONG CH 1 - 8 / 9 - 16 display settings
 |
View all Yamaha CVP-601 manuals
Add to My Manuals
Save this manual to your list of manuals |
Page 87 highlights
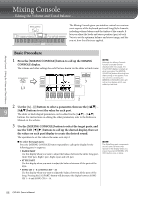
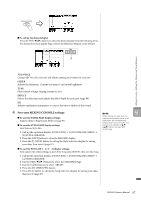
To call up the desired display Press the TAB [-][3] buttons to select the desired display from the following items. For details about each display Page, refer to the Reference Manual on the website. 3 Mixing Console - Editing the Volume and Tonal Balance - VOL/VOICE Changes the Voice for each part and adjusts panning and volume for each part. FILTER Adjusts the Harmonic Content (resonance) and sound brightness. TUNE Pitch-related settings (tuning, transpose, etc.). EFFECT Selects the effect type and adjusts the effect depth for each part (page 88). EQ Adjusts equalization parameters to correct the tone or timbre of the sound. 4 Save your MIXING CONSOLE settings. To save the PANEL PART display settings: NOTE 9 When editing one part, you can instantly set the same value for all Register them to Registration Memory (page 83). To save the STYLE PART display settings: Save them as Style data. other parts, by simultaneously holding down one of the [A] - [J] buttons and using the [1] - [8] buttons (or the DATA ENTRY dial). 1 Call up the operation display. [FUNCTION] → [F] DIGITAL REC MENU → [B] STYLE CREATOR 2 Press the [EXIT] button to close the RECORD display. 3 Press the [I] (SAVE) button to call up the Style Selection display for saving your data, then save it (page 67). To save the SONG CH 1 - 8 / 9 - 16 display settings: First register the edited settings as part of the Song data (SETUP), then save the Song. 1 Call up the operation display. [FUNCTION] → [F] DIGITAL REC MENU → [A] SONG CREATOR 2 Use the TAB [-][3] buttons to select the CHANNEL Page. 3 Use the [A]/[B] buttons to select "SETUP." 4 Press the [D] (EXECUTE) button. 5 Press the [I] button to call up the Song Selection display for saving your data, then save it (page 67). CVP-601 Owner's Manual 87
-
 1
1 -
2
-
3
-
4
-
5
-
6
-
7
-
8
-
9
-
10
-
11
-
12
-
13
-
14
-
15
-
16
-
17
-
18
-
19
-
20
-
21
-
22
-
23
-
24
-
25
-
26
-
27
-
28
-
29
-
30
-
31
-
32
-
33
-
34
-
35
-
36
-
37
-
38
-
39
-
40
-
41
-
42
-
43
-
44
-
45
-
46
-
47
-
48
-
49
-
50
-
51
-
52
-
53
-
54
-
55
-
56
-
57
-
58
-
59
-
60
-
61
-
62
-
63
-
64
-
65
-
66
-
67
-
68
-
69
-
70
-
71
-
72
-
73
-
74
-
75
-
76
-
77
-
78
-
79
-
80
-
81
-
 82
82 -
 83
83 -
 84
84 -
 85
85 -
 86
86 -
 87
87 -
 88
88 -
 89
89 -
 90
90 -
 91
91 -
 92
92 -
93
-
94
-
95
-
96
-
97
-
98
-
99
-
100
-
101
-
102
-
103
-
104
-
105
-
106
-
107
-
108
-
109
-
110
-
111
-
112
-
113
-
114
-
115
-
116
-
117
 |
 |
