Adaptec 2805 User Manual and Install Guide - Page 50
About Your RAID Controller, About Your, RAID Controller, Connecting Disk, Drives to Your Controllers
 |
View all Adaptec 2805 manuals
Add to My Manuals
Save this manual to your list of manuals |
Page 50 highlights
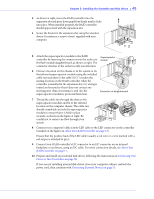
Chapter 5: Installing the Controller and Disk Drives ● 49 3 As shown at right, insert the RAID controller into the expansion slot and press down gently but firmly until it clicks into place. When installed properly, the RAID controller should appear level with the expansion slot. 4 Secure the bracket in the expansion slot, using the retention device (for instance, a screw or lever) supplied with your computer. 5 Attach the supercapacitor module to the RAID Supercapacitor controller by inserting the connector into the socket on module the flash module daughterboard, as shown at right. The connector attaches to the socket in only one direction. 6 Choose a location on the chassis or in the system to fix the tethered supercapacitor module using the included cable-ties such that (i) the cable (18.5") reaches the mating location on the RAID controller when the controller is installed in the expansion slot; (ii) wiring is routed and secured so that it does not contact any moving parts (fans, for instance); and (iii) the Connector on daughterboard supercapacitor module is protected from heat. 7 Thread the cable-ties through the slots on the supercapacitor module and fix to the selected location on the computer chassis. The cable-ties should completely encircle the supercapacitor module to ensure that it is held in place securely, as shown in the figure at right. Be careful not to restrict air-flow through your system. 8 Connect your computer's disk activity LED cable to the LED connector on the controller (marked on the figures in About Your RAID Controller on page 17). Ensure that the positive lead of the LED cable (usually a red wire or a wire marked with a red stripe) is attached to pin 1. 9 Connect your RAID controller's I2C connector to an I2C connector on an internal backplane or enclosure, using an I2C cable. For more connection details, see About Your RAID Controller on page 17. 10 Prepare and install your internal disk drives, following the instructions in Connecting Disk Drives to Your Controllers on page 50. If you are not installing internal disk drives, close your computer cabinet, reattach the power cord, then continue with Connecting External Devices on page 53.
-
 1
1 -
2
-
3
-
4
-
5
-
6
-
7
-
8
-
9
-
10
-
11
-
12
-
13
-
14
-
15
-
16
-
17
-
18
-
19
-
20
-
21
-
22
-
23
-
24
-
25
-
26
-
27
-
28
-
29
-
30
-
31
-
32
-
33
-
34
-
35
-
36
-
37
-
38
-
39
-
40
-
41
-
42
-
43
-
44
-
 45
45 -
 46
46 -
 47
47 -
 48
48 -
 49
49 -
 50
50 -
 51
51 -
 52
52 -
 53
53 -
 54
54 -
 55
55 -
56
-
57
-
58
-
59
-
60
-
61
-
62
-
63
-
64
-
65
-
66
-
67
-
68
-
69
-
70
-
71
-
72
-
73
-
74
-
75
-
76
-
77
-
78
-
79
-
80
-
81
-
82
-
83
-
84
-
85
-
86
-
87
-
88
-
89
-
90
-
91
-
92
-
93
-
94
-
95
-
96
-
97
-
98
-
99
-
100
-
101
-
102
-
103
-
104
-
105
-
106
-
107
-
108
-
109
-
110
-
111
-
112
-
113
-
114
-
115
-
116
-
117
-
118
-
119
-
120
-
121
-
122
-
123
-
124
-
125
-
126
-
127
-
128
-
129
-
130
-
131
-
132
-
133
-
134
-
135
-
136
-
137
-
138
-
139
-
140
-
141
-
142
-
143
-
144
-
145
-
146
-
147
-
148
-
149
-
150
-
151
-
152
-
153
-
154
-
155
 |
 |
