Adobe 22012057DM User Guide - Page 30
Browsing assets with Adobe Bridge, Record a new file
 |
UPC - 883919114866
View all Adobe 22012057DM manuals
Add to My Manuals
Save this manual to your list of manuals |
Page 30 highlights
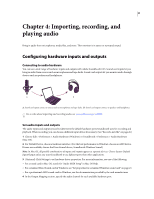
SOUNDBOOTH CS3 26 User Guide The menu at the top of the Editor panel lets you choose which open file to display. 1 Choose File > Open, or double-click the Files panel. 2 Select the desired files. (If you don't see the file you want, choose All Supported Media from the Files Of Type menu.) 3 Click Open. For each open file, the Files panel displays properties such as Name, Media Type, and Duration. By default, files are sorted alphabetically by name. To sort files based on another property, click the property header. See also "Choosing an audio file format" on page 64 "Choosing a video file format" on page 64 "Saving and closing files" on page 63 Browsing assets with Adobe Bridge Adobe Bridge CS3, included with Adobe Creative Suite 3 components, is a cross-platform application that helps you organize and browse assets for audio, video, web, and print projects. To access Adobe Bridge in Soundbooth, choose File > Browse, or select a file in the Files panel, and choose File > Reveal in Bridge. From Adobe Bridge, you can: • View, search, sort, and manage audio and video files • Work with Adobe Version Cue-managed assets • Group related files in stacks • Edit metadata • Perform automated tasks, such as batch commands Record a new file You can record audio from any device that you can plug in to your sound card's Microphone In or Line In port. Before recording, optimize your system's input levels, if you haven't already done so. (See "Adjusting recording levels for standard sound cards" on page 27.) 1 Choose File > Record, or click the Record button in the Editor panel. 2 Choose an audio input from the Device menu. If necessary, click Settings to set driver properties for the input. 3 Choose a Sample Rate option appropriate for your project. (See "Sample rate" on page 14.) 4 Select Stereo or Mono, and then choose a Port option. 5 To ensure that the recorded signal is undistorted, select Monitor Input During Recording. (If you use this option for a microphone recording, wear headphones to avoid feedback.)
-
 1
1 -
2
-
3
-
4
-
5
-
6
-
7
-
8
-
9
-
10
-
11
-
12
-
13
-
14
-
15
-
16
-
17
-
18
-
19
-
20
-
21
-
22
-
23
-
24
-
 25
25 -
 26
26 -
 27
27 -
 28
28 -
 29
29 -
 30
30 -
 31
31 -
 32
32 -
 33
33 -
 34
34 -
 35
35 -
36
-
37
-
38
-
39
-
40
-
41
-
42
-
43
-
44
-
45
-
46
-
47
-
48
-
49
-
50
-
51
-
52
-
53
-
54
-
55
-
56
-
57
-
58
-
59
-
60
-
61
-
62
-
63
-
64
-
65
-
66
-
67
-
68
-
69
-
70
-
71
-
72
-
73
-
74
-
75
-
76
-
77
-
78
-
79
-
80
-
81
-
82
-
83
-
84
-
85
-
86
-
87
-
88
-
89
-
90
-
91
 |
 |
