Adobe 22012057DM User Guide - Page 34
Level meters overview
 |
UPC - 883919114866
View all Adobe 22012057DM manuals
Add to My Manuals
Save this manual to your list of manuals |
Page 34 highlights
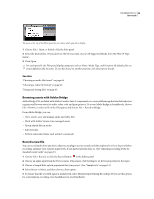
SOUNDBOOTH CS3 30 User Guide To start or stop playback without using the transport controls, press the spacebar. Go To Previous Moves the current-time indicator to the previous marker, the previous selection edge, or the beginning of the file. Go To Next Moves the current-time indicator to the next marker, the next selection edge, or the end of the file. Stop Stops playback. Play Starts playback at the current-time indicator. To alternate the button above between Play and Pause functions, select Return To Start Position On Stop in the General section of the Preferences dialog box. When this option is enabled, the Stop and Go To buttons move the current-time indicator back to its original position. Loop Enables looped playback of audio. Record Opens the Record dialog box. (See "Record a new file" on page 26.) See also "Shortcuts for playing and zooming audio" on page 77 Level meters overview To monitor the amplitude of signals during playback, use the level meters in the toolbar. For stereo files, the upper meter represents the left channel, and the lower meter represents the right channel. For surround-sound (5.1) files, six meters represent the following channels from top to bottom: Left, Right, Left Surround, Right Surround, Center, and LFE. A B C D Level meters for stereo file A. Left channel B. Right channel C. Peak indicator D. Clip indicators The meters show signal levels in dBFS (decibels below full scale), where a level of 0 dB is the maximum amplitude possible before clipping occurs. (Clipping produces audible distortion.) To identify amplitude at a specific point in the meters, position the mouse over that point, and note the value in the tool tip. To the right of the meters, Soundbooth indicates the peak level since playback last began. If clipping occurs, this value is replaced by the word Over, and red clip indicators in the meters light up. To clear clip indicators and peak amplitude values, click them, or right-click the meters and choose Reset Meters.
-
 1
1 -
2
-
3
-
4
-
5
-
6
-
7
-
8
-
9
-
10
-
11
-
12
-
13
-
14
-
15
-
16
-
17
-
18
-
19
-
20
-
21
-
22
-
23
-
24
-
25
-
26
-
27
-
28
-
 29
29 -
 30
30 -
 31
31 -
 32
32 -
 33
33 -
 34
34 -
 35
35 -
 36
36 -
 37
37 -
 38
38 -
 39
39 -
40
-
41
-
42
-
43
-
44
-
45
-
46
-
47
-
48
-
49
-
50
-
51
-
52
-
53
-
54
-
55
-
56
-
57
-
58
-
59
-
60
-
61
-
62
-
63
-
64
-
65
-
66
-
67
-
68
-
69
-
70
-
71
-
72
-
73
-
74
-
75
-
76
-
77
-
78
-
79
-
80
-
81
-
82
-
83
-
84
-
85
-
86
-
87
-
88
-
89
-
90
-
91
 |
 |
