Adobe 22012057DM User Guide - Page 31
Adjusting recording levels for standard sound cards
 |
UPC - 883919114866
View all Adobe 22012057DM manuals
Add to My Manuals
Save this manual to your list of manuals |
Page 31 highlights
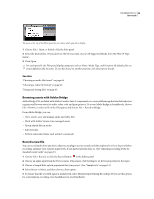
SOUNDBOOTH CS3 27 User Guide 6 Enter a filename, and choose a suffix from the pop-up menu. (The suffix helps you distinguish between multiple related recordings with the same filename.) 7 To change the location for the saved file, click Browse. 8 Click the Record button to begin recording. 9 As you record, click the Marker button to add audio markers (which you can later export as Adobe Flash cue points). 10 When you finish recording, click the Stop button , or close the dialog box. Soundbooth automatically stores the new file in WAV format. If you prefer a different format, choose File > Save As. See also "Use markers" on page 35 "Copying, cutting, pasting, and deleting audio" on page 38 Adjusting recording levels for standard sound cards Adjust levels if recordings are too quiet (causing background noise) or too loud (causing distortion). To get the best sounding results, record audio as loud as possible without clipping. When setting recording levels, watch the meters in the Record dialog box, and try to keep the loudest peaks in the yellow range below -3 dB. Soundbooth doesn't directly control a sound card's recording levels. For a professional sound card, you adjust these levels with the mixer application provided with the card (see the card's documentation for instructions). For a standard sound card, you use the mixer provided by Windows or Mac OS. See also "Set audio inputs and outputs" on page 24 Adjust sound card levels in Windows Vista 1 Right-click the speaker icon in the taskbar, and choose Recording Devices. 2 Double-click the input source you want to use. 3 Click the Levels tab, and adjust the slider as needed. Adjust sound card levels in Windows XP 1 Double-click the speaker icon in the taskbar. 2 Choose Options > Properties. 3 Select Recording, and then click OK. 4 Select the input source you want to use, and adjust the Volume slider as needed. Adjust sound card levels in Mac OS 1 Choose System Preferences from the Apple menu. 2 Click Sound, and then click the Input tab. 3 Select the device you want to use, and adjust the Input Volume slider as needed.
-
 1
1 -
2
-
3
-
4
-
5
-
6
-
7
-
8
-
9
-
10
-
11
-
12
-
13
-
14
-
15
-
16
-
17
-
18
-
19
-
20
-
21
-
22
-
23
-
24
-
25
-
 26
26 -
 27
27 -
 28
28 -
 29
29 -
 30
30 -
 31
31 -
 32
32 -
 33
33 -
 34
34 -
 35
35 -
 36
36 -
37
-
38
-
39
-
40
-
41
-
42
-
43
-
44
-
45
-
46
-
47
-
48
-
49
-
50
-
51
-
52
-
53
-
54
-
55
-
56
-
57
-
58
-
59
-
60
-
61
-
62
-
63
-
64
-
65
-
66
-
67
-
68
-
69
-
70
-
71
-
72
-
73
-
74
-
75
-
76
-
77
-
78
-
79
-
80
-
81
-
82
-
83
-
84
-
85
-
86
-
87
-
88
-
89
-
90
-
91
 |
 |
