Adobe 65023809 Printing Guide - Page 101
Output Preview, Soft-Proofing Colors
 |
UPC - 883919165974
View all Adobe 65023809 manuals
Add to My Manuals
Save this manual to your list of manuals |
Page 101 highlights
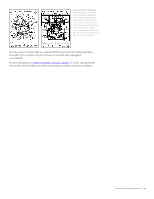
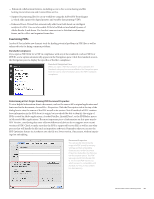
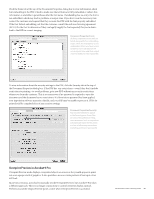
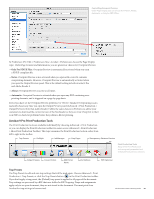
Creating a Trap Preset Comprehensive trap controls let you govern trapping between objects or images. Other options let you trap images internally and trap 1-bit images to other objects. Applying these presets establishes trap parameters. Traps are generated only when PostScript from Acrobat is processed by a RIP using Adobe In-RIP trapping. Output Preview Output Preview in Acrobat selectively shows, hides, and highlights objects on screen according to choices made in the Output Preview dialog box. Use Output Preview to visually check for extraneous inks, areas in excess of a total allowable area ink coverage value, RGB content, overprinting objects, rich black areas, and more. Because the feature does not generate a report, you must examine each page individually, and you might overlook very small details in a complex page. (For a rules-based check of the document that generates a report on all pages, see "Preflight," later in this chapter. Subtle Problems None of these problems are apparent in the initial view of the PDF: extraneous spot colors, RGB image content, and overprinting white artwork. All may cause incorrect output if not fixed. Use the forensic tools in Acrobat 9 Pro to highlight such potential problems. Soft-Proofing Colors In a color-managed workflow, you can soft-proof your document directly on the monitor to see how the document's colors will look based on a specific output profile. The reliability of the soft proof depends on the quality of your monitor, your monitor profile, the accuracy of your device output profile, and the ambient lighting conditions of your work environment. To display a soft proof: 1. In the Output Preview dialog box, choose a profile from the Simulation Profile pop-up menu. In a PDF/X file, the simulation profile will be dictated by the output profile chosen when the PDF was created. 2. Select the Simulate Ink Black option to preview in the monitor space the actual dynamic range defined by the proof profile. (This option is not available for all profiles.) 3. Select the Simulate Paper White option to preview the specific shade of white for the print medium described by the proof profile. Simulate Ink Black is automatically selected. (This option is not available for all profiles.) Adobe Creative Suite 4 Printing Guide 99
-
 1
1 -
2
-
3
-
4
-
5
-
6
-
7
-
8
-
9
-
10
-
11
-
12
-
13
-
14
-
15
-
16
-
17
-
18
-
19
-
20
-
21
-
22
-
23
-
24
-
25
-
26
-
27
-
28
-
29
-
30
-
31
-
32
-
33
-
34
-
35
-
36
-
37
-
38
-
39
-
40
-
41
-
42
-
43
-
44
-
45
-
46
-
47
-
48
-
49
-
50
-
51
-
52
-
53
-
54
-
55
-
56
-
57
-
58
-
59
-
60
-
61
-
62
-
63
-
64
-
65
-
66
-
67
-
68
-
69
-
70
-
71
-
72
-
73
-
74
-
75
-
76
-
77
-
78
-
79
-
80
-
81
-
82
-
83
-
84
-
85
-
86
-
87
-
88
-
89
-
90
-
91
-
92
-
93
-
94
-
95
-
 96
96 -
 97
97 -
 98
98 -
 99
99 -
 100
100 -
 101
101 -
 102
102 -
 103
103 -
 104
104 -
 105
105 -
 106
106 -
107
-
108
-
109
-
110
-
111
-
112
-
113
-
114
-
115
-
116
-
117
-
118
-
119
-
120
-
121
-
122
-
123
-
124
-
125
-
126
-
127
-
128
-
129
-
130
-
131
-
132
-
133
-
134
-
135
-
136
-
137
-
138
-
139
 |
 |
