Adobe 65023809 Printing Guide - Page 92
Print presets, Print options, General, Marks and Bleed, Output, Graphics
 |
UPC - 883919165974
View all Adobe 65023809 manuals
Add to My Manuals
Save this manual to your list of manuals |
Page 92 highlights
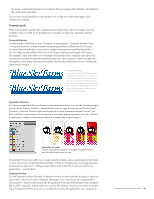
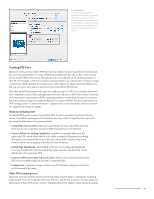
Tiling an Artboard To tile an artboard, select the artboard's number in the Range field, then set the Tile options. You can drag the thumbnail in the preview window to reposition the artwork in the tile indicators. Print presets You can create print presets to store specific settings for each printing device in your department, making it faster and easier to print to multiple devices without having to change settings each time you switch devices. Set all the options as you wish for a single device, then click the Save Preset button at the bottom of the Print dialog box to name and save it as a preset. The preset will then be available under the Print Preset pop-up menu any time you open the Print dialog box. You can also export and import saved print presets. To export print presets: 1 Choose Edit > Print Presets. 2 Select one or more presets in the list and click Export. Shift-click to select a range of presets. Control-click (Windows) or Command-click (Mac OS) to select several individual presets. 3 Specify a name and location, and then click Save. If you have chosen multiple print presets, they are all stored in a single, saved Preset file. Saved Illustrator print presets do not have a file extension, so it is a good idea to give the saved presets a recognizable name. To import print presets: 1 Choose Edit > Print Presets. 2 Click Import. Locate and select the file containing the presets you wish to import, and click OK. Print options You can select from the following options: • General: This option lets you choose number of copies, page size and orientation, page range, scaling (including anamorphic factors that do not maintain the original proportions), tiling options, and which layers to print. You can also choose to ignore artboards or skip blank artboards. • Marks and Bleed: Select printer's marks, page information and color bars, as well as bleed. Now that Illustrator supports a specified bleed "zone," you can check the Use Document Bleed Settings option if the document was set up with bleed, or you can manually specify bleed values. Bleed begins at the edge of an artboard. If you are printing multiple artboards, the same bleed value is applied to all of them. • Output: Select composite or separated output; also choose in-RIP separations, and specify which colors are output when printing separations. • Graphics: Set path flatness, font downloading, and PostScript level. If necessary, you can choose Compatible Gradient and Gradient Mesh Printing to convert meshes and Adobe Creative Suite 4 Printing Guide 90
-
 1
1 -
2
-
3
-
4
-
5
-
6
-
7
-
8
-
9
-
10
-
11
-
12
-
13
-
14
-
15
-
16
-
17
-
18
-
19
-
20
-
21
-
22
-
23
-
24
-
25
-
26
-
27
-
28
-
29
-
30
-
31
-
32
-
33
-
34
-
35
-
36
-
37
-
38
-
39
-
40
-
41
-
42
-
43
-
44
-
45
-
46
-
47
-
48
-
49
-
50
-
51
-
52
-
53
-
54
-
55
-
56
-
57
-
58
-
59
-
60
-
61
-
62
-
63
-
64
-
65
-
66
-
67
-
68
-
69
-
70
-
71
-
72
-
73
-
74
-
75
-
76
-
77
-
78
-
79
-
80
-
81
-
82
-
83
-
84
-
85
-
86
-
 87
87 -
 88
88 -
 89
89 -
 90
90 -
 91
91 -
 92
92 -
 93
93 -
 94
94 -
 95
95 -
 96
96 -
 97
97 -
98
-
99
-
100
-
101
-
102
-
103
-
104
-
105
-
106
-
107
-
108
-
109
-
110
-
111
-
112
-
113
-
114
-
115
-
116
-
117
-
118
-
119
-
120
-
121
-
122
-
123
-
124
-
125
-
126
-
127
-
128
-
129
-
130
-
131
-
132
-
133
-
134
-
135
-
136
-
137
-
138
-
139
 |
 |
