Adobe 65023809 Printing Guide - Page 102
Previewing Separations, Choose Advanced > Print Production > Output Preview
 |
UPC - 883919165974
View all Adobe 65023809 manuals
Add to My Manuals
Save this manual to your list of manuals |
Page 102 highlights
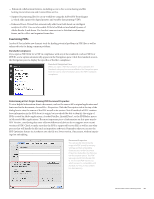
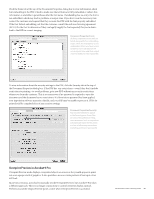
Previewing Separations You can choose to view a single separation or multiple separations in any combination, much like progressive proofs. To preview color separations: 1. Display the page you want to preview. 2. Choose Advanced > Print Production > Output Preview, or click the Output Preview button ( ) in the Print Production toolbar. When you choose Output Preview, Acrobat automatically activates Overprint Preview if your preferences are not set to automatically activate it. The appearance of any overprinting objects changes, but such changes may be hard to see in very small objects. (You can check for overprinting objects more precisely later by using the Color Warnings feature in Output Preview.) 3. In the Output Preview dialog box, choose Separations from the Preview menu. 4. Use the check boxes to the left of the ink list to select the color separations you want to view or hide. When you deselect the box next to an ink, any content using that ink disappears in the document window. This makes it easy to pinpoint areas that are using the wrong spot color ink. 5. Set the Sample Size to Point Sample, 3 by 3 Average, or 5 by 5 Average. Note: At this point, if you discover any extraneous spot colors or find spot color content that should print as four-color process, use the Ink Manager function (see "Using the Ink Manager" later in this chapter) to fix the problem without having to return to the originating application. Viewing Separations Use the check boxes to the left of ink names to selectively view separations. This can help you quickly determine if there are extraneous inks, or if objects may print in the wrong color. 5 Check ink percentage values by hovering the mouse pointer over an area in the document window. The ink percentages appear next to each ink, and your pointer acts as a rolling densitometer. Acrobat 9 now also displays a Total Area Coverage amount at the bottom of the list; this is especially helpful when spot and process colors are combined. Separations See all inks used in the file at a glance. View color values with a "rolling densitometer" as you move the pointer on screen. Note the new Total Area Coverage value displayed. Adobe Creative Suite 4 Printing Guide 100
-
 1
1 -
2
-
3
-
4
-
5
-
6
-
7
-
8
-
9
-
10
-
11
-
12
-
13
-
14
-
15
-
16
-
17
-
18
-
19
-
20
-
21
-
22
-
23
-
24
-
25
-
26
-
27
-
28
-
29
-
30
-
31
-
32
-
33
-
34
-
35
-
36
-
37
-
38
-
39
-
40
-
41
-
42
-
43
-
44
-
45
-
46
-
47
-
48
-
49
-
50
-
51
-
52
-
53
-
54
-
55
-
56
-
57
-
58
-
59
-
60
-
61
-
62
-
63
-
64
-
65
-
66
-
67
-
68
-
69
-
70
-
71
-
72
-
73
-
74
-
75
-
76
-
77
-
78
-
79
-
80
-
81
-
82
-
83
-
84
-
85
-
86
-
87
-
88
-
89
-
90
-
91
-
92
-
93
-
94
-
95
-
96
-
 97
97 -
 98
98 -
 99
99 -
 100
100 -
 101
101 -
 102
102 -
 103
103 -
 104
104 -
 105
105 -
 106
106 -
 107
107 -
108
-
109
-
110
-
111
-
112
-
113
-
114
-
115
-
116
-
117
-
118
-
119
-
120
-
121
-
122
-
123
-
124
-
125
-
126
-
127
-
128
-
129
-
130
-
131
-
132
-
133
-
134
-
135
-
136
-
137
-
138
-
139
 |
 |
