Adobe 65023809 Printing Guide - Page 103
Show Options, Viewing Color Warnings, DeviceCMYK or Spot.
 |
UPC - 883919165974
View all Adobe 65023809 manuals
Add to My Manuals
Save this manual to your list of manuals |
Page 103 highlights
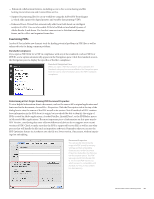
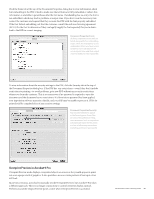
Show Options To highlight potential problem areas, choose a type of content from the Show menu. This feature isolates the chosen content on screen and temporarily hides all other content. This makes it easy to catch RGB content or to isolate CMYK content from spot content. RGB content is not a problem in a color-managed workflow, but it can be an issue in an all-CMYK workflow if the RIP does not perform satisfactory in-RIP color conversion. Fortunately, this problem can be fixed easily with another Print Production tool, the Convert Colors function. Acrobat 9 Pro adds several new options to the Show menu, including Registration, Text, and Line Art, and Not DeviceCMYK or Spot. Select the Total Area Coverage option to highlight any areas that exceed a total ink limit that you specify. The pop-up menu has predefined entries ranging from 180% to 400% in 20% increments; you can also manually enter any value between 1% and 1000%. You can change the highlight color by clicking the color block to the left of the percentage field and choosing a new color from the swatch menu. If one of the predefined swatches isn't satisfactory, click the Other Color option at the bottom of the swatches matrix and create a new custom highlight color. If only very small areas are highlighted, you shouldn't have any problem printing the job. But the larger the areas that exceed the limit, the more likelihood that you'll experience problems on press from heavy coverage. You may have to edit problem content and then regenerate the PDF. Total Area Coverage Highlight areas that exceed the total ink limit. As with other warnings, you can change the highlight color by clicking the color block. Viewing Color Warnings The Output Preview dialog box also includes color warnings that show where rich black inks and overprinting effects appear in the document. Such attributes don't always indicate a problem, but highlighting them can help you determine whether they will cause any issues on output. To view color warnings, choose Color Warnings from the Preview list, and select the warnings you want to activate. Select Show Overprinting, Rich Black, or both. To change the highlight color for the warnings, click the swatch next to the warning, and select a new color from the swatch menu that appears. The Overprinting warning highlights areas affected by some blending modes, and areas that have been set to overprint. Overprinting, such as black text overprinting a color area, is not necessarily a problem. But in the example document, the white logo at the lower right will disappear during imaging because it is set to overprint. This will have to be fixed before output. Adobe Creative Suite 4 Printing Guide 101
-
 1
1 -
2
-
3
-
4
-
5
-
6
-
7
-
8
-
9
-
10
-
11
-
12
-
13
-
14
-
15
-
16
-
17
-
18
-
19
-
20
-
21
-
22
-
23
-
24
-
25
-
26
-
27
-
28
-
29
-
30
-
31
-
32
-
33
-
34
-
35
-
36
-
37
-
38
-
39
-
40
-
41
-
42
-
43
-
44
-
45
-
46
-
47
-
48
-
49
-
50
-
51
-
52
-
53
-
54
-
55
-
56
-
57
-
58
-
59
-
60
-
61
-
62
-
63
-
64
-
65
-
66
-
67
-
68
-
69
-
70
-
71
-
72
-
73
-
74
-
75
-
76
-
77
-
78
-
79
-
80
-
81
-
82
-
83
-
84
-
85
-
86
-
87
-
88
-
89
-
90
-
91
-
92
-
93
-
94
-
95
-
96
-
97
-
 98
98 -
 99
99 -
 100
100 -
 101
101 -
 102
102 -
 103
103 -
 104
104 -
 105
105 -
 106
106 -
 107
107 -
 108
108 -
109
-
110
-
111
-
112
-
113
-
114
-
115
-
116
-
117
-
118
-
119
-
120
-
121
-
122
-
123
-
124
-
125
-
126
-
127
-
128
-
129
-
130
-
131
-
132
-
133
-
134
-
135
-
136
-
137
-
138
-
139
 |
 |
