Adobe 65023809 Printing Guide - Page 93
Printing Multiple Artboards, Printing Bleed, Color Management, Advanced, Summary, Ignore Artboards
 |
UPC - 883919165974
View all Adobe 65023809 manuals
Add to My Manuals
Save this manual to your list of manuals |
Page 93 highlights
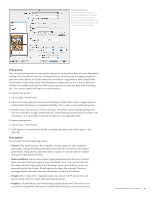
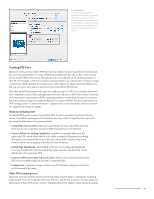
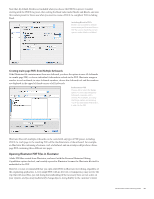
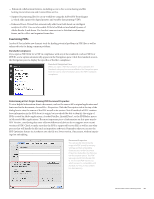
gradients to JPEG in the print stream. Use this option only if you cannot get complicated meshes or gradients to print otherwise. The current Raster Effects Resolution is displayed, but you must exit the print dialog box to change the setting. • Color Management: Choose whether to let Illustrator determine correct printing colors or allow the printer to do so. Select a color profile and rendering intent for printing. • Advanced: Choose to preserve, discard, or simulate overprints. Choose from existing flattener presets, or create a custom preset for this document. • Summary: View a list of chosen printing options, and see warnings about issues such as transparency flattening or out-of-gamut objects. Printing Multiple Artboards There are several important controls for printing artboards under the General topic: • Ignore Artboards: This option prints all the artwork on the entire Illustrator canvas and disregards the Artboard boundaries. The content is treated much like artwork in previous versions of Illustrator: the outside boundaries of all the artwork are regarded as a bounding box and the Artboard edges are ignored. • Skip Blank Artboards: This option will prevent outputting blank plates for empty Artboards. Printing Multiple Artboards The Print dialog now contains controls for selecting and previewing artboards before you print. To select a discontiguous range of artboards, separate the artboard numbers with a comma (e.g., "1,3" to print the first and third artboard). The navigational control beneath the preview thumbnail pane in the print dialog allows you scroll through the Artboards in the Illustrator file so you can confirm that selected Artboards will fit in the specified media. Printing Bleed There are two methods for including bleed in print output: invoking an existing bleed setting, or manually entering bleed values. If a bleed value has been specified during document setup, or added by modifying the document setup at some point (File > Document Setup), it can be invoked by just checking the Use Document Bleed Settings option in the Print dialog. If bleed has not been established formally by specifying bleed settings in Document Setup, you can manually enter the appropriate values in the bleed fields in the Print dialog. Note that, by default, the four bleed fields are linked: change the value in one field, and they all change. You can, however, click the link icon to unlink the fields, and enter different values if necessary. Adobe Creative Suite 4 Printing Guide 91
-
 1
1 -
2
-
3
-
4
-
5
-
6
-
7
-
8
-
9
-
10
-
11
-
12
-
13
-
14
-
15
-
16
-
17
-
18
-
19
-
20
-
21
-
22
-
23
-
24
-
25
-
26
-
27
-
28
-
29
-
30
-
31
-
32
-
33
-
34
-
35
-
36
-
37
-
38
-
39
-
40
-
41
-
42
-
43
-
44
-
45
-
46
-
47
-
48
-
49
-
50
-
51
-
52
-
53
-
54
-
55
-
56
-
57
-
58
-
59
-
60
-
61
-
62
-
63
-
64
-
65
-
66
-
67
-
68
-
69
-
70
-
71
-
72
-
73
-
74
-
75
-
76
-
77
-
78
-
79
-
80
-
81
-
82
-
83
-
84
-
85
-
86
-
87
-
 88
88 -
 89
89 -
 90
90 -
 91
91 -
 92
92 -
 93
93 -
 94
94 -
 95
95 -
 96
96 -
 97
97 -
 98
98 -
99
-
100
-
101
-
102
-
103
-
104
-
105
-
106
-
107
-
108
-
109
-
110
-
111
-
112
-
113
-
114
-
115
-
116
-
117
-
118
-
119
-
120
-
121
-
122
-
123
-
124
-
125
-
126
-
127
-
128
-
129
-
130
-
131
-
132
-
133
-
134
-
135
-
136
-
137
-
138
-
139
 |
 |
