Belkin F5D8230-4 User Manual - Page 63
Using Dynamic DNS, Setting up the Router's Dynamic DNS Update Client - password
 |
View all Belkin F5D8230-4 manuals
Add to My Manuals
Save this manual to your list of manuals |
Page 63 highlights
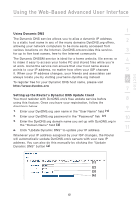
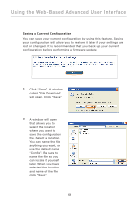
section Using the Web-Based Advanced User Interface 1 Using Dynamic DNS The Dynamic DNS service allows you to alias a dynamic IP address to a static host name in any of the many domains DynDNS.org offers, 2 allowing your network computers to be more easily accessed from various locations on the Internet. DynDNS.org provides this service, 3 for up to five host names, free to the Internet community. The Dynamic DNSSM service is ideal for a home website, file server, or 4 to make it easy to access your home PC and stored files while you're at work. Using the service can ensure that your host name always points to your IP address, no matter how often your ISP changes 5 it. When your IP address changes, your friends and associates can always locate you by visiting yourname.dyndns.org instead! 6 To register free for your Dynamic DNS host name, please visit http://www.dyndns.org. 7 Setting up the Router's Dynamic DNS Update Client You must register with DynDNS.org's free update service before 8 using this feature. Once you have your registration, follow the directions below. 9 1. Enter your DynDNS.org user name in the "User Name" field (1). 2. Enter your DynDNS.org password in the "Password" field (2). 10 3. Enter the DynDNS.org domain name you set up with DynDNS.org in the "Domain Name" field (3). 11 4. Click "Update Dynamic DNS" to update your IP address. Whenever your IP address assigned by your ISP changes, the Router will automatically update DynDNS.org's servers with your new IP address. You can also do this manually by clicking the "Update Dynamic DNS" button (4). (1) (2) (3) (4) 61
-
 1
1 -
2
-
3
-
4
-
5
-
6
-
7
-
8
-
9
-
10
-
11
-
12
-
13
-
14
-
15
-
16
-
17
-
18
-
19
-
20
-
21
-
22
-
23
-
24
-
25
-
26
-
27
-
28
-
29
-
30
-
31
-
32
-
33
-
34
-
35
-
36
-
37
-
38
-
39
-
40
-
41
-
42
-
43
-
44
-
45
-
46
-
47
-
48
-
49
-
50
-
51
-
52
-
53
-
54
-
55
-
56
-
57
-
 58
58 -
 59
59 -
 60
60 -
 61
61 -
 62
62 -
 63
63 -
 64
64 -
 65
65 -
 66
66 -
 67
67 -
 68
68 -
69
-
70
-
71
-
72
-
73
-
74
-
75
-
76
-
77
-
78
-
79
-
80
-
81
-
82
-
83
-
84
-
85
-
86
-
87
-
88
-
89
-
90
-
91
-
92
-
93
-
94
-
95
-
96
-
97
-
98
-
99
-
100
-
101
-
102
-
103
-
104
-
105
-
106
-
107
-
108
-
109
-
110
-
111
-
112
-
113
-
114
-
115
-
116
-
117
-
118
-
119
 |
 |