Brother International 9840CDW Users Manual - English - Page 229
Printer, Duplex, Output Color, Reset Printer, Reset, Calibration, Auto Regist., Registration, - color calibration
 |
UPC - 012502618744
View all Brother International 9840CDW manuals
Add to My Manuals
Save this manual to your list of manuals |
Page 229 highlights
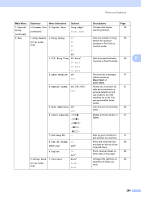
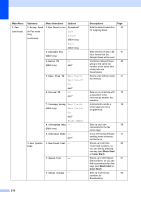
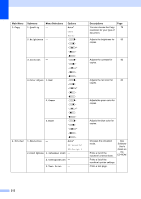
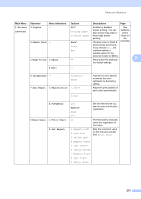
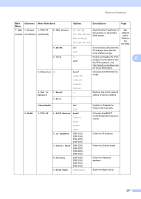
Menu and features Main Menu Submenu Menu Selections Options Descriptions Page 4.Printer 3.Duplex - (continued) 4.Output Color - 5.Reset Printer 1.Reset Off* Enables or disables See On(Long Edge) duplex printing. You can Software also choose long edge or User's On(Short Edge) short edge duplex Guide on printing. the Auto* Chooses color or black & CD-ROM. Color white printed documents. If you choose Auto, the B&W machine selects a suitable option for the - document (color or B&W). Returns the PCL setting to D the default settings. 2.Exit - 6.Calibration - Calibrate Reset 7.Auto Regist. 1.Registration 1.Start 2.Exit Adjusts the color density or returns the color calibration to the factory setting. Adjust the print position of each color automatically. 2.Frequency 8.Manual Regist. 1.Print Chart 2.Set Regist. Low Medium* High Set the interval time you want to carry out the auto registration. Off - Print the chart to manually check the registration of the colors. 1 Magenta Left 2 Cyan Left 3 Yellow Left Sets the correction value on the chart you printed from Print Chart. 4 Magenta Center 5 Cyan Center 6 Yellow Center 7 Magenta Right 8 Cyan Right 9 Yellow Right 213
-
 1
1 -
2
-
3
-
4
-
5
-
6
-
7
-
8
-
9
-
10
-
11
-
12
-
13
-
14
-
15
-
16
-
17
-
18
-
19
-
20
-
21
-
22
-
23
-
24
-
25
-
26
-
27
-
28
-
29
-
30
-
31
-
32
-
33
-
34
-
35
-
36
-
37
-
38
-
39
-
40
-
41
-
42
-
43
-
44
-
45
-
46
-
47
-
48
-
49
-
50
-
51
-
52
-
53
-
54
-
55
-
56
-
57
-
58
-
59
-
60
-
61
-
62
-
63
-
64
-
65
-
66
-
67
-
68
-
69
-
70
-
71
-
72
-
73
-
74
-
75
-
76
-
77
-
78
-
79
-
80
-
81
-
82
-
83
-
84
-
85
-
86
-
87
-
88
-
89
-
90
-
91
-
92
-
93
-
94
-
95
-
96
-
97
-
98
-
99
-
100
-
101
-
102
-
103
-
104
-
105
-
106
-
107
-
108
-
109
-
110
-
111
-
112
-
113
-
114
-
115
-
116
-
117
-
118
-
119
-
120
-
121
-
122
-
123
-
124
-
125
-
126
-
127
-
128
-
129
-
130
-
131
-
132
-
133
-
134
-
135
-
136
-
137
-
138
-
139
-
140
-
141
-
142
-
143
-
144
-
145
-
146
-
147
-
148
-
149
-
150
-
151
-
152
-
153
-
154
-
155
-
156
-
157
-
158
-
159
-
160
-
161
-
162
-
163
-
164
-
165
-
166
-
167
-
168
-
169
-
170
-
171
-
172
-
173
-
174
-
175
-
176
-
177
-
178
-
179
-
180
-
181
-
182
-
183
-
184
-
185
-
186
-
187
-
188
-
189
-
190
-
191
-
192
-
193
-
194
-
195
-
196
-
197
-
198
-
199
-
200
-
201
-
202
-
203
-
204
-
205
-
206
-
207
-
208
-
209
-
210
-
211
-
212
-
213
-
214
-
215
-
216
-
217
-
218
-
219
-
220
-
221
-
222
-
223
-
 224
224 -
 225
225 -
 226
226 -
 227
227 -
 228
228 -
 229
229 -
 230
230 -
 231
231 -
 232
232 -
 233
233 -
 234
234 -
235
-
236
-
237
-
238
-
239
-
240
-
241
-
242
-
243
-
244
-
245
-
246
-
247
-
248
-
249
-
250
-
251
-
252
-
253
-
254
-
255
-
256
-
257
-
258
-
259
-
260
-
261
-
262
-
263
-
264
-
265
 |
 |
