Brother International ADS-2500We Network Users Guide - Page 21
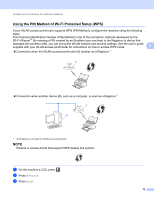
Personal Identification Number Method, see, Using the PIN Method of Wi-Fi Protected Setup WPS
 |
View all Brother International ADS-2500We manuals
Add to My Manuals
Save this manual to your list of manuals |
Page 21 highlights
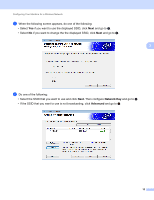
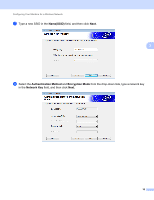
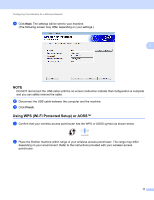
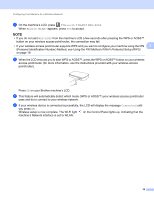
Configuring Your Machine for a Wireless Network 3 On the machine's LCD, press > Network > WLAN > WPS/AOSS. When Enable WLAN? appears, press Yes to accept. NOTE • If you do not start WPS/AOSS from the machine's LCD a few seconds after pressing the WPS or AOSS™ button on your wireless access point/router, the connection may fail. • If your wireless access point/router supports WPS and you want to configure your machine using the PIN 3 (Personal Identification Number) Method, see Using the PIN Method of Wi-Fi Protected Setup (WPS) on page 19. 4 When the LCD instructs you to start WPS or AOSS™, press the WPS or AOSS™ button on your wireless access point/router (for more information, see the instructions provided with your wireless access point/router). Press OK on your Brother machine's LCD. 5 This feature will automatically detect which mode (WPS or AOSS™) your wireless access point/router uses and try to connect to your wireless network. 6 If your wireless device is connected successfully, the LCD will display the message Connected until you press OK. Wireless setup is now complete. The Wi-Fi light on the Control Panel lights up, indicating that the machine's Network interface is set to WLAN. 18
-
 1
1 -
2
-
3
-
4
-
5
-
6
-
7
-
8
-
9
-
10
-
11
-
12
-
13
-
14
-
15
-
 16
16 -
 17
17 -
 18
18 -
 19
19 -
 20
20 -
 21
21 -
 22
22 -
 23
23 -
 24
24 -
 25
25 -
 26
26 -
27
-
28
-
29
-
30
-
31
-
32
-
33
-
34
-
35
-
36
-
37
-
38
-
39
-
40
-
41
-
42
-
43
-
44
-
45
-
46
-
47
-
48
-
49
-
50
-
51
-
52
-
53
-
54
-
55
-
56
-
57
-
58
-
59
-
60
-
61
-
62
-
63
-
64
-
65
-
66
-
67
-
68
-
69
-
70
-
71
-
72
-
73
-
74
-
75
-
76
-
77
 |
 |
