Brother International DCP1000 Users Manual - English - Page 32
Key Operations Table, Menu/Set, Options
 |
UPC - 012502565796
View all Brother International DCP1000 manuals
Add to My Manuals
Save this manual to your list of manuals |
Page 32 highlights
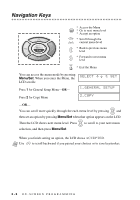
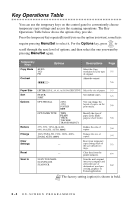
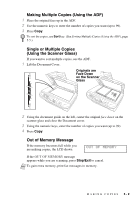
Key Operations Table You can use the temporary keys on the control panel to conveniently choose temporary copy settings and access the scanning operations. The Key Operations Table below shows the options they provide. Press the temporary key repeatedly until you see the option you want; some keys require pressing Menu/Set to select it. For the Options key, press or to scroll through the next level of options, and then select the one you want by pressing Menu/Set again. Temporary Keys Copy Mode AUTO TXT PH Contrast - + Options Descriptions Page Select the Copy resolution for your type 5-5 of original. Adjust the contrast. 5-6 Paper Size Sort Options Reduce Enlarge Clear Settings Reset Scan to LETTER, LEGAL, A4, A5, A6, B5, B6, EXECUTIVE Select the size of paper. 5-5 STACK SORT Sort multiple copies. 5-5 OPT:SPECIAL 2 IN 1 4 IN 1 POSTER OFF You can change the layout of copies on the print media. 5-6 OPT:PAPER TYPE THIN Identify the type of PLAIN paper in the multi- THICK purpose sheet feeder. 5-8 THICKER TRANSPARENCY 25%, 50%, 78% LGL>LTR, 94% A4>LTR, AUTO, 100% Reduce the size of copies. 5-4 104% EXE>LTR, 150%, 200%, 400%, ZOOM, AUTO, 100% Enlarge the size of copies. 5-4 Reset your temporary - copy settings back to the user default set- 5-3 tings. - Clear data from the printer memory. 6-4 SCAN TO E-MAIL SCAN/IMAGE SCAN/OCR Scan the next original into your computer and select the type of destination: word pro- 8-2 cessing, graphics or E-mail application. Note The factory setting (option) is shown in bold. 3-4 ON-SCREEN PROGRAMMING
-
 1
1 -
2
-
3
-
4
-
5
-
6
-
7
-
8
-
9
-
10
-
11
-
12
-
13
-
14
-
15
-
16
-
17
-
18
-
19
-
20
-
21
-
22
-
23
-
24
-
25
-
26
-
 27
27 -
 28
28 -
 29
29 -
 30
30 -
 31
31 -
 32
32 -
 33
33 -
 34
34 -
 35
35 -
 36
36 -
 37
37 -
38
-
39
-
40
-
41
-
42
-
43
-
44
-
45
-
46
-
47
-
48
-
49
-
50
-
51
-
52
-
53
-
54
-
55
-
56
-
57
-
58
-
59
-
60
-
61
-
62
-
63
-
64
-
65
-
66
-
67
-
68
-
69
-
70
-
71
-
72
-
73
-
74
-
75
-
76
-
77
-
78
-
79
-
80
-
81
-
82
-
83
-
84
-
85
-
86
-
87
-
88
-
89
-
90
-
91
-
92
-
93
-
94
-
95
-
96
-
97
-
98
-
99
-
100
-
101
-
102
-
103
-
104
-
105
-
106
-
107
-
108
-
109
-
110
-
111
-
112
-
113
-
114
-
115
-
116
-
117
-
118
-
119
-
120
-
121
-
122
-
123
-
124
-
125
-
126
-
127
-
128
-
129
 |
 |