Brother International Innov-ís 950D Users Manual - English - Page 134
Entering the pattern data
 |
View all Brother International Innov-ís 950D manuals
Add to My Manuals
Save this manual to your list of manuals |
Page 134 highlights
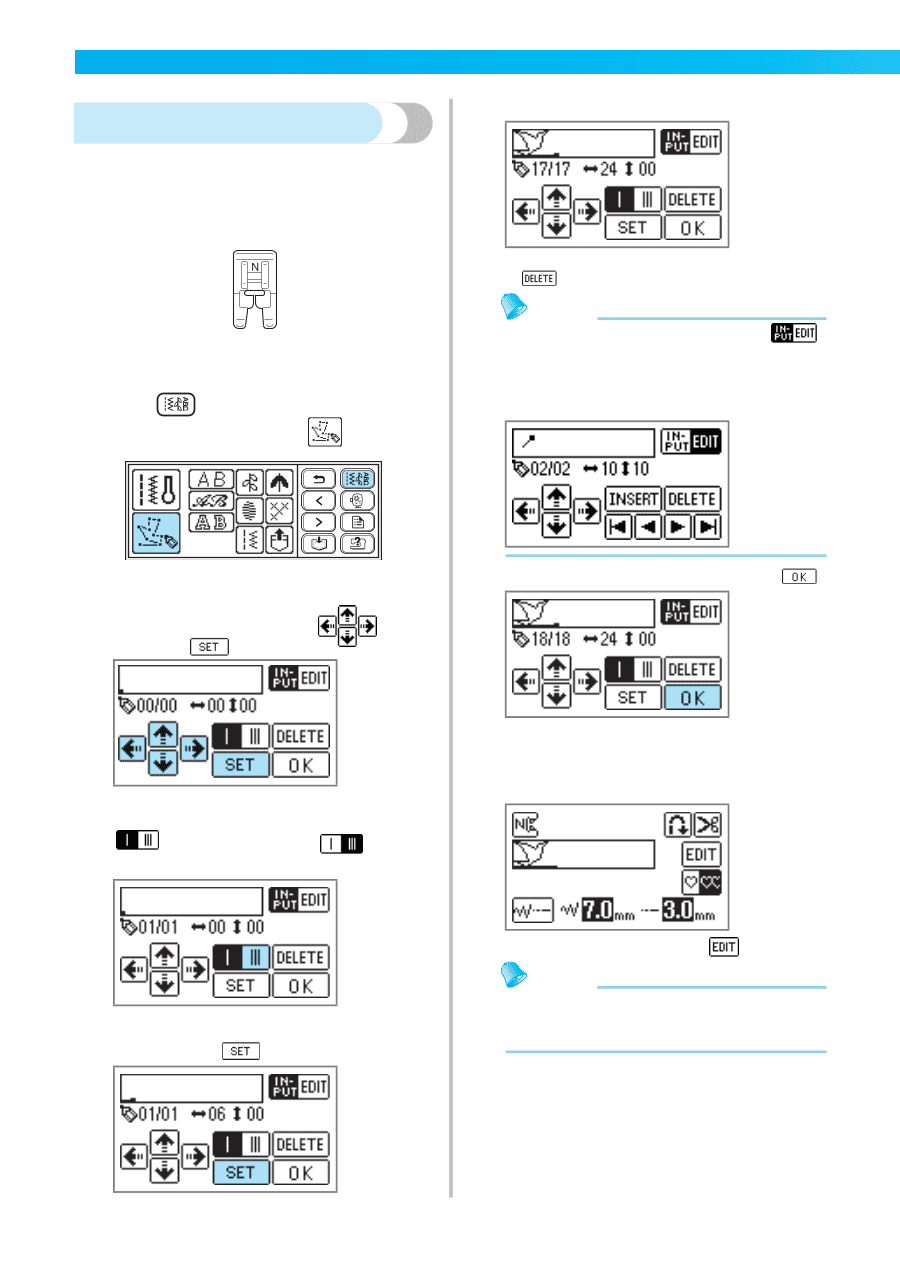
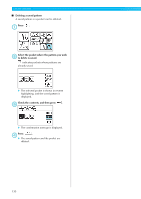
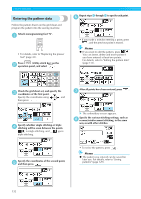
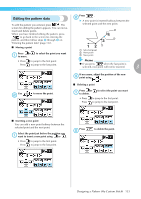
UTILITY STITCHES Entering the pattern data Repeat steps d through e to specify each point. f Follow the pattern drawn on the grid sheet and program the pattern into the sewing machine. Attach monogramming foot "N". a • For details, refer to "Replacing the presser foot" (page 43). Press (Utility stitch key) on the b operation panel, and select . • If you make a mistake entering a point, press , and the previous point is erased. Memo z If you want to edit the pattern, press . You can insert, delete and move points if you have entered at least two points. For details, refer to "Editing the pattern data" (page 133). Check the grid sheet set, and specify the c coordinates of the first point. Specify the coordinates using , and then press . After all points have been entered, press . g Specify whether single stitching or triple d stitching will be sewn between the points. is single stitching, and gives triple stitching. X The embroidery screen appears. Specify the various stitching settings, such as h reverse/reinforcement stitching, in the same way as with other stitches. Specify the coordinates of the second point, e and then press . • To revise the pattern, press . Memo z The pattern you entered can be saved for later use. For details, refer to "Saving patterns" (page 129). 132
-
 1
1 -
2
-
3
-
4
-
5
-
6
-
7
-
8
-
9
-
10
-
11
-
12
-
13
-
14
-
15
-
16
-
17
-
18
-
19
-
20
-
21
-
22
-
23
-
24
-
25
-
26
-
27
-
28
-
29
-
30
-
31
-
32
-
33
-
34
-
35
-
36
-
37
-
38
-
39
-
40
-
41
-
42
-
43
-
44
-
45
-
46
-
47
-
48
-
49
-
50
-
51
-
52
-
53
-
54
-
55
-
56
-
57
-
58
-
59
-
60
-
61
-
62
-
63
-
64
-
65
-
66
-
67
-
68
-
69
-
70
-
71
-
72
-
73
-
74
-
75
-
76
-
77
-
78
-
79
-
80
-
81
-
82
-
83
-
84
-
85
-
86
-
87
-
88
-
89
-
90
-
91
-
92
-
93
-
94
-
95
-
96
-
97
-
98
-
99
-
100
-
101
-
102
-
103
-
104
-
105
-
106
-
107
-
108
-
109
-
110
-
111
-
112
-
113
-
114
-
115
-
116
-
117
-
118
-
119
-
120
-
121
-
122
-
123
-
124
-
125
-
126
-
127
-
128
-
 129
129 -
 130
130 -
 131
131 -
 132
132 -
 133
133 -
 134
134 -
 135
135 -
 136
136 -
 137
137 -
 138
138 -
 139
139 -
140
-
141
-
142
-
143
-
144
-
145
-
146
-
147
-
148
-
149
-
150
-
151
-
152
-
153
-
154
-
155
-
156
-
157
-
158
-
159
-
160
-
161
-
162
-
163
-
164
-
165
-
166
-
167
-
168
-
169
-
170
-
171
-
172
-
173
-
174
-
175
-
176
-
177
-
178
-
179
-
180
-
181
-
182
-
183
-
184
-
185
-
186
-
187
-
188
-
189
-
190
-
191
-
192
-
193
-
194
-
195
-
196
 |
 |