Brother International Innov-ís 950D Users Manual - English - Page 54
Example
 |
View all Brother International Innov-ís 950D manuals
Add to My Manuals
Save this manual to your list of manuals |
Page 54 highlights
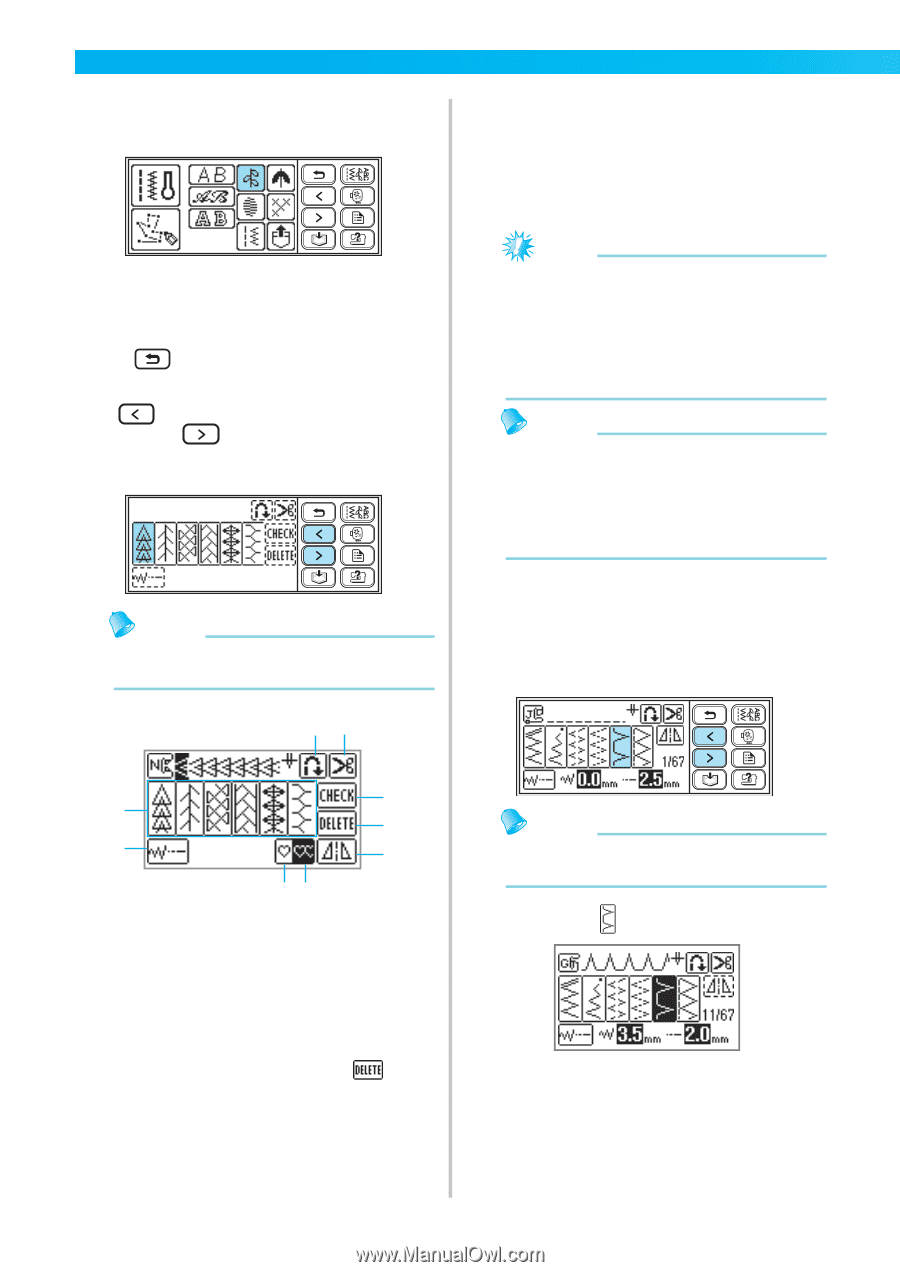
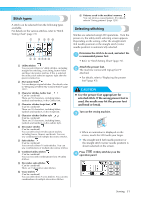
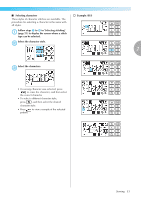
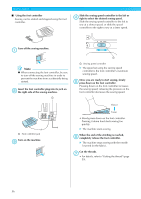
SEWING BASICS Select the stitch type. e † When selecting a decorative stitch If necessary, specify the settings for automatic g reverse/reinforcement stitching and adjust the stitch length, etc. • For details on sewing with each of the utility stitches, refer to Chapter3, "UTILITY STITCHES" which begins from page 72. X The screen containing the various stitches in the selected stitch type appears. • To select a different stitch type, press (Back key). Select a stitch. f (Previous page key) displays the previous page, and (Next page key) displays the next page. Memo z When touching the screen with your finger is difficult, use the included touch pen. ih Note z When a stitch is selected, the icon for the presser foot that should be used appears on the screen. Check that the correct presser foot is attached before starting to sew. If the wrong presser foot is installed, turn off the sewing machine, attach the correct presser foot, and then select the desired stitch again. Memo z For details on setting automatic reverse/ reinforcement stitching etc., refer to "Useful Functions" (page 64). z For details on adjusting the stitch width, stitch length and thread tension, refer to "Setting the Stitch" (page 61). ■ Selecting utility stitches Follow steps a to c in "Selecting stitching" a (page 51). Select a stitch. b g a f b e cd a Selects decorative stitch b Sets width and length c Selects single stitch sewing d Selects repeat sewing e Makes horizontal mirror image f Deletes a selected pattern g Used for checking combined pattern h Activates automatic thread cutting i Activates automatic reverse/reinforcement stitch • To select a different stitch, press to remove the selected pattern. Memo z The utility stitch selection screen appears when you turn on the machine. Example: When 11 is selected: 52
-
 1
1 -
2
-
3
-
4
-
5
-
6
-
7
-
8
-
9
-
10
-
11
-
12
-
13
-
14
-
15
-
16
-
17
-
18
-
19
-
20
-
21
-
22
-
23
-
24
-
25
-
26
-
27
-
28
-
29
-
30
-
31
-
32
-
33
-
34
-
35
-
36
-
37
-
38
-
39
-
40
-
41
-
42
-
43
-
44
-
45
-
46
-
47
-
48
-
 49
49 -
 50
50 -
 51
51 -
 52
52 -
 53
53 -
 54
54 -
 55
55 -
 56
56 -
 57
57 -
 58
58 -
 59
59 -
60
-
61
-
62
-
63
-
64
-
65
-
66
-
67
-
68
-
69
-
70
-
71
-
72
-
73
-
74
-
75
-
76
-
77
-
78
-
79
-
80
-
81
-
82
-
83
-
84
-
85
-
86
-
87
-
88
-
89
-
90
-
91
-
92
-
93
-
94
-
95
-
96
-
97
-
98
-
99
-
100
-
101
-
102
-
103
-
104
-
105
-
106
-
107
-
108
-
109
-
110
-
111
-
112
-
113
-
114
-
115
-
116
-
117
-
118
-
119
-
120
-
121
-
122
-
123
-
124
-
125
-
126
-
127
-
128
-
129
-
130
-
131
-
132
-
133
-
134
-
135
-
136
-
137
-
138
-
139
-
140
-
141
-
142
-
143
-
144
-
145
-
146
-
147
-
148
-
149
-
150
-
151
-
152
-
153
-
154
-
155
-
156
-
157
-
158
-
159
-
160
-
161
-
162
-
163
-
164
-
165
-
166
-
167
-
168
-
169
-
170
-
171
-
172
-
173
-
174
-
175
-
176
-
177
-
178
-
179
-
180
-
181
-
182
-
183
-
184
-
185
-
186
-
187
-
188
-
189
-
190
-
191
-
192
-
193
-
194
-
195
-
196
 |
 |