Brother International Innov-ís 950D Users Manual - English - Page 159
Embroidering
 |
View all Brother International Innov-ís 950D manuals
Add to My Manuals
Save this manual to your list of manuals |
Page 159 highlights
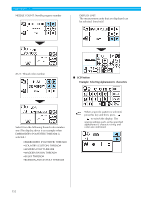
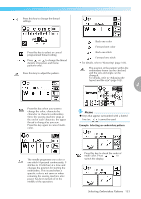
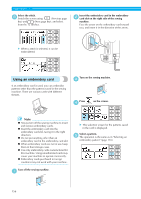
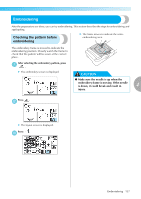
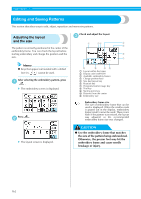
Embroidering After the preparations are done, you can try embroidering. This section describes the steps for embroidering and appliquéing. Checking the pattern before embroidering X The frame moves to indicate the entire embroidering area. The embroidery frame is moved to indicate the embroidering position. Closely watch the frame to check that the pattern will be sewn at the correct place. After selecting the embroidery pattern, press a . X The embroidery screen is displayed. CAUTION ● Make sure the needle is up when the embroidery frame is moving. If the needle is down, it could break and result in 4 injury. Press . b X The layout screen is displayed. Press . c Embroidering 157
-
 1
1 -
2
-
3
-
4
-
5
-
6
-
7
-
8
-
9
-
10
-
11
-
12
-
13
-
14
-
15
-
16
-
17
-
18
-
19
-
20
-
21
-
22
-
23
-
24
-
25
-
26
-
27
-
28
-
29
-
30
-
31
-
32
-
33
-
34
-
35
-
36
-
37
-
38
-
39
-
40
-
41
-
42
-
43
-
44
-
45
-
46
-
47
-
48
-
49
-
50
-
51
-
52
-
53
-
54
-
55
-
56
-
57
-
58
-
59
-
60
-
61
-
62
-
63
-
64
-
65
-
66
-
67
-
68
-
69
-
70
-
71
-
72
-
73
-
74
-
75
-
76
-
77
-
78
-
79
-
80
-
81
-
82
-
83
-
84
-
85
-
86
-
87
-
88
-
89
-
90
-
91
-
92
-
93
-
94
-
95
-
96
-
97
-
98
-
99
-
100
-
101
-
102
-
103
-
104
-
105
-
106
-
107
-
108
-
109
-
110
-
111
-
112
-
113
-
114
-
115
-
116
-
117
-
118
-
119
-
120
-
121
-
122
-
123
-
124
-
125
-
126
-
127
-
128
-
129
-
130
-
131
-
132
-
133
-
134
-
135
-
136
-
137
-
138
-
139
-
140
-
141
-
142
-
143
-
144
-
145
-
146
-
147
-
148
-
149
-
150
-
151
-
152
-
153
-
 154
154 -
 155
155 -
 156
156 -
 157
157 -
 158
158 -
 159
159 -
 160
160 -
 161
161 -
 162
162 -
 163
163 -
 164
164 -
165
-
166
-
167
-
168
-
169
-
170
-
171
-
172
-
173
-
174
-
175
-
176
-
177
-
178
-
179
-
180
-
181
-
182
-
183
-
184
-
185
-
186
-
187
-
188
-
189
-
190
-
191
-
192
-
193
-
194
-
195
-
196
 |
 |

Embroidering
157
4
— — — — — — — — — — — — — — — — — — — — — — — — — — — — — — — — — — — — — — — — — — — — — — — — — — — —
Embroidering
After the preparations are done, you can try embroidering. This section describes the steps for embroidering and
appliqu
é
ing.
Checking the pattern before
embroidering
The embroidery frame is moved to indicate the
embroidering position. Closely watch the frame to
check that the pattern will be sewn at the correct
place.
a
After selecting the embroidery pattern, press
.
±
The embroidery screen is displayed.
b
Press
.
±
The layout screen is displayed.
c
Press
.
±
The frame moves to indicate the entire
embroidering area.
CAUTION
●
Make sure the needle is up when the
embroidery frame is moving. If the needle
is down, it could break and result in
injury.