Brother International Innov-ís 950D Users Manual - English - Page 166
Adjusting the thread tension
 |
View all Brother International Innov-ís 950D manuals
Add to My Manuals
Save this manual to your list of manuals |
Page 166 highlights
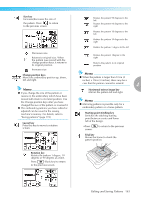
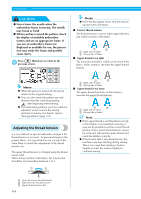
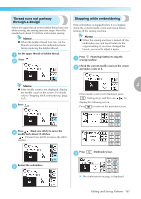
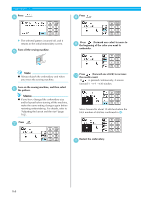
EMBROIDERY CAUTION ● Never lower the needle when the embroidery frame is moving. The needle may break or bend. ● When you have revised the pattern, check the display of available embroidery frames and use an appropriate frame. If you use an embroidery frame not displayed as available for use, the presser foot may strike the frame and possibly cause injury. Press (Back key) to return to the d previous screen. Memo z If the stitches appear loose, turn the tension up one notch and resew. ■ Correct thread tension The thread tension is correct when upper thread is just visible on back of the fabric. a b a Right side of fabric b Wrong side of fabric ■ Upper thread is too tight The lower thread will be visible on the front of the fabric. In this instance, decrease the upper thread tension. Memo z When the power is turned off, the layout returns to the original setting. z You can also check the pattern size and distance from the center by pressing after beginning embroidering. z The embroidery patterns you have edited or adjusted can be saved in the sewing machine's memory. For details, refer to "Saving patterns" (page 174). Adjusting the thread tension It is very difficult to rip out embroidery designs if the thread tension is incorrect. To prevent damage to the project fabric, it is a good idea to use a scrap of the same fabric to check the adjustment of the thread tension, etc. The upper thread tension is changed using the thread tension dial. When doing machine embroidery, the tension dial should be set somewhere between 2 to 6. a b a b a Right side of fabric b Wrong side of fabric ■ Upper thread is too loose The upper thread has slack. In this instance, increase the upper thread tension. a b a Right side of fabric b Wrong side of fabric Note z If the upper thread is not threaded correctly or the bobbin is not installed correctly, it may not be possible to set the correct thread tension. If the correct thread tension cannot be achieved, rethread the upper thread and insert the bobbin correctly. z If the tension dial is set extremely low, the machine may stop stitching during sewing. This is not a sign that anything's broken. Simply increase the tension slightly to continue sewing. c a Loose (Decrease thread tension) b Tight (Increase thread tension) c Upper thread tension dial 164
-
 1
1 -
2
-
3
-
4
-
5
-
6
-
7
-
8
-
9
-
10
-
11
-
12
-
13
-
14
-
15
-
16
-
17
-
18
-
19
-
20
-
21
-
22
-
23
-
24
-
25
-
26
-
27
-
28
-
29
-
30
-
31
-
32
-
33
-
34
-
35
-
36
-
37
-
38
-
39
-
40
-
41
-
42
-
43
-
44
-
45
-
46
-
47
-
48
-
49
-
50
-
51
-
52
-
53
-
54
-
55
-
56
-
57
-
58
-
59
-
60
-
61
-
62
-
63
-
64
-
65
-
66
-
67
-
68
-
69
-
70
-
71
-
72
-
73
-
74
-
75
-
76
-
77
-
78
-
79
-
80
-
81
-
82
-
83
-
84
-
85
-
86
-
87
-
88
-
89
-
90
-
91
-
92
-
93
-
94
-
95
-
96
-
97
-
98
-
99
-
100
-
101
-
102
-
103
-
104
-
105
-
106
-
107
-
108
-
109
-
110
-
111
-
112
-
113
-
114
-
115
-
116
-
117
-
118
-
119
-
120
-
121
-
122
-
123
-
124
-
125
-
126
-
127
-
128
-
129
-
130
-
131
-
132
-
133
-
134
-
135
-
136
-
137
-
138
-
139
-
140
-
141
-
142
-
143
-
144
-
145
-
146
-
147
-
148
-
149
-
150
-
151
-
152
-
153
-
154
-
155
-
156
-
157
-
158
-
159
-
160
-
 161
161 -
 162
162 -
 163
163 -
 164
164 -
 165
165 -
 166
166 -
 167
167 -
 168
168 -
 169
169 -
 170
170 -
 171
171 -
172
-
173
-
174
-
175
-
176
-
177
-
178
-
179
-
180
-
181
-
182
-
183
-
184
-
185
-
186
-
187
-
188
-
189
-
190
-
191
-
192
-
193
-
194
-
195
-
196
 |
 |