Brother International MFC-9340CDW Network Users Manual - English - Page 93
How to create a CSR, Auto Register IPv4
 |
View all Brother International MFC-9340CDW manuals
Add to My Manuals
Save this manual to your list of manuals |
Page 93 highlights
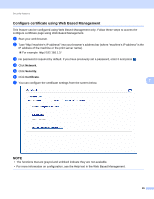
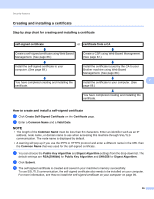
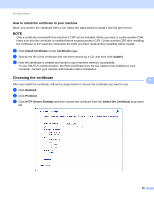
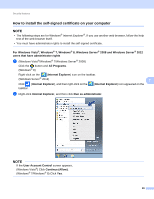
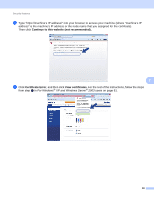
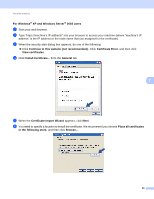
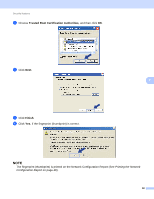
Security features How to create a CSR 7 a Click Create CSR on the Certificate page. b Enter a Common Name and your information, such as Organization. NOTE • We recommend that the Root Certificate from the CA be installed on your computer before creating the CSR. • The length of the Common Name must be less than 64 characters. Enter an identifier such as an IP address, node name, or domain name to use when accessing this printer through SSL/TLS communication. The node name is displayed by default. The Common Name is required. • A warning will pop-up if you enter a different name in the URL than the Common Name that was used for the certificate. • The length of the Organization, the Organization Unit, the City/Locality and the State/Province must be less than 64 characters. • The Country/Region should be an ISO 3166 country code composed of two characters. 7 • If you are configuring X.509v3 certificate extension, choose the Configure extended partition check box and then choose Auto (Register IPv4) or Manual. c You can choose the Public Key Algorithm and Digest Algorithm settings from the drop-down list. The default settings are RSA(2048bit) for Public Key Algorithm and SHA256 for Digest Algorithm. d Click Submit. e When the contents of the CSR appear, click Save to save the CSR file to your computer. f The CSR is created. NOTE • Follow your CA policy regarding the method to send a CSR to your CA. • If you are using Enterprise root CA of Windows Server® 2003/2008/2012, we recommend using the Web Server for the certificate template when creating the Client Certificate for secure management. If you are creating a Client Certificate for an IEEE 802.1x environment with EAP-TLS authentication, we recommend using User for the certificate template. For more information, see the SSL communication page from the top page for your model at http://solutions.brother.com/. 87
-
 1
1 -
2
-
3
-
4
-
5
-
6
-
7
-
8
-
9
-
10
-
11
-
12
-
13
-
14
-
15
-
16
-
17
-
18
-
19
-
20
-
21
-
22
-
23
-
24
-
25
-
26
-
27
-
28
-
29
-
30
-
31
-
32
-
33
-
34
-
35
-
36
-
37
-
38
-
39
-
40
-
41
-
42
-
43
-
44
-
45
-
46
-
47
-
48
-
49
-
50
-
51
-
52
-
53
-
54
-
55
-
56
-
57
-
58
-
59
-
60
-
61
-
62
-
63
-
64
-
65
-
66
-
67
-
68
-
69
-
70
-
71
-
72
-
73
-
74
-
75
-
76
-
77
-
78
-
79
-
80
-
81
-
82
-
83
-
84
-
85
-
86
-
87
-
 88
88 -
 89
89 -
 90
90 -
 91
91 -
 92
92 -
 93
93 -
 94
94 -
 95
95 -
 96
96 -
 97
97 -
 98
98 -
99
-
100
-
101
-
102
-
103
-
104
-
105
-
106
-
107
-
108
-
109
-
110
-
111
-
112
-
113
-
114
-
115
-
116
-
117
-
118
-
119
-
120
-
121
-
122
-
123
-
124
-
125
-
126
-
127
-
128
-
129
-
130
-
131
-
132
-
133
-
134
-
135
-
136
-
137
-
138
-
139
-
140
-
141
-
142
-
143
-
144
-
145
-
146
-
147
-
148
-
149
-
150
 |
 |