Brother International NX-250 Users Manual - English - Page 33
Replacing the needle
 |
View all Brother International NX-250 manuals
Add to My Manuals
Save this manual to your list of manuals |
Page 33 highlights
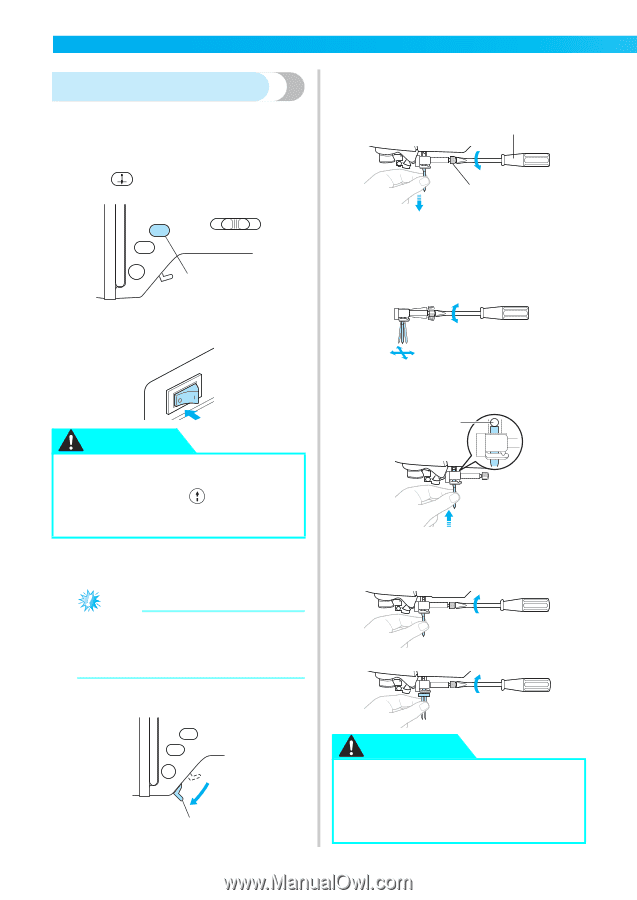
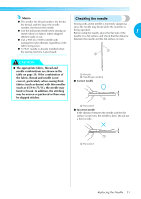
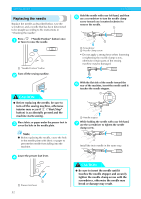
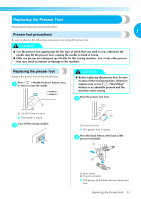
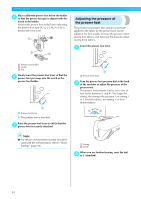
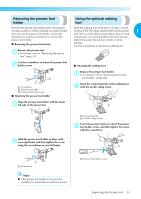
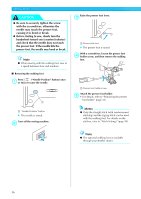
GETTING READY Replacing the needle Replace the needle as described below. Use the screwdriver and a needle that has been determined to be straight according to the instructions in "Checking the needle". Hold the needle with your left hand, and then 5 use a screwdriver to turn the needle clamp screw toward you (counterclockwise) to remove the needle. 1 Press ("Needle Position" button) once 1 or twice to raise the needle. 2 1 1 "Needle Position" button Turn off the sewing machine. 2 1 Screwdriver 2 Needle clamp screw • Do not apply a strong force when loosening or tightening the needle clamp screw, otherwise certain parts of the sewing machine may be damaged. CAUTION ● Before replacing the needle, be sure to turn off the sewing machine, otherwise injuries may occur if ("Start/Stop" button) is accidentally pressed and the machine starts sewing. Place fabric or paper under the presser foot to 3 cover the hole in the needle plate. With the flat side of the needle toward the 6 rear of the machine, insert the needle until it touches the needle stopper. 1 1 Needle stopper While holding the needle with your left hand, 7 use the screwdriver to tighten the needle clamp screw. Note ● Before replacing the needle, cover the hole in the needle plate with fabric or paper to prevent the needle from falling into the machine. Install the twin needle in the same way. Lower the presser foot lever. 4 1 1 Presser foot lever 32 CAUTION ● Be sure to insert the needle until it touches the needle stopper and securely tighten the needle clamp screw with the screwdriver, otherwise the needle may break or damage may result.
-
 1
1 -
2
-
3
-
4
-
5
-
6
-
7
-
8
-
9
-
10
-
11
-
12
-
13
-
14
-
15
-
16
-
17
-
18
-
19
-
20
-
21
-
22
-
23
-
24
-
25
-
26
-
27
-
 28
28 -
 29
29 -
 30
30 -
 31
31 -
 32
32 -
 33
33 -
 34
34 -
 35
35 -
 36
36 -
 37
37 -
 38
38 -
39
-
40
-
41
-
42
-
43
-
44
-
45
-
46
-
47
-
48
-
49
-
50
-
51
-
52
-
53
-
54
-
55
-
56
-
57
-
58
-
59
-
60
-
61
-
62
-
63
-
64
-
65
-
66
-
67
-
68
-
69
-
70
-
71
-
72
-
73
-
74
-
75
-
76
-
77
-
78
-
79
-
80
-
81
-
82
-
83
-
84
-
85
-
86
-
87
-
88
-
89
-
90
-
91
-
92
-
93
-
94
-
95
-
96
-
97
-
98
-
99
-
100
-
101
-
102
-
103
-
104
-
105
-
106
-
107
-
108
-
109
-
110
 |
 |