Brother International NX-250 Users Manual - English - Page 35
Adjusting the pressure of, the presser foot
 |
View all Brother International NX-250 manuals
Add to My Manuals
Save this manual to your list of manuals |
Page 35 highlights
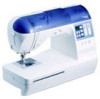
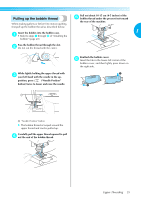
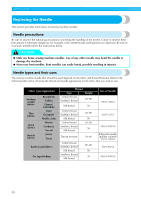
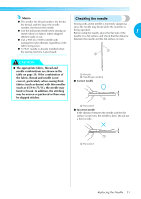
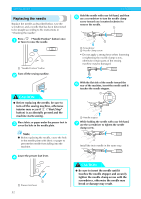
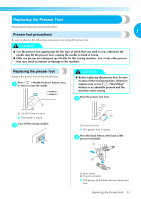
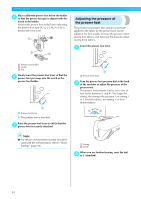
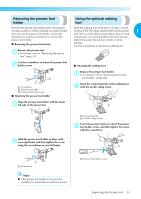
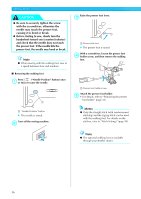
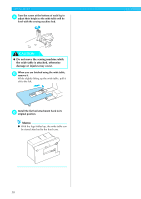
GETTING READY Place a different presser foot below the holder 5 so that the presser foot pin is aligned with the notch in the holder. Position the presser foot so the letter indicating the presser foot type (A, G, I, J, M, N or R) is positioned to be read. a Adjusting the pressure of the presser foot The presser foot pressure (the amount of pressure applied to the fabric by the presser foot) can be adjusted. For best results, increase the pressure when sewing thin fabrics, and decrease the pressure when sewing thick fabrics. b c Lower the presser foot lever. 1 1 Presser foot holder 2 Notch 3 Pin Slowly lower the presser foot lever so that the 6 presser foot pin snaps into the notch in the presser foot holder. 1 1 Presser foot lever X The presser foot is attached. Raise the presser foot lever to check that the 7 presser foot is securely attached. 1 1 Presser foot lever Turn the presser foot pressure dial at the back 2 of the machine to adjust the pressure of the presser foot. The presser foot pressure can be set to one of four levels (between 1 and 4). The larger the setting, the stronger the pressure. Use setting 1 or 2 for thick fabrics, use setting 3 or 4 for thinner fabrics. a b Note ● For details on the presser foot that should be used with the selected stitch, refer to "Stitch Settings" (page 94). 1 Strong 2 Weak When you are finished sewing, reset the dial 3 to 3 (standard). 34
-
 1
1 -
2
-
3
-
4
-
5
-
6
-
7
-
8
-
9
-
10
-
11
-
12
-
13
-
14
-
15
-
16
-
17
-
18
-
19
-
20
-
21
-
22
-
23
-
24
-
25
-
26
-
27
-
28
-
29
-
 30
30 -
 31
31 -
 32
32 -
 33
33 -
 34
34 -
 35
35 -
 36
36 -
 37
37 -
 38
38 -
 39
39 -
 40
40 -
41
-
42
-
43
-
44
-
45
-
46
-
47
-
48
-
49
-
50
-
51
-
52
-
53
-
54
-
55
-
56
-
57
-
58
-
59
-
60
-
61
-
62
-
63
-
64
-
65
-
66
-
67
-
68
-
69
-
70
-
71
-
72
-
73
-
74
-
75
-
76
-
77
-
78
-
79
-
80
-
81
-
82
-
83
-
84
-
85
-
86
-
87
-
88
-
89
-
90
-
91
-
92
-
93
-
94
-
95
-
96
-
97
-
98
-
99
-
100
-
101
-
102
-
103
-
104
-
105
-
106
-
107
-
108
-
109
-
110
 |
 |