Brother International NX-250 Users Manual - English - Page 88
Fagoting
 |
View all Brother International NX-250 manuals
Add to My Manuals
Save this manual to your list of manuals |
Page 88 highlights
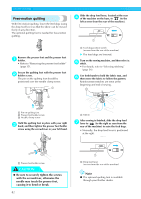
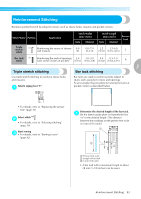
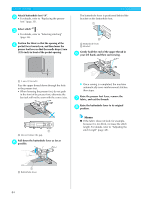
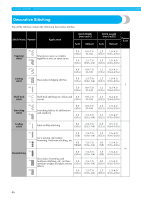
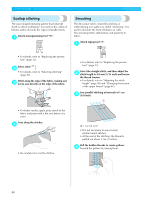
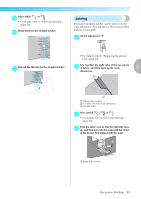
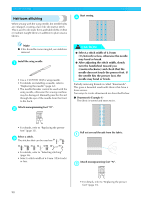
Stitch Name Pattern Application Stitch Width [mm (inch)] Auto Manual Stitch Length [mm (inch)] Auto Manual Presser Foot Ladder 27 stitch 4.0 0.0-7.0 (3/16) (0-1/4) 3.0 2.0-4.0 (1/8) (1/16-3/16) Rick-rack 28 stitch Decorative 29 stitch Decorative stitching 4.0 0.0-7.0 2.5 1.0-4.0 (3/16) (0-1/4) (3/32) (1/16-3/16) J 5.5 0.0-7.0 1.6 1.0-4.0 (7/32) (0-1/4) (1/16) (1/16-3/16) Serpentine 30 stitch 5.0 1.5-7.0 1.0 0.2-4.0 (3/16) (1/16-1/4) (1/16) (1/64-3/16) N 3 Fagoting Stitching across an open seam is called "fagoting". It is used on blouses and children's clothing. This stitch is more decorative when thicker thread is used. Use an iron to fold the two pieces of fabric 1 along their seams. Baste the two pieces of fabric, separated by 2 about 4 mm (3/16 inch), onto thin paper or a sheet of water-soluble stabilizer. If you draw a line down the middle of the thin paper or water-soluble stabilizer, sewing is easier. 3 Select stitch 25 or 26 . 4 • For details, refer to "Selecting stitching" (page 56). Set the stitch width to 7.0 mm (1/4 inch). 5 • For details, refer to "Adjusting the stitch width" (page 47). Sew with the center of the presser foot aligned 6 along the center of the two pieces of fabric. 1 2 1 Thin paper or water soluble stabilizer 2 Basting stitching 3 4 mm (3/16 inch) Attach zigzag foot "J". 3 J After sewing is finished, remove the paper. 7 • For details, refer to "Replacing the presser foot" (page 33). Decorative Stitching 87
-
 1
1 -
2
-
3
-
4
-
5
-
6
-
7
-
8
-
9
-
10
-
11
-
12
-
13
-
14
-
15
-
16
-
17
-
18
-
19
-
20
-
21
-
22
-
23
-
24
-
25
-
26
-
27
-
28
-
29
-
30
-
31
-
32
-
33
-
34
-
35
-
36
-
37
-
38
-
39
-
40
-
41
-
42
-
43
-
44
-
45
-
46
-
47
-
48
-
49
-
50
-
51
-
52
-
53
-
54
-
55
-
56
-
57
-
58
-
59
-
60
-
61
-
62
-
63
-
64
-
65
-
66
-
67
-
68
-
69
-
70
-
71
-
72
-
73
-
74
-
75
-
76
-
77
-
78
-
79
-
80
-
81
-
82
-
 83
83 -
 84
84 -
 85
85 -
 86
86 -
 87
87 -
 88
88 -
 89
89 -
 90
90 -
 91
91 -
 92
92 -
 93
93 -
94
-
95
-
96
-
97
-
98
-
99
-
100
-
101
-
102
-
103
-
104
-
105
-
106
-
107
-
108
-
109
-
110
 |
 |
