Brother International NX-250 Users Manual - English - Page 74
Inserting a side zipper
 |
View all Brother International NX-250 manuals
Add to My Manuals
Save this manual to your list of manuals |
Page 74 highlights
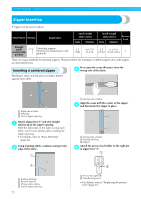
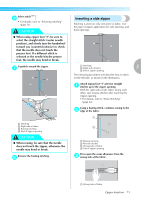
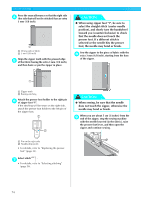
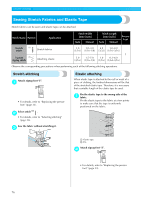
Select stitch 01 . 6 • For details, refer to "Selecting stitching" (page 56). CAUTION ● When using zipper foot "I", be sure to select the straight stitch (center needle position), and slowly turn the handwheel toward you (counterclockwise) to check that the needle does not touch the presser foot. If a different stitch is selected or the needle hits the presser foot, the needle may bend or break. Topstitch around the zipper. 7 1 3 2 4 1 Stitching 2 Right side of fabric 3 Basting stitching 4 End of zipper opening CAUTION ● When sewing, be sure that the needle does not touch the zipper, otherwise the needle may bend or break. Remove the basting stitching. 8 Inserting a side zipper Stitching is sewn on only one piece of fabric. Use this type of zipper application for side openings and back openings. 1 2 3 1 Stitching 2 Right side of fabric 3 3 End of zipper opening The following procedure will describe how to stitch on the left side, as shown in the illustration. Attach zigzag foot "J" and sew straight 1 stitches up to the zipper opening. With the right sides of the fabric facing each other, sew reverse stitches after reaching the zipper opening. • For details, refer to "Basic Stitching" (page 62). Using a basting stitch, continue sewing to the 2 edge of the fabric. 1 3 2 4 1 Basting stitching 2 Reverse stitches 3 Wrong side of fabric 4 End of zipper opening Press open the seam allowance from the 3 wrong side of the fabric. 1 1 Wrong side of fabric Zipper Insertion 73
-
 1
1 -
2
-
3
-
4
-
5
-
6
-
7
-
8
-
9
-
10
-
11
-
12
-
13
-
14
-
15
-
16
-
17
-
18
-
19
-
20
-
21
-
22
-
23
-
24
-
25
-
26
-
27
-
28
-
29
-
30
-
31
-
32
-
33
-
34
-
35
-
36
-
37
-
38
-
39
-
40
-
41
-
42
-
43
-
44
-
45
-
46
-
47
-
48
-
49
-
50
-
51
-
52
-
53
-
54
-
55
-
56
-
57
-
58
-
59
-
60
-
61
-
62
-
63
-
64
-
65
-
66
-
67
-
68
-
 69
69 -
 70
70 -
 71
71 -
 72
72 -
 73
73 -
 74
74 -
 75
75 -
 76
76 -
 77
77 -
 78
78 -
 79
79 -
80
-
81
-
82
-
83
-
84
-
85
-
86
-
87
-
88
-
89
-
90
-
91
-
92
-
93
-
94
-
95
-
96
-
97
-
98
-
99
-
100
-
101
-
102
-
103
-
104
-
105
-
106
-
107
-
108
-
109
-
110
 |
 |
