Brother International NX-250 Users Manual - English - Page 58
Example] Selecting stitch
 |
View all Brother International NX-250 manuals
Add to My Manuals
Save this manual to your list of manuals |
Page 58 highlights
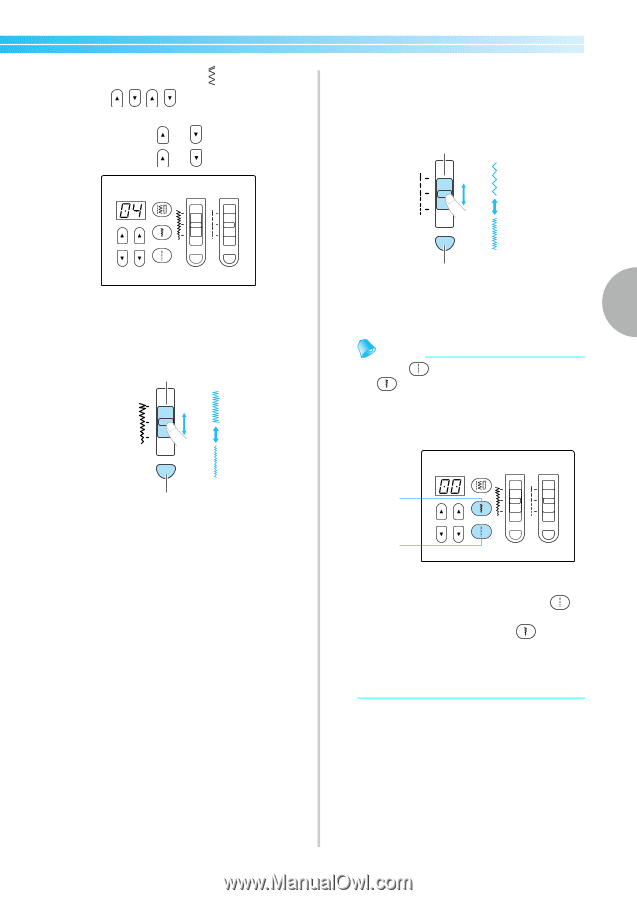
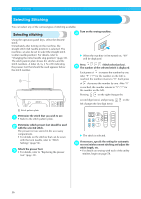
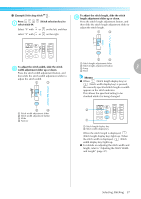
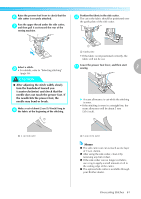
■ [Example] Selecting stitch 04 . Press 1 select stitch 04. Select "0" with select "4" with (Stitch selection key) to or on the left, and then or on the right. To adjust the stitch length, slide the stitch 3 length adjustment slider up or down. Press the stitch length adjustment button, and then slide the stitch length adjustment slider to adjust the stitch length. 1 3 To adjust the stitch width, slide the stitch 2 width adjustment slider up or down. Press the stitch width adjustment button, and then slide the stitch width adjustment slider to adjust the stitch width. 1 3 2 4 1 Stitch width adjustment slider 2 Stitch width adjustment button 3 Wide 4 Narrow 2 4 1 Stitch length adjustment slider 2 Stitch length adjustment button 3 Long 3 4 Short Memo ● When (Stitch length display key) or (Stitch width display key) is pressed, the currently specified stitch length or width appears in the stitch indicator. This allows the specified setting to be checked while it is being changed. 2 1 1 Stitch length display key 2 Stitch width display key When the stitch length is displayed, (Stitch length display key) lights up. When the stitch width is displayed, (Stitch width display key) lights up. ● For details on adjusting the stitch width and length, refer to "Adjusting the Stitch Width and Length" (page 47). Selecting Stitching 57
-
 1
1 -
2
-
3
-
4
-
5
-
6
-
7
-
8
-
9
-
10
-
11
-
12
-
13
-
14
-
15
-
16
-
17
-
18
-
19
-
20
-
21
-
22
-
23
-
24
-
25
-
26
-
27
-
28
-
29
-
30
-
31
-
32
-
33
-
34
-
35
-
36
-
37
-
38
-
39
-
40
-
41
-
42
-
43
-
44
-
45
-
46
-
47
-
48
-
49
-
50
-
51
-
52
-
 53
53 -
 54
54 -
 55
55 -
 56
56 -
 57
57 -
 58
58 -
 59
59 -
 60
60 -
 61
61 -
 62
62 -
 63
63 -
64
-
65
-
66
-
67
-
68
-
69
-
70
-
71
-
72
-
73
-
74
-
75
-
76
-
77
-
78
-
79
-
80
-
81
-
82
-
83
-
84
-
85
-
86
-
87
-
88
-
89
-
90
-
91
-
92
-
93
-
94
-
95
-
96
-
97
-
98
-
99
-
100
-
101
-
102
-
103
-
104
-
105
-
106
-
107
-
108
-
109
-
110
 |
 |