Canon Color imageCLASS MF8280Cw Basic Guide - Page 32
Selecting the Document Type, Adjusting the Sharpness, to highlight <Original Type>
 |
View all Canon Color imageCLASS MF8280Cw manuals
Add to My Manuals
Save this manual to your list of manuals |
Page 32 highlights
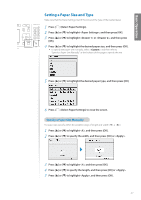
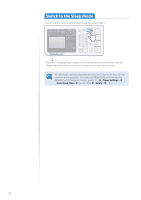
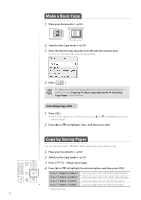
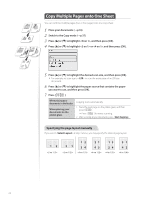
3 Press [▲] or [▼] to highlight , and then press [OK]. 4 Press [◄] or [►] to adjust the density , and then press . - : Less density (lighter) + : More density (darker) You can adjust the background color. For details, see [Copying] [Various Copy Settings] [Adjusting Density] in the e-Manual. 5 Press [ ]. Selecting the Document Type Select the appropriate document type. 1 Place your documents (→p.18). 2 Switch to the Copy mode (→ p.15). 3 Press [▲] or [▼] to highlight , and then press [OK]. 4 Press [▲] or [▼] to highlight the appropriate document type, and then press [OK]. Suitable for documents that contain text, photos, and maps. (Scanned documents are at a low resolution at high speed.) Suitable for documents that contain text, photos, and maps. Suitable for documents that contain text, photos, and maps. (Scanned documents are at a high resolution at low speed.) You can also adjust the level of priority given to the quality of the text or photos. For details, see [Copying] [Various Copy Settings] [Selecting Document Type] in the e-Manual. Suitable for documents that contain printed photos. Best suited for text-only documents. 5 Press [ ]. Adjusting the Sharpness You can sharpen or soften the edges of images by adjusting the sharpness. 1 Place your documents (→p.18). 2 Switch to the Copy mode (→p.15). 3 Press [▲] or [▼] to highlight , and then press [OK]. 32
-
 1
1 -
2
-
3
-
4
-
5
-
6
-
7
-
8
-
9
-
10
-
11
-
12
-
13
-
14
-
15
-
16
-
17
-
18
-
19
-
20
-
21
-
22
-
23
-
24
-
25
-
26
-
 27
27 -
 28
28 -
 29
29 -
 30
30 -
 31
31 -
 32
32 -
 33
33 -
 34
34 -
 35
35 -
 36
36 -
 37
37 -
38
-
39
-
40
-
41
-
42
-
43
-
44
-
45
-
46
-
47
-
48
-
49
-
50
-
51
-
52
-
53
-
54
-
55
-
56
-
57
-
58
-
59
-
60
-
61
-
62
-
63
-
64
-
65
-
66
-
67
-
68
-
69
-
70
-
71
-
72
-
73
-
74
-
75
-
76
-
77
-
78
-
79
-
80
-
81
-
82
-
83
-
84
-
85
-
86
-
87
-
88
-
89
-
90
-
91
-
92
-
93
-
94
-
95
-
96
-
97
-
98
-
99
-
100
-
101
-
102
-
103
-
104
-
105
-
106
-
107
-
108
-
109
-
110
-
111
-
112
-
113
-
114
-
115
-
116
-
117
-
118
-
119
-
120
 |
 |
