Canon Color imageCLASS MF8280Cw Basic Guide - Page 58
Sending a Fax to Multiple Destinations (Sequential Broadcast)
 |
View all Canon Color imageCLASS MF8280Cw manuals
Add to My Manuals
Save this manual to your list of manuals |
Page 58 highlights
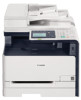
5 Press [ ] (B&W). • When is set to , this feature is not available. • The destinations and their fax settings in Manual Sending are not available for this feature. • Turning OFF the machine or setting to deletes the past destinations and their fax settings, and disables this feature. Sending a Fax to Multiple Destinations (Sequential Broadcast) You can send the same document to multiple recipients at once. 1 Place your documents (→p.18). 2 Switch to the Fax mode (→p.15). 3 Specify the destination. • Specify the destination using the Address Book or the numeric keys. • To specify a destination using the numeric keys, enter the fax number and press . To specify additional destinations, press [▲] or [▼] to select , and repeat the procedure. • You can also specify the destination from an LDAP server. For details, see the e-Manual. 4 Repeat step 3 to enter additional destinations as needed. • is available up to 10 destinations. • To confirm or delete destinations, press [▲] or [▼] to highlight , and then press [OK]. 5 Adjust the image quality of the documents as needed (→p.52). 6 Press [ ] (B&W). Sending a Fax to an International Destination (Adding Pauses) When sending faxes to international destinations, it is sometimes difficult to connect to a recipient, due to the long distance that the signal must travel. You can insert a pause after the international access code to reduce this problem. 1 Place your documents (→p.18). 2 Switch to the Fax mode (→p.15). 3 Use the numeric keys to enter the international access code. • For details about international access codes, contact your telephone service provider. 4 Press [▲] or [▼] to highlight , and then press [OK]. • The letter is displayed to indicate the pause. • The default pause added before the number is two seconds. To change the pause time, see "" (→p.67). • To add another pause, press [OK] again. 58
-
 1
1 -
2
-
3
-
4
-
5
-
6
-
7
-
8
-
9
-
10
-
11
-
12
-
13
-
14
-
15
-
16
-
17
-
18
-
19
-
20
-
21
-
22
-
23
-
24
-
25
-
26
-
27
-
28
-
29
-
30
-
31
-
32
-
33
-
34
-
35
-
36
-
37
-
38
-
39
-
40
-
41
-
42
-
43
-
44
-
45
-
46
-
47
-
48
-
49
-
50
-
51
-
52
-
 53
53 -
 54
54 -
 55
55 -
 56
56 -
 57
57 -
 58
58 -
 59
59 -
 60
60 -
 61
61 -
 62
62 -
 63
63 -
64
-
65
-
66
-
67
-
68
-
69
-
70
-
71
-
72
-
73
-
74
-
75
-
76
-
77
-
78
-
79
-
80
-
81
-
82
-
83
-
84
-
85
-
86
-
87
-
88
-
89
-
90
-
91
-
92
-
93
-
94
-
95
-
96
-
97
-
98
-
99
-
100
-
101
-
102
-
103
-
104
-
105
-
106
-
107
-
108
-
109
-
110
-
111
-
112
-
113
-
114
-
115
-
116
-
117
-
118
-
119
-
120
 |
 |