Canon Color imageCLASS MF8280Cw Basic Guide - Page 78
Scan a Document with MF Toolbox, Performing a Scan Using a Shortcut Key
 |
View all Canon Color imageCLASS MF8280Cw manuals
Add to My Manuals
Save this manual to your list of manuals |
Page 78 highlights
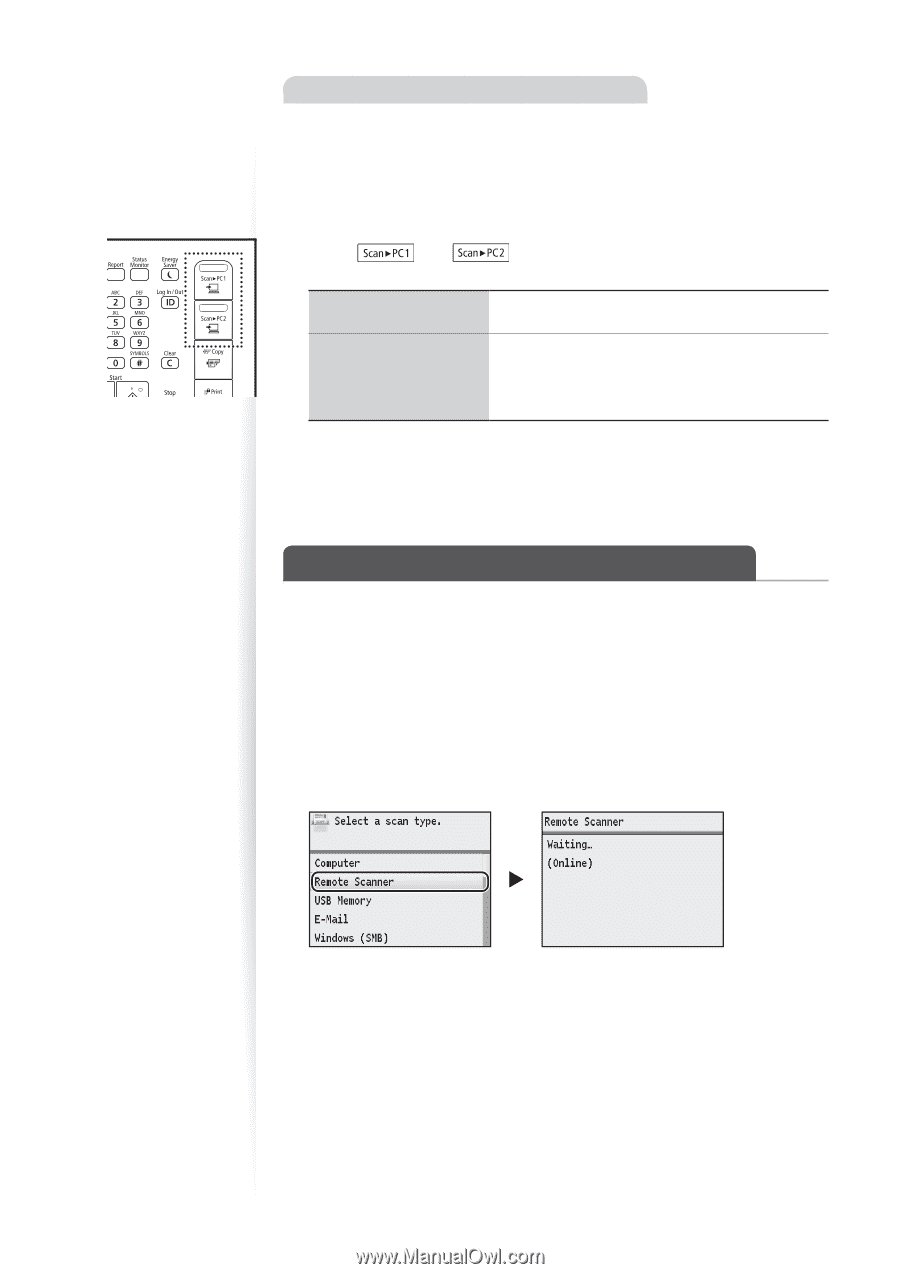
Performing a Scan Using a Shortcut Key 1 Make sure that the computer and machine are connected (See Getting Started). 2 Place your documents (→p.18). 3 Switch to the Scan mode (→p.15). 4 Press [ ] or [ registered. ] into which the desired destination is When placing your documents in the feeder When placing your documents on the platen glass Scanning operation starts. 1. To continuously scan the document, press [▲] or [▼] to highlight , and then press [OK]. 2. Press . • When scanning is complete, the folder that contains the scanned images is opened on the screen of the computer. Scan a Document with MF Toolbox You can specify various scan settings if you select from the operation panel, and then open MF Toolbox. 1 Make sure that the computer and machine are connected (See Getting Started). 2 Place your documents (→p.18). 3 Switch to the Scan mode (→p.15). 4 Press [▲] or [▼] to highlight , and then press [OK]. 5 From your computer, double-click the [Canon MF Toolbox] icon. 78
-
 1
1 -
2
-
3
-
4
-
5
-
6
-
7
-
8
-
9
-
10
-
11
-
12
-
13
-
14
-
15
-
16
-
17
-
18
-
19
-
20
-
21
-
22
-
23
-
24
-
25
-
26
-
27
-
28
-
29
-
30
-
31
-
32
-
33
-
34
-
35
-
36
-
37
-
38
-
39
-
40
-
41
-
42
-
43
-
44
-
45
-
46
-
47
-
48
-
49
-
50
-
51
-
52
-
53
-
54
-
55
-
56
-
57
-
58
-
59
-
60
-
61
-
62
-
63
-
64
-
65
-
66
-
67
-
68
-
69
-
70
-
71
-
72
-
 73
73 -
 74
74 -
 75
75 -
 76
76 -
 77
77 -
 78
78 -
 79
79 -
 80
80 -
 81
81 -
 82
82 -
 83
83 -
84
-
85
-
86
-
87
-
88
-
89
-
90
-
91
-
92
-
93
-
94
-
95
-
96
-
97
-
98
-
99
-
100
-
101
-
102
-
103
-
104
-
105
-
106
-
107
-
108
-
109
-
110
-
111
-
112
-
113
-
114
-
115
-
116
-
117
-
118
-
119
-
120
 |
 |