Canon PowerShot ELPH 320 HS Blue User Guide - Page 117
Rearranging Icons, Removing Icons, Changing Layouts
 |
View all Canon PowerShot ELPH 320 HS Blue manuals
Add to My Manuals
Save this manual to your list of manuals |
Page 117 highlights
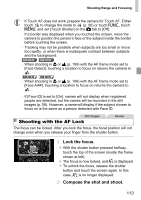
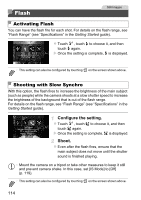
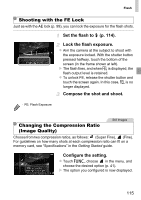
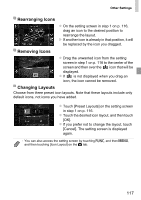
Other Settings Rearranging Icons z On the setting screen in step 1 on p. 116, drag an icon to the desired position to rearrange the layout. X If another icon is already in that position, it will be replaced by the icon you dragged. Removing Icons z Drag the unwanted icon from the setting screen in step 1 on p. 116 to the center of the screen and then over the icon that will be displayed. z If is not displayed when you drag an icon, the icon cannot be removed. Changing Layouts Choose from three preset icon layouts. Note that these layouts include only default icons, not icons you have added. z Touch [Preset Layouts] on the setting screen in step 1 on p. 116. z Touch the desired icon layout, and then touch [OK]. z If you prefer not to change the layout, touch [Cancel]. The setting screen is displayed again. • You can also access the setting screen by touching H and then n, and then touching [Icon Layout] on the 4 tab. 117
-
 1
1 -
2
-
3
-
4
-
5
-
6
-
7
-
8
-
9
-
10
-
11
-
12
-
13
-
14
-
15
-
16
-
17
-
18
-
19
-
20
-
21
-
22
-
23
-
24
-
25
-
26
-
27
-
28
-
29
-
30
-
31
-
32
-
33
-
34
-
35
-
36
-
37
-
38
-
39
-
40
-
41
-
42
-
43
-
44
-
45
-
46
-
47
-
48
-
49
-
50
-
51
-
52
-
53
-
54
-
55
-
56
-
57
-
58
-
59
-
60
-
61
-
62
-
63
-
64
-
65
-
66
-
67
-
68
-
69
-
70
-
71
-
72
-
73
-
74
-
75
-
76
-
77
-
78
-
79
-
80
-
81
-
82
-
83
-
84
-
85
-
86
-
87
-
88
-
89
-
90
-
91
-
92
-
93
-
94
-
95
-
96
-
97
-
98
-
99
-
100
-
101
-
102
-
103
-
104
-
105
-
106
-
107
-
108
-
109
-
110
-
111
-
 112
112 -
 113
113 -
 114
114 -
 115
115 -
 116
116 -
 117
117 -
 118
118 -
 119
119 -
 120
120 -
 121
121 -
 122
122 -
123
-
124
-
125
-
126
-
127
-
128
-
129
-
130
-
131
-
132
-
133
-
134
-
135
-
136
-
137
-
138
-
139
-
140
-
141
-
142
-
143
-
144
-
145
-
146
-
147
-
148
-
149
-
150
-
151
-
152
-
153
-
154
-
155
-
156
-
157
-
158
-
159
-
160
-
161
-
162
-
163
-
164
-
165
-
166
-
167
-
168
-
169
-
170
-
171
-
172
-
173
-
174
-
175
-
176
-
177
-
178
-
179
-
180
-
181
-
182
-
183
-
184
-
185
-
186
-
187
-
188
-
189
-
190
-
191
-
192
-
193
-
194
-
195
-
196
-
197
-
198
-
199
-
200
-
201
-
202
-
203
-
204
-
205
-
206
-
207
-
208
-
209
-
210
-
211
-
212
-
213
-
214
 |
 |
