Canon PowerShot ELPH 320 HS Blue User Guide - Page 43
Indicator Display
 |
View all Canon PowerShot ELPH 320 HS Blue manuals
Add to My Manuals
Save this manual to your list of manuals |
Page 43 highlights
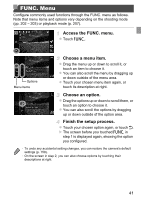
Indicator Display Choose an option. z For options displayed with qr on either side, touch qr to change the option. z For options displayed with a bar to indicate the level, touch the desired position on the bar. Finish the setup process. z Touch ^ to return to the screen displayed before you touched H in step 1. • To undo any accidental setting changes, you can restore the camera's default settings (p. 159). Indicator Display The indicator of the camera (p. 5) lights up or blinks depending on the camera status. Color Indicator Status Camera Status Green On Blinking Connected to a computer (p. 33), or display off Starting up, recording/reading/transmitting images, or shooting long exposures (p. 91) Blue On Wireless LAN connection established Blinking Wireless LAN connection or data transfer in progress • When the indicator blinks green, never do any of the following things, as they may corrupt images, or damage the camera or memory card. - Turn the camera off - Shake or jolt the camera ELPH 530 HS IXUS 510 HS - Open the memory card cover or battery cover ELPH 320 HS IXUS 240 HS - Open the memory card/battery cover 43
-
 1
1 -
2
-
3
-
4
-
5
-
6
-
7
-
8
-
9
-
10
-
11
-
12
-
13
-
14
-
15
-
16
-
17
-
18
-
19
-
20
-
21
-
22
-
23
-
24
-
25
-
26
-
27
-
28
-
29
-
30
-
31
-
32
-
33
-
34
-
35
-
36
-
37
-
 38
38 -
 39
39 -
 40
40 -
 41
41 -
 42
42 -
 43
43 -
 44
44 -
 45
45 -
 46
46 -
 47
47 -
 48
48 -
49
-
50
-
51
-
52
-
53
-
54
-
55
-
56
-
57
-
58
-
59
-
60
-
61
-
62
-
63
-
64
-
65
-
66
-
67
-
68
-
69
-
70
-
71
-
72
-
73
-
74
-
75
-
76
-
77
-
78
-
79
-
80
-
81
-
82
-
83
-
84
-
85
-
86
-
87
-
88
-
89
-
90
-
91
-
92
-
93
-
94
-
95
-
96
-
97
-
98
-
99
-
100
-
101
-
102
-
103
-
104
-
105
-
106
-
107
-
108
-
109
-
110
-
111
-
112
-
113
-
114
-
115
-
116
-
117
-
118
-
119
-
120
-
121
-
122
-
123
-
124
-
125
-
126
-
127
-
128
-
129
-
130
-
131
-
132
-
133
-
134
-
135
-
136
-
137
-
138
-
139
-
140
-
141
-
142
-
143
-
144
-
145
-
146
-
147
-
148
-
149
-
150
-
151
-
152
-
153
-
154
-
155
-
156
-
157
-
158
-
159
-
160
-
161
-
162
-
163
-
164
-
165
-
166
-
167
-
168
-
169
-
170
-
171
-
172
-
173
-
174
-
175
-
176
-
177
-
178
-
179
-
180
-
181
-
182
-
183
-
184
-
185
-
186
-
187
-
188
-
189
-
190
-
191
-
192
-
193
-
194
-
195
-
196
-
197
-
198
-
199
-
200
-
201
-
202
-
203
-
204
-
205
-
206
-
207
-
208
-
209
-
210
-
211
-
212
-
213
-
214
 |
 |
