Canon PowerShot ELPH 320 HS Blue User Guide - Page 138
Rotating Images
 |
View all Canon PowerShot ELPH 320 HS Blue manuals
Add to My Manuals
Save this manual to your list of manuals |
Page 138 highlights
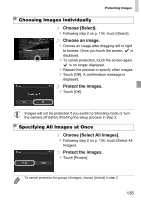
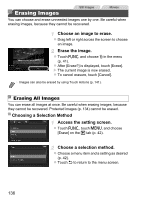
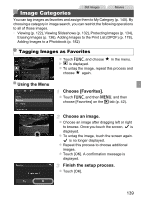
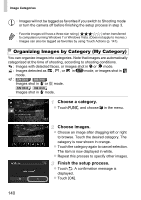
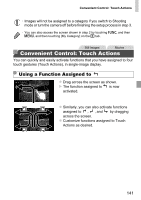
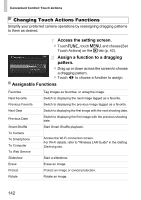
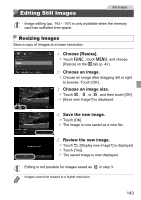
Still Images Rotating Images Change the orientation of images and save them as follows. Movies Choose \. z Touch H and choose \ in the menu (p. 41). Rotate the image. z Touch or , depending on the desired direction. Each time you touch, the image is rotated 90°. Touch ^ to complete the setting. • Movies with an image quality of or cannot be rotated. • Rotation is not possible when [Auto Rotate] is set to [Off] (p. 138). • You can also access the screen shown in step 2 by touching H and then n, and then touching [Rotate] on the 1 tab (p. 42). Deactivating Auto Rotation Follow these steps to deactivate automatic rotation by the camera, which rotates images shot in vertical orientation so they are displayed vertically on the camera. z Touch H, touch n, choose [Auto Rotate] on the 1 tab, and then choose [Off] (p. 42). • Images cannot be rotated (p. 138) when you set [Auto Rotate] to [Off]. Additionally, images already rotated will be displayed in the original orientation. • In Smart Shuffle (p. 133) mode, even if [Auto Rotate] is set to [Off], images shot vertically will be displayed vertically, and rotated images will be displayed in the rotated orientation. 138
-
 1
1 -
2
-
3
-
4
-
5
-
6
-
7
-
8
-
9
-
10
-
11
-
12
-
13
-
14
-
15
-
16
-
17
-
18
-
19
-
20
-
21
-
22
-
23
-
24
-
25
-
26
-
27
-
28
-
29
-
30
-
31
-
32
-
33
-
34
-
35
-
36
-
37
-
38
-
39
-
40
-
41
-
42
-
43
-
44
-
45
-
46
-
47
-
48
-
49
-
50
-
51
-
52
-
53
-
54
-
55
-
56
-
57
-
58
-
59
-
60
-
61
-
62
-
63
-
64
-
65
-
66
-
67
-
68
-
69
-
70
-
71
-
72
-
73
-
74
-
75
-
76
-
77
-
78
-
79
-
80
-
81
-
82
-
83
-
84
-
85
-
86
-
87
-
88
-
89
-
90
-
91
-
92
-
93
-
94
-
95
-
96
-
97
-
98
-
99
-
100
-
101
-
102
-
103
-
104
-
105
-
106
-
107
-
108
-
109
-
110
-
111
-
112
-
113
-
114
-
115
-
116
-
117
-
118
-
119
-
120
-
121
-
122
-
123
-
124
-
125
-
126
-
127
-
128
-
129
-
130
-
131
-
132
-
 133
133 -
 134
134 -
 135
135 -
 136
136 -
 137
137 -
 138
138 -
 139
139 -
 140
140 -
 141
141 -
 142
142 -
 143
143 -
144
-
145
-
146
-
147
-
148
-
149
-
150
-
151
-
152
-
153
-
154
-
155
-
156
-
157
-
158
-
159
-
160
-
161
-
162
-
163
-
164
-
165
-
166
-
167
-
168
-
169
-
170
-
171
-
172
-
173
-
174
-
175
-
176
-
177
-
178
-
179
-
180
-
181
-
182
-
183
-
184
-
185
-
186
-
187
-
188
-
189
-
190
-
191
-
192
-
193
-
194
-
195
-
196
-
197
-
198
-
199
-
200
-
201
-
202
-
203
-
204
-
205
-
206
-
207
-
208
-
209
-
210
-
211
-
212
-
213
-
214
 |
 |
