Canon SX50 Realis_E.pdf - Page 16
Remote Control
 |
UPC - 013803046830
View all Canon SX50 manuals
Add to My Manuals
Save this manual to your list of manuals |
Page 16 highlights
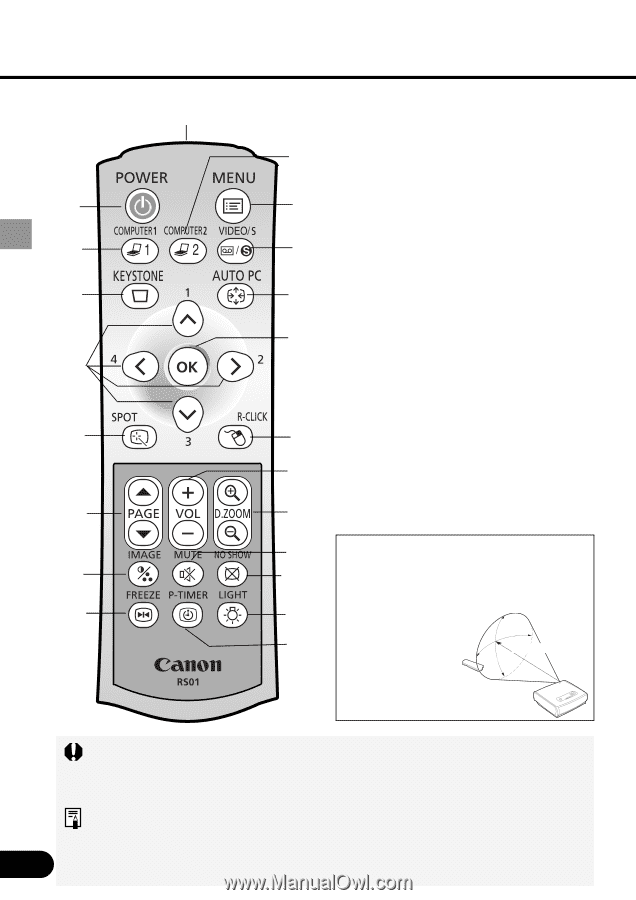
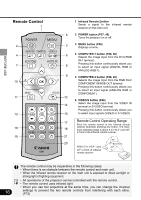
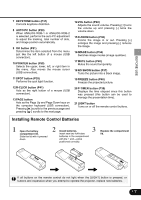
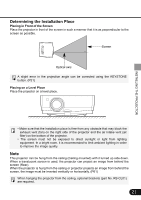
BEFORE USE Remote Control 1 2 4 7 10 11 13 16 19 1 Infrared Remote Emitter Sends a signal to the infrared remote receiver on the main unit. 5 2 POWER button (P27, 45) Turns the projector on or off. 3 3 MENU button (P50) Displays a menu. 6 4 COMPUTER-1 button (P28, 46) Selects the image input from the DVI-I/RGB IN-1 terminal. 8 Pressing this button continuously allows you to select an input signal (DIGITAL RGB or ANALOG RGB-1). 9 5 COMPUTER-2 button (P28, 46) Selects the image input from the RGB IN-2/ COMPONENT IN/RGB OUT terminal. Pressing this button continuously allows you to select an input signal (ANALOG RGB or COMPONENT). 12 6 VIDEO/S button (P46) 14 Select the image input from the VIDEO IN terminal or S-VIDEO terminal. Pressing this button continuously allows you 15 to select input signals (VIDEO or S-VIDEO). 17 Remote Control Operating Range Point the remote control to the infrared remote receiver whenever pressing any button. The maxi- 18 mum operating range is about 5 m (16.4' ) and 30o in front of the infrared remote receiver. 21 20 Within 5 m (16.4' ) and 30o in front of infrared remote receiver 30o 5m (16.4') 30o The remote control may be inoperative in the following cases: • When there is an obstacle between the remote control and main unit. • When the infrared remote receiver on the main unit is exposed to direct sunlight or strong light of lighting equipment. • All operations of the projector can be controlled with the remote control. • The remote control uses infrared light. • When you use two projectors at the same time, you can change the channel 16 settings to prevent the two remote controls from interfering with each other. (P72)
-
 1
1 -
2
-
3
-
4
-
5
-
6
-
7
-
8
-
9
-
10
-
 11
11 -
 12
12 -
 13
13 -
 14
14 -
 15
15 -
 16
16 -
 17
17 -
 18
18 -
 19
19 -
 20
20 -
 21
21 -
22
-
23
-
24
-
25
-
26
-
27
-
28
-
29
-
30
-
31
-
32
-
33
-
34
-
35
-
36
-
37
-
38
-
39
-
40
-
41
-
42
-
43
-
44
-
45
-
46
-
47
-
48
-
49
-
50
-
51
-
52
-
53
-
54
-
55
-
56
-
57
-
58
-
59
-
60
-
61
-
62
-
63
-
64
-
65
-
66
-
67
-
68
-
69
-
70
-
71
-
72
-
73
-
74
-
75
-
76
-
77
-
78
-
79
-
80
-
81
-
82
-
83
-
84
-
85
-
86
-
87
-
88
-
89
-
90
-
91
-
92
-
93
 |
 |