Canon SX50 Realis_E.pdf - Page 92
Installing the Lens Cap, Optional Parts
 |
UPC - 013803046830
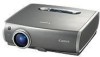
View all Canon SX50 manuals
Add to My Manuals
Save this manual to your list of manuals |
Page 92 highlights
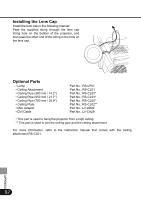
Installing the Lens Cap Install the lens cap in the following manner: Pass the supplied string through the lens cap string hole on the bottom of the projector, and then pass the other end of the string in the hole on the lens cap. Optional Parts • Lamp • Ceiling Attachment • Ceiling Pipe (360 mm / 14.2″) • Ceiling Pipe (550 mm / 21.7″) • Ceiling Pipe (760 mm / 29.9″) • Ceiling Plate • Mac Adapter • DVI Cable Part No.: RS-LP01 Part No.: RS-CL01 Part No.: RS-CL03* Part No.: RS-CL04* Part No.: RS-CL05* Part No.: RS-CL02** Part No.: LV-AD02 Part No.: LV-CA29 * This part is used to hang the projector from a high ceiling. ** This part is used to join the ceiling pipe and the ceiling attachment. For more information, refer to the instruction manual that comes with the ceiling attachment RS-CL01. APPENDIX 92
-
 1
1 -
2
-
3
-
4
-
5
-
6
-
7
-
8
-
9
-
10
-
11
-
12
-
13
-
14
-
15
-
16
-
17
-
18
-
19
-
20
-
21
-
22
-
23
-
24
-
25
-
26
-
27
-
28
-
29
-
30
-
31
-
32
-
33
-
34
-
35
-
36
-
37
-
38
-
39
-
40
-
41
-
42
-
43
-
44
-
45
-
46
-
47
-
48
-
49
-
50
-
51
-
52
-
53
-
54
-
55
-
56
-
57
-
58
-
59
-
60
-
61
-
62
-
63
-
64
-
65
-
66
-
67
-
68
-
69
-
70
-
71
-
72
-
73
-
74
-
75
-
76
-
77
-
78
-
79
-
80
-
81
-
82
-
83
-
84
-
85
-
86
-
 87
87 -
 88
88 -
 89
89 -
 90
90 -
 91
91 -
 92
92 -
 93
93
 |
 |
