Canon SX50 Realis_E.pdf - Page 26
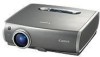
Starting Projection
 |
UPC - 013803046830
View all Canon SX50 manuals
Add to My Manuals
Save this manual to your list of manuals |
Page 26 highlights
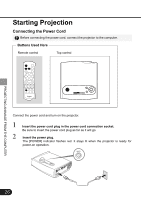
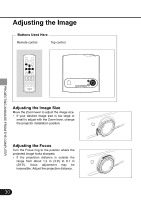
Starting Projection Connecting the Power Cord Before connecting the power cord, connect the projector to the computer. Buttons Used Here Remote control Top control PROJECTING AN IMAGE FROM THE COMPUTER Connect the power cord and turn on the projector. 1 Insert the power cord plug in the power cord connection socket. Be sure to insert the power cord plug as far as it will go. 2 Insert the power plug. The [POWER] indicator flashes red. It stays lit when the projector is ready for power-on operation. 26
-
 1
1 -
2
-
3
-
4
-
5
-
6
-
7
-
8
-
9
-
10
-
11
-
12
-
13
-
14
-
15
-
16
-
17
-
18
-
19
-
20
-
 21
21 -
 22
22 -
 23
23 -
 24
24 -
 25
25 -
 26
26 -
 27
27 -
 28
28 -
 29
29 -
 30
30 -
 31
31 -
32
-
33
-
34
-
35
-
36
-
37
-
38
-
39
-
40
-
41
-
42
-
43
-
44
-
45
-
46
-
47
-
48
-
49
-
50
-
51
-
52
-
53
-
54
-
55
-
56
-
57
-
58
-
59
-
60
-
61
-
62
-
63
-
64
-
65
-
66
-
67
-
68
-
69
-
70
-
71
-
72
-
73
-
74
-
75
-
76
-
77
-
78
-
79
-
80
-
81
-
82
-
83
-
84
-
85
-
86
-
87
-
88
-
89
-
90
-
91
-
92
-
93
 |
 |

26
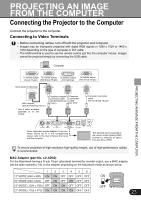
PROJECTING AN IMAGE FROM THE COMPUTER
Starting Projection
Connecting the Power Cord
Before connecting the power cord, connect the projector to the computer.
Buttons Used Here
Remote control
Top control
Connect the power cord and turn on the projector.
Insert the power cord plug in the power cord connection socket.
Be sure to insert the power cord plug as far as it will go.
Insert the power plug.
The [POWER] indicator flashes red. It stays lit when the projector is ready for
power-on operation.
1
2