Canon SX50 Realis_E.pdf - Page 17
Installing Remote Control Batteries
 |
UPC - 013803046830
View all Canon SX50 manuals
Add to My Manuals
Save this manual to your list of manuals |
Page 17 highlights
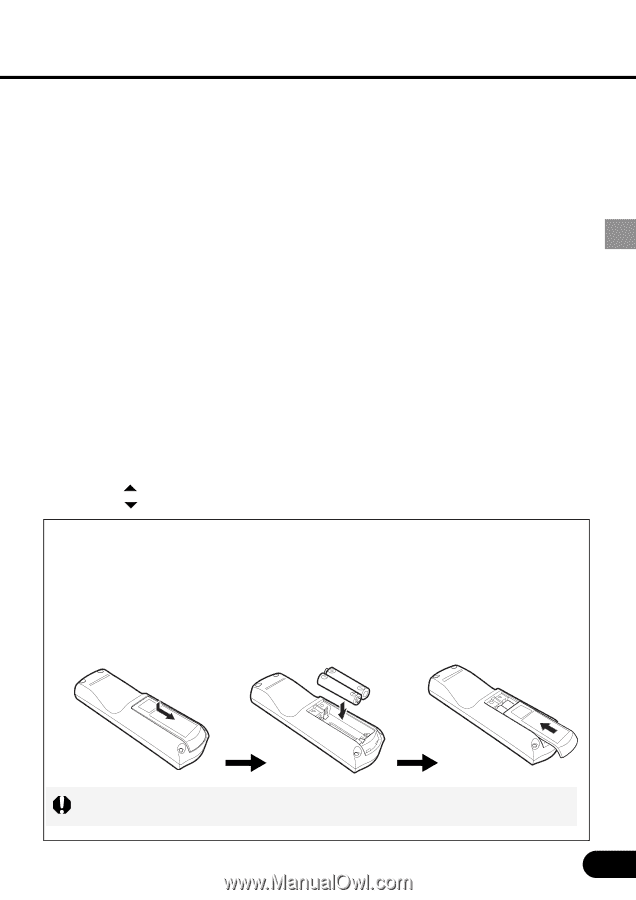
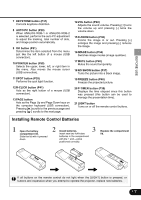
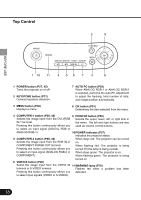
BEFORE USE 7 KEYSTONE button (P31) Corrects keystone distortion. 8 AUTO PC button (P29) When ANALOG RGB-1 or ANALOG RGB-2 is selected, performs the auto PC adjustment to adjust the tracking, total number of dots, and image position automatically. 9 OK button (P51) Determines the item selected from the menu just like the left button of a mouse (USB connection). 10 POINTER button (P50) Selects the upper, lower, left, or right item in the menu. Also moves the mouse cursor (USB connection). 11 SPOT button (P39) Performs the spot light function. 12 R-CLICK button (P41) Acts as the right button of a mouse (USB connection). 13 PAGE button Acts as the Page Up and Page Down keys on the computer keyboard (USB connection). Pressing [ ] scrolls to the previous page and pressing [ ] scrolls to the next page. 14 VOL button (P40) Adjusts the sound volume. Pressing [+] turns the volume up and pressing [-] turns the volume down. 15 D.ZOOM button (P38) Zooms the image in or out. Pressing [+] enlarges the image and pressing [-] reduces the image. 16 IMAGE button (P34) Switches image modes (image qualities). 17 MUTE button (P40) Mutes the sound temporarily. 18 NO SHOW button (P37) Turns the picture into a black image. 19 FREEZE button (P40) Freezes the projected picture. 20 P-TIMER button (P39) Displays the time elapsed since this button was pressed (this button can be used to manage the presentation time). 21 LIGHT button Turns on or off the remote control buttons. Installing Remote Control Batteries 1 Open the battery compartment lid. Slide the lid with it pressed down. 2 Install batteries. 3 Insert new two AAA-size batteries in the compartment with the + and - poles positioned correctly. Replace the compartment lid. If all buttons on the remote control do not light when the [LIGHT] button is pressed, or buttons are inoperative when you attempt to operate the projector, replace new batteries. 17
-
 1
1 -
2
-
3
-
4
-
5
-
6
-
7
-
8
-
9
-
10
-
11
-
 12
12 -
 13
13 -
 14
14 -
 15
15 -
 16
16 -
 17
17 -
 18
18 -
 19
19 -
 20
20 -
 21
21 -
 22
22 -
23
-
24
-
25
-
26
-
27
-
28
-
29
-
30
-
31
-
32
-
33
-
34
-
35
-
36
-
37
-
38
-
39
-
40
-
41
-
42
-
43
-
44
-
45
-
46
-
47
-
48
-
49
-
50
-
51
-
52
-
53
-
54
-
55
-
56
-
57
-
58
-
59
-
60
-
61
-
62
-
63
-
64
-
65
-
66
-
67
-
68
-
69
-
70
-
71
-
72
-
73
-
74
-
75
-
76
-
77
-
78
-
79
-
80
-
81
-
82
-
83
-
84
-
85
-
86
-
87
-
88
-
89
-
90
-
91
-
92
-
93
 |
 |