Canon SX50 Realis_E.pdf - Page 23
Projecting An Image, From The Computer - resolution
 |
UPC - 013803046830
View all Canon SX50 manuals
Add to My Manuals
Save this manual to your list of manuals |
Page 23 highlights
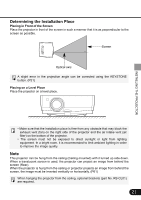
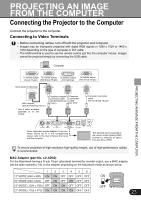
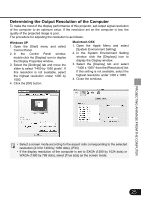
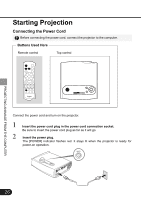
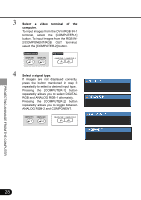
PROJECTING AN IMAGE FROM THE COMPUTER Connecting the Projector to the Computer Connect the projector to the computer. Connecting to Video Terminals • Before connecting cables, turn off both the projector and computer. • Images may be improperly projected with digital RGB signals in 1280 x 1024 or 1400 x 1050 depending on the type of computer or DVI cable. • The USB terminal is used to use the remote control just like the computer mouse. Images cannot be projected simply by connecting the USB cable. Computer To monitor output To monitor output To monitor output To monitor output (D-sub 15-pin) (mini D-sub 15-pin) (DVI terminal) (mini D-sub 15-pin) Some types of Macintosh MAC adapter (See the following memo.) * Use a cable available optionally or on the market. Supplied computer connection cable (for DVI/mini D-sub 15-pin) Computer connection cable (for DVI)* Computer connection cable (for mini D-sub 15-pin)* PROJECTING AN IMAGE FROM THE COMPUTER Some computers require adapters. If any connector cannot be fit in the corresponding socket, refer to the User's Manual that came with the computer. This terminal can be switched to the monitor output (analog RGB) terminal by selecting an option from the menu. (P69) To ensure projection of high-resolution high-quality images, use of high-performance cables is recommended. MAC Adapter (part No. LV-AD02) For the Macintosh having a D-sub 15-pin (standard) terminal for monitor output, use a MAC adapter. Set the slide switches (1-6) on the adapter depending on the Macintosh mode as shown below. 123456 13" MODE (640 x 480) ON ON OFF OFF OFF OFF 16" MODE (832 x 624) OFF ON OFF ON OFF OFF 19" MODE (1024 x 768) OFF ON ON OFF OFF OFF 21" MODE (1152 x 870) ON ON ON ON OFF OFF 23
-
 1
1 -
2
-
3
-
4
-
5
-
6
-
7
-
8
-
9
-
10
-
11
-
12
-
13
-
14
-
15
-
16
-
17
-
 18
18 -
 19
19 -
 20
20 -
 21
21 -
 22
22 -
 23
23 -
 24
24 -
 25
25 -
 26
26 -
 27
27 -
 28
28 -
29
-
30
-
31
-
32
-
33
-
34
-
35
-
36
-
37
-
38
-
39
-
40
-
41
-
42
-
43
-
44
-
45
-
46
-
47
-
48
-
49
-
50
-
51
-
52
-
53
-
54
-
55
-
56
-
57
-
58
-
59
-
60
-
61
-
62
-
63
-
64
-
65
-
66
-
67
-
68
-
69
-
70
-
71
-
72
-
73
-
74
-
75
-
76
-
77
-
78
-
79
-
80
-
81
-
82
-
83
-
84
-
85
-
86
-
87
-
88
-
89
-
90
-
91
-
92
-
93
 |
 |
