Canon SX50 Realis_E.pdf - Page 29
Using the Auto PC Adjustment Function
 |
UPC - 013803046830
View all Canon SX50 manuals
Add to My Manuals
Save this manual to your list of manuals |
Page 29 highlights
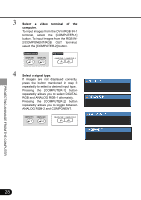
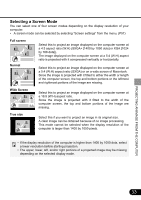
PROJECTING AN IMAGE FROM THE COMPUTER Using the Auto PC Adjustment Function This projector automatically selects a signal type (VGA, SVGA, XGA, SXGA, SXGA+, etc.) and makes optimum settings for the total number of dots and tracking depending on the connected computer (auto PC adjustment). (This function cannot be used when digital RGB is selected.) When you switched to the computer mode using the [COMPUTER-1] or [COMPUTER-2] button, press the [AUTO PC] button. The auto PC adjustment becomes active to display images correctly. For some computers, the auto PC adjustment does not work. In this case, you need to make settings (total dots, tracking, horizontal/vertical positions, horizontal/ vertical pixels, etc.) for the input signal. • The last used signal types are recorded for the [COMPUTER-1] and [COMPUTER-2] buttons respectively. When the projector is connected to the same computer, it can be used with the same settings as before simply by switching to the computer mode. • For the settings for the input signal, refer to P52 to 57. 29
-
 1
1 -
2
-
3
-
4
-
5
-
6
-
7
-
8
-
9
-
10
-
11
-
12
-
13
-
14
-
15
-
16
-
17
-
18
-
19
-
20
-
21
-
22
-
23
-
 24
24 -
 25
25 -
 26
26 -
 27
27 -
 28
28 -
 29
29 -
 30
30 -
 31
31 -
 32
32 -
 33
33 -
 34
34 -
35
-
36
-
37
-
38
-
39
-
40
-
41
-
42
-
43
-
44
-
45
-
46
-
47
-
48
-
49
-
50
-
51
-
52
-
53
-
54
-
55
-
56
-
57
-
58
-
59
-
60
-
61
-
62
-
63
-
64
-
65
-
66
-
67
-
68
-
69
-
70
-
71
-
72
-
73
-
74
-
75
-
76
-
77
-
78
-
79
-
80
-
81
-
82
-
83
-
84
-
85
-
86
-
87
-
88
-
89
-
90
-
91
-
92
-
93
 |
 |