Canon imageFORMULA DR-2010C Compact Color Scanner User Manual - Page 34
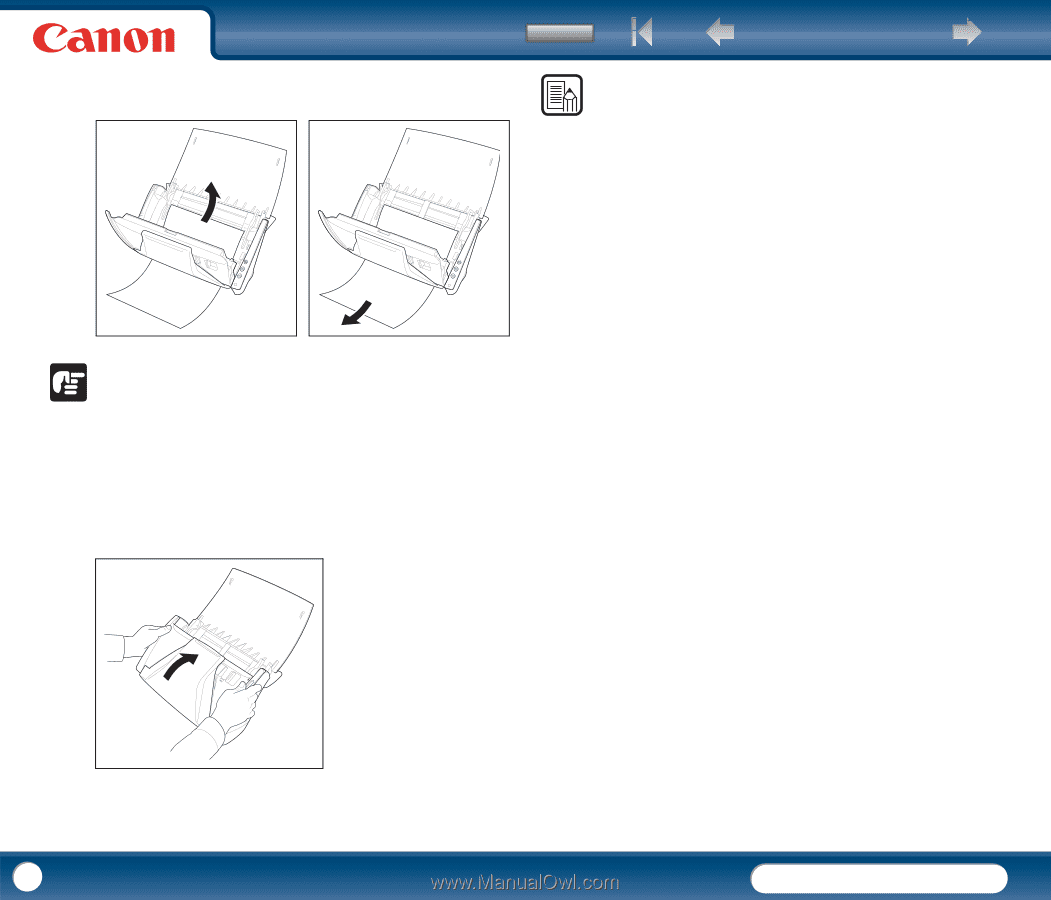
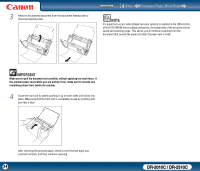
Make sure to pull the document out carefully, without applying too much force. If
 |
View all Canon imageFORMULA DR-2010C Compact Color Scanner manuals
Add to My Manuals
Save this manual to your list of manuals |
Page 34 highlights
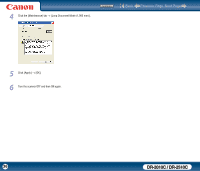
3 Remove the jammed document from the document feeding side or document ejecting side. Contents Back Previous Page Next Page NOTE If a paper jam occurs when [Rapid recovery system] is enabled in the [Others] tab of the ISIS/TWAIN driver settings dialog box, the image data of the document is not saved and scanning stops. This allows you to continue scanning from the document that caused the paper jam after the paper jam is fixed. IMPORTANT Make sure to pull the document out carefully, without applying too much force. If the jammed paper tears while you are pulling it out, make sure to remove any remaining pieces from inside the scanner. 4 Close the front unit by gently pushing it up on both sides until clicks into place. Make sure that the front unit is completely closed by pushing until you hear a click. After removing the jammed paper, check to see if the last page was scanned correctly, and then continue scanning. 34 DR-2010C / DR-2510C
-
 1
1 -
2
-
3
-
4
-
5
-
6
-
7
-
8
-
9
-
10
-
11
-
12
-
13
-
14
-
15
-
16
-
17
-
18
-
19
-
20
-
21
-
22
-
23
-
24
-
25
-
26
-
27
-
28
-
 29
29 -
 30
30 -
 31
31 -
 32
32 -
 33
33 -
 34
34 -
 35
35 -
 36
36 -
 37
37 -
 38
38 -
 39
39 -
40
-
41
-
42
-
43
-
44
-
45
-
46
-
47
-
48
-
49
-
50
-
51
-
52
-
53
-
54
-
55
-
56
-
57
-
58
-
59
-
60
-
61
-
62
-
63
-
64
-
65
-
66
-
67
-
68
-
69
-
70
-
71
-
72
-
73
-
74
-
75
-
76
-
77
-
78
-
79
-
80
-
81
-
82
 |
 |