Canon imageFORMULA DR-2010C Compact Color Scanner User Manual - Page 45
Scan Area Dialog Box TWAIN Driver, Size, Area Window, Margin, Preview Button TWAIN driver only
 |
View all Canon imageFORMULA DR-2010C Compact Color Scanner manuals
Add to My Manuals
Save this manual to your list of manuals |
Page 45 highlights
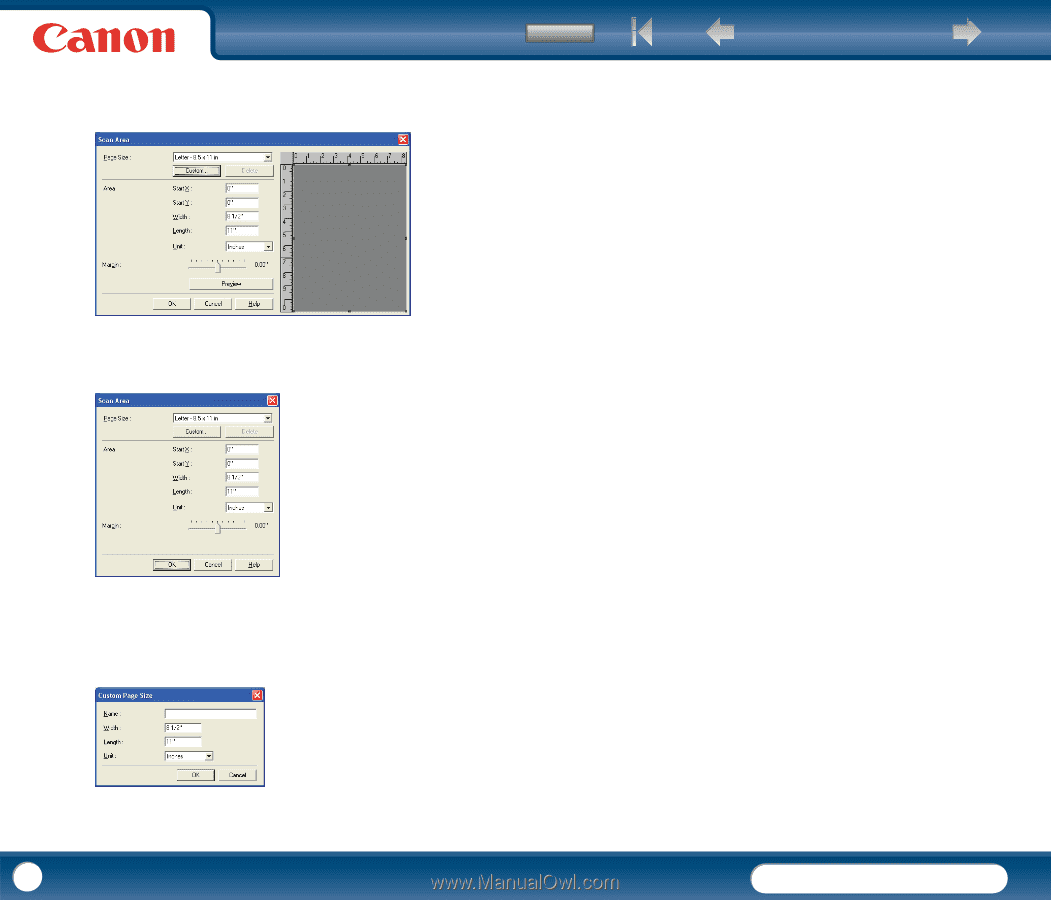
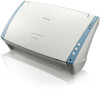
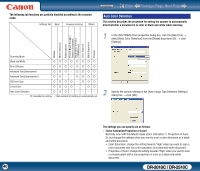
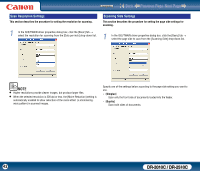
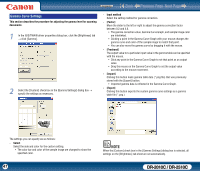
Contents Back Previous Page Next Page Scan Area Dialog Box (TWAIN Driver) This dialog box appears with application programs that display the [Scan] button in the Properties dialog box. The Area window and [Preview] button are not displayed when using applications like the Job Registration Tool that display the [OK] button in the Properties dialog box. Page Size This setting is linked to the [Page Size] setting, for selecting the size of document pages to scan. Clicking the [Custom] button opens the [Custom Page Size] dialog box, where non-standard page sizes can be registered as custom page sizes. Area Select the area to be scanned. → Area settings here are overridden in the following cases: y When the [Auto-detection] page size is selected y When [Text Orientation Recognition] is enabled on the [Image processing] tab sheet → When [Deskew] is enabled on the [Basic] tab sheet, the specified area may be displaced when scanning. Area Window The size indicated for the Area window corresponds to the page size setting, and the area within the panel indicates the current scanning area. The scanning area can be adjusted by dragging the handles bordering the Area window with your mouse. → With CapturePerfect, the last scanned image appears in the Area window. Margin This control adjusts the top, bottom, left and right margins around the scanning area so that you can expand the scanning area to include the edges of a document, or reduce it to avoid black frames around scanned images. → If the edges of documents are missing from scanned images, move the slider to the right to expand the scanning area. → To eliminate the black frame around scanned images, reduce the scanning area by moving the slider to the left. → The measurement units for margins are determined by the [Unit] setting. Preview Button (TWAIN driver only) Click the [Preview] button to scan one document page and display its preview image in the Area window. 45 DR-2010C / DR-2510C
-
 1
1 -
2
-
3
-
4
-
5
-
6
-
7
-
8
-
9
-
10
-
11
-
12
-
13
-
14
-
15
-
16
-
17
-
18
-
19
-
20
-
21
-
22
-
23
-
24
-
25
-
26
-
27
-
28
-
29
-
30
-
31
-
32
-
33
-
34
-
35
-
36
-
37
-
38
-
39
-
 40
40 -
 41
41 -
 42
42 -
 43
43 -
 44
44 -
 45
45 -
 46
46 -
 47
47 -
 48
48 -
 49
49 -
 50
50 -
51
-
52
-
53
-
54
-
55
-
56
-
57
-
58
-
59
-
60
-
61
-
62
-
63
-
64
-
65
-
66
-
67
-
68
-
69
-
70
-
71
-
72
-
73
-
74
-
75
-
76
-
77
-
78
-
79
-
80
-
81
-
82
 |
 |